Konica Minolta bizhub PRESS C6000 bizhub PRESS C6000/C7000 IC-601 Network Scan - Page 94
Original Setting
 |
View all Konica Minolta bizhub PRESS C6000 manuals
Add to My Manuals
Save this manual to your list of manuals |
Page 94 highlights
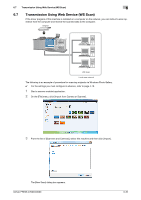
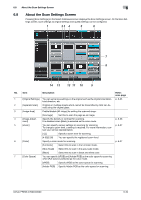
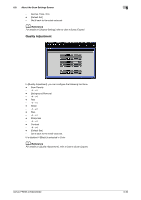
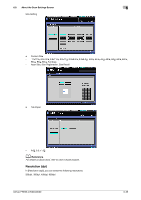
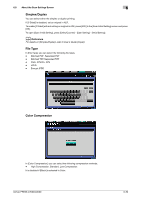
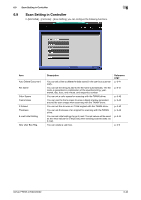
6.8 About the Scan Settings Screen 6 No. Item Description Reference page 8 [File Type] Specify the file type to scan. • [Pack. PDF]/[Div. PDF] • [Pack. TIFF]/[Div. TIFF] • [Pack. XPS]/[Div. XPS] • [JPEG]/[Encrypt] You can specify a password by pressing [Encrypt] when PDF is selected for the file type. p. 6-39 9 [Color Compres- You can select the compression method when scanning in the color or p. 6-39 sion] gray scale color mode. You cannot select it when scanning in the [Black] color mode. 10 [Simplex/Duplex] You can scan both sides of the original when [ADF] is selected in [Scan In- p. 6-39 itial Setting]. To open [Scan Initial Setting], press [Utility/Counter] - [User Setting] - [Ini- tial Setting]. 11 [File Name] You can input a Fine Name for data you are about to scan. If you don't input the file name, the file name is automatically specified with the combination of the specified string, year, month, day, hour, and minute, and sequence number. You can specify the string in [MACHINE] - [Controller] - [Scan Setting] [File Name]. 12 [Resolution] You can specify the resolution for scanning. p. 6-38 13 [Address] The specified address is displayed. Press [Address] to return to the Select Addresses screen for changing the address. 14 [Scan Size] You can set the scan size. p. 6-37 [Standard Select this to specify [Custom Size] or [Tab Paper]. Size Setting] [Auto Size] Select this to scan by detecting the scan size automatically. [Default Set] Press this to return to the initial setting. It is displayed on the Original Setting screen and the Quality Adjustment screen. Original Setting In [Original Setting], you can configure the following functions. - Bind Direction - Right & Left, Top - Direction - Normal, Left, Upside Down, Right - Special - Normal, Mixed, Z-Folded - Thickness bizhub PRESS C7000/C6000 6-35
-
 1
1 -
2
-
3
-
4
-
5
-
6
-
7
-
8
-
9
-
10
-
11
-
12
-
13
-
14
-
15
-
16
-
17
-
18
-
19
-
20
-
21
-
22
-
23
-
24
-
25
-
26
-
27
-
28
-
29
-
30
-
31
-
32
-
33
-
34
-
35
-
36
-
37
-
38
-
39
-
40
-
41
-
42
-
43
-
44
-
45
-
46
-
47
-
48
-
49
-
50
-
51
-
52
-
53
-
54
-
55
-
56
-
57
-
58
-
59
-
60
-
61
-
62
-
63
-
64
-
65
-
66
-
67
-
68
-
69
-
70
-
71
-
72
-
73
-
74
-
75
-
76
-
77
-
78
-
79
-
80
-
81
-
82
-
83
-
84
-
85
-
86
-
87
-
88
-
 89
89 -
 90
90 -
 91
91 -
 92
92 -
 93
93 -
 94
94 -
 95
95 -
 96
96 -
 97
97 -
 98
98 -
 99
99 -
100
-
101
-
102
-
103
-
104
-
105
-
106
-
107
-
108
-
109
-
110
-
111
-
112
-
113
-
114
-
115
-
116
-
117
-
118
-
119
 |
 |