Kyocera FS-1028MFP FS-1028MFP/1128MFP Quick Guide - Page 11
Network FAX - add to address book
 |
View all Kyocera FS-1028MFP manuals
Add to My Manuals
Save this manual to your list of manuals |
Page 11 highlights
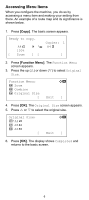
temporarily, and automatically repeats dialing and transmission to the set destination afterwards. 1. Press [FAX]. 2. Place the originals. 3. Select the destination. You can select destinations using a combination of direct entry, address book and One-touch keys. Enter the fax number Enter the fax number using the numeric keys and press [OK]. Select the destination from the Address Book 2 Press [Address Book], press U or V to select the destination and press [OK]. Select the destination from the One-touch keys Press all [One-touch] to which necessary destinations are registered. 4. After selecting all the destinations, press [Start]. Transmission begins. Network FAX The Network FAX Driver must be installed on the computer from which you want to send the documents. For more information, refer to the Network FAX Driver Operation Guide in the included CD-ROM. 1. Use an application on your computer to create the documents to be sent. 2. Select Print from the File menu. The print dialog box for the application that you are using will appear. 3. Use the drop-down menu in the Name field to select the name of the machine to be used as the Network FAX. 4. Enter the page numbers, etc., to be faxed. 5. Click Properties in order to access the Properties window. 6. Specify all of the desired settings under the FAX Setting tab, such as the original size, and then click OK. 7. The print dialogue box for the application that you are using will be displayed once again. Click OK. The Transmit Settings dialog box will appear. 8. Use the keyboard to enter the destination fax number. 9. Click Add to Destination List. The entered destination information will be displayed under the Destination List area. To send the same documents to more than one destination, repeat steps 9 and 10 as required. 10. Click Send to initiate the fax transmission operation. 11
-
 1
1 -
2
-
3
-
4
-
5
-
 6
6 -
 7
7 -
 8
8 -
 9
9 -
 10
10 -
 11
11 -
 12
12 -
 13
13 -
 14
14 -
 15
15 -
 16
16 -
17
-
18
-
19
-
20
-
21
-
22
-
23
-
24
 |
 |
