Kyocera FS-1028MFP FS-1028MFP/1128MFP Quick Guide - Page 9
FAX Functions - scan to folder
 |
View all Kyocera FS-1028MFP manuals
Add to My Manuals
Save this manual to your list of manuals |
Page 9 highlights
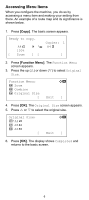
8. Press [Start]. The scanned image is sent to the destination e-mail address as an attachment. Send to Folder (SMB) Stores a scanned original image file in the specified shared folder of any PC. 1. Press [Send]. 2. Press U or V to select Folder(SMB) and press [OK]. 3. Enter the Host Name with numeric keys and press [OK]. 4. Enter the Path with numeric keys and press [OK]. 2 5. Enter the Login User Name with numeric keys and press [OK]. 6. Enter the Login Password with numeric keys and press [OK]. 7. Press [Right Select] (Yes). The connection begins. When the connection succeeds, the display shows Completed. NOTE: If the connection fails, the display shows Cannot connect. Press [Right Select] (OK). Return to step 3. Confirm the destination and input it again. 8. Press [Right Select] (OK). The display shows Completed and returns to the basic screen. 9. Place the originals. 10. Press [Start]. The scanned image is sent to the des- tination folder. FAX Functions Using One-touch Keys Register destinations to One-touch keys, and you can enter the desired destination by pressing the applicable One-touch key. Registering a New One-touch Key 1. In the basic screen, press and hold [One-touch] that registers for at least two seconds. The Select Key No. screen appears. 2. Press U or V to select the key number to which you want to register the destination. 3. Press [OK]. The Address Book screen appears. 4. Press U or V to select the destination (contact or group) you want to register. 5. Press [OK]. The selected destination is registered to the One-touch key. The display shows Registered. and returns to the basic screen. 9
-
 1
1 -
2
-
3
-
 4
4 -
 5
5 -
 6
6 -
 7
7 -
 8
8 -
 9
9 -
 10
10 -
 11
11 -
 12
12 -
 13
13 -
 14
14 -
15
-
16
-
17
-
18
-
19
-
20
-
21
-
22
-
23
-
24
 |
 |
