Kyocera KM-3530 Fax System (F) Operation Guide - Page 123
Optional Equipment
 |
View all Kyocera KM-3530 manuals
Add to My Manuals
Save this manual to your list of manuals |
Page 123 highlights
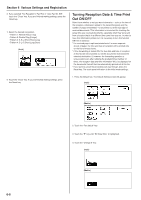
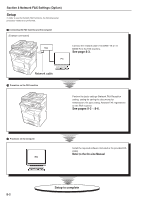
Section 7 Optional Equipment Section 7 Optional Equipment Duplex Unit (Duplex Reception ON/OFF) By installing the optional Duplex Unit, Duplex Reception - in which paper is turned over inside the fax machine and printing accomplished on the back side - will be possible. When the width of each page received is exactly the same, the documents will be printed onto the front and back sides of that size of paper. * To use the Duplex Reception function, it is necessary to turn it ON in advance. * When the Duplex Reception function is turned ON, all pages of a fax reception will be temporarily stored in memory - regardless of the reception mode setting - and they will then be printed out at one time. G Turning Duplex Reception ON/OFF * 2 in 1 Reception will not be available when both 2 in 1 Reception and Duplex Reception are turned ON. * If you want to cancel the procedure part way through, press the Reset key. The touch panel will return to the initial mode settings. 1. Press the Default key. (Inch) (Metric) 4. Touch the "Change #" key. (Inch) (Metric) 5. Select whether you want to turn Duplex Reception ON or OFF by touching either the "ON" or "OFF" key, as appropriate. 6. Touch the "Close" key. If you are finished making settings, press the Reset key. Optional Memory By adding 8 MB of optional memory, the amount of memory available for Bitmapping will be increased and you will thus be able to transmit and receive documents using the Ultra fine resolution mode. In addition, you will be able to store a greater number of documents into memory (for transmission or through reception). 2. Touch the "Fax default" key. 3. Use the "M" cursor key until "Duplex RX" ["2-sided RX"] is highlighted. 7-1
-
 1
1 -
2
-
3
-
4
-
5
-
6
-
7
-
8
-
9
-
10
-
11
-
12
-
13
-
14
-
15
-
16
-
17
-
18
-
19
-
20
-
21
-
22
-
23
-
24
-
25
-
26
-
27
-
28
-
29
-
30
-
31
-
32
-
33
-
34
-
35
-
36
-
37
-
38
-
39
-
40
-
41
-
42
-
43
-
44
-
45
-
46
-
47
-
48
-
49
-
50
-
51
-
52
-
53
-
54
-
55
-
56
-
57
-
58
-
59
-
60
-
61
-
62
-
63
-
64
-
65
-
66
-
67
-
68
-
69
-
70
-
71
-
72
-
73
-
74
-
75
-
76
-
77
-
78
-
79
-
80
-
81
-
82
-
83
-
84
-
85
-
86
-
87
-
88
-
89
-
90
-
91
-
92
-
93
-
94
-
95
-
96
-
97
-
98
-
99
-
100
-
101
-
102
-
103
-
104
-
105
-
106
-
107
-
108
-
109
-
110
-
111
-
112
-
113
-
114
-
115
-
116
-
117
-
 118
118 -
 119
119 -
 120
120 -
 121
121 -
 122
122 -
 123
123 -
 124
124 -
 125
125 -
 126
126 -
 127
127 -
 128
128 -
129
-
130
-
131
-
132
-
133
-
134
-
135
-
136
-
137
-
138
-
139
-
140
-
141
-
142
-
143
-
144
-
145
-
146
 |
 |
