Kyocera TASKalfa 500ci FS-C2126MFP Network Fax Driver Operation Guide Rev. 3 - Page 19
Accessing the Printing Preferences Dialog Box, Add to Destination List, Destination List, Delete
 |
View all Kyocera TASKalfa 500ci manuals
Add to My Manuals
Save this manual to your list of manuals |
Page 19 highlights
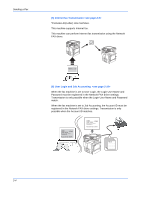
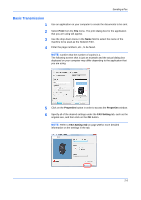
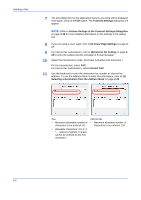
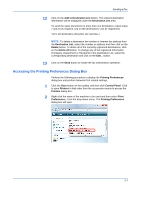
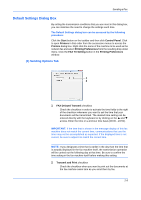
Sending a Fax 12 Click on the Add to Destination List button. The entered destination information will be displayed under the Destination List area. To send the same documents to more than one destination, repeat steps 7 and 10 as required. (Up to 500 destinations* can be registered.) *Up to 100 destinations (A4(Letter) size machines.) NOTE: To delete a destination fax number or Internet fax address from the Destination List, select the number or address and then click on the Delete button. To delete all of the currently registered destinations, click on the Delete All button. To change any of the registered information (Company, Department or Recipient) in the Destination List, select the corresponding destination and click on the Edit... button. 13 Click on the Send button to initiate the fax transmission operation. Accessing the Printing Preferences Dialog Box Perform the following procedure to display the Printing Preferences dialog box and perform Network FAX related settings. 1 Click the Start button on the taskbar and then click Control Panel. Click to open Printers in that order from the successive menus to access the Printers dialog box. 2 Right click the name of the machine to be used and then select Print Preferences... from the drop-down menu. The Printing Preferences dialog box will open. 2-7
-
 1
1 -
2
-
3
-
4
-
5
-
6
-
7
-
8
-
9
-
10
-
11
-
12
-
13
-
 14
14 -
 15
15 -
 16
16 -
 17
17 -
 18
18 -
 19
19 -
 20
20 -
 21
21 -
 22
22 -
 23
23 -
 24
24 -
25
-
26
-
27
-
28
-
29
-
30
-
31
-
32
-
33
-
34
-
35
-
36
-
37
-
38
-
39
-
40
-
41
-
42
-
43
-
44
-
45
-
46
-
47
-
48
 |
 |