LG LGVX4500 Owner's Manual (English) - Page 10
Getting Y, our Phone Star - charger
 |
View all LG LGVX4500 manuals
Add to My Manuals
Save this manual to your list of manuals |
Page 10 highlights
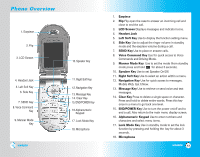
Getting Your Phone Started The Battery NOTE: It is important to fully charge the battery before initial use of the phone. The phone comes with a rechargeable battery. Keep the battery charged while not in use in order to maximize talk and standby time. The battery charge level is shown at the top of the LCD screen. Installing the Battery To install the battery, insert the bottom of the battery into the opening on the back of the phone. Push the battery down until the latch clicks. Removing the Battery Turn the power off. Lift the release latch to detach the battery. Charging the Battery The desktop charger has a charging slot that accommodates the phone with the battery attached or the battery by itself. Warning! Use only the desktop charger provided with the phone. Using any (desktop) charger other than the one included with the VX4500 may damage your phone or battery. 1. Plug the charger into a wall outlet. The phone must be charged from a 120V AC power source. 2. Insert the phone with an installed battery, or the battery by itself, into the charging slot. The red light indicates the battery is charging and the green light indicates the battery is fully charged. The charge time varies depending upon the battery level. The maximum charge time for a fully discharged battery is 3 hours. 16 VX4500 Battery Charge Level The battery charge level is shown at the top right of the LCD screen. When the battery charge level becomes low, the low battery sensor alerts you in three ways: sounding an audible tone, blinking the battery icon, and displaying LOW BATTERY WARNING! If the battery charge level becomes exceedingly low, the phone automatically switches off and any function in progress is not saved. Fully Charged Fully Discharged Turning the Phone On and Off Turning the Phone On 1. Install a charged battery or connect the phone to an external power source such as a cigarette lighter charger or handsfree car kit. 2. Press for a few seconds until the LCD screen lights up. NOTE: Like any other radio device, avoid any unnecessary contact with the antenna while your phone is on. Turning the Phone Off 1. Press and hold until the display turns off. Signal Strength Call quality depends on the signal strength in your area. The signal strength is indicated on the screen as the number of bars next to the signal strength icon: The more bars, the better the signal strength. If the signal quality is poor, move to an open area. If you are in a building, the reception may be better near a window. VX4500 17
-
 1
1 -
2
-
3
-
4
-
 5
5 -
 6
6 -
 7
7 -
 8
8 -
 9
9 -
 10
10 -
 11
11 -
 12
12 -
 13
13 -
 14
14 -
 15
15 -
16
-
17
-
18
-
19
-
20
-
21
-
22
-
23
-
24
-
25
-
26
-
27
-
28
-
29
-
30
-
31
-
32
-
33
-
34
-
35
-
36
-
37
-
38
-
39
-
40
-
41
-
42
-
43
-
44
-
45
-
46
-
47
-
48
-
49
-
50
-
51
-
52
-
53
-
54
-
55
-
56
-
57
-
58
-
59
-
60
-
61
-
62
-
63
-
64
-
65
-
66
-
67
-
68
-
69
-
70
-
71
 |
 |