Lenovo NetVista X40 Quick Reference for NetVista 2179 and 6643 systems (Dutch) - Page 79
Installing a SCSI adapter (some models)
 |
View all Lenovo NetVista X40 manuals
Add to My Manuals
Save this manual to your list of manuals |
Page 79 highlights
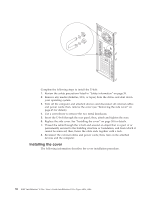
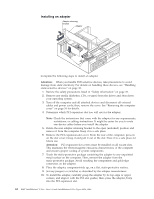
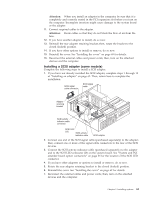
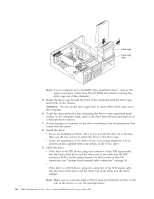
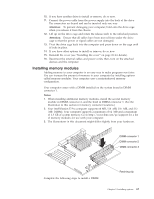
Attention: When you install an adapter in the computer, be sure that it is completely and correctly seated in the PCI expansion slot before you turn on the computer. Incomplete insertion might cause damage to the system board or the adapter. 11. Connect required cables to the adapter. Attention: Route cables so that they do not block the flow of air from the fans. 12. If you have another adapter to install, do so now. 13. Reinstall the rear adapter retaining bracket; then, rotate the bracket to the closed (locked) position. 14. If you have other options to install or remove, do so now. 15. Reinstall the cover. See "Installing the cover" on page 69 for details. 16. Reconnect the external cables and power cords; then, turn on the attached devices and the computer. Installing a SCSI adapter (some models) Complete the following steps to install a SCSI adapter. 1. If you have not already installed the SCSI adapter, complete steps 1 through 10 of "Installing an adapter" on page 62. Then, return here to complete the installation. SCSI signal cable connector SCSI signal cable Adapter retaining bracket SCSI activity indicator cable connector SCSI LED (J3) SCSI activity indicator cable SCSI adapter 2. Connect one end of the SCSI signal cable (purchased separately) to the adapter; then, connect one or more of the signal cable connectors to the rear of the SCSI devices. 3. Connect the SCSI activity indicator cable (purchased separately) to the adapter and to the SCSI LED connector (J3) on the system board. See "System and PCI extender board option connectors" on page 35 for the location of the SCSI LED connector. 4. If you have other adapters or options to install or remove, do so now. 5. Rotate the rear adapter retaining bracket to the closed (locked) position. 6. Reinstall the cover. See "Installing the cover" on page 69 for details. 7. Reconnect the external cables and power cords; then, turn on the attached devices and the computer. Chapter 5. Installing options 63
-
 1
1 -
2
-
3
-
4
-
5
-
6
-
7
-
8
-
9
-
10
-
11
-
12
-
13
-
14
-
15
-
16
-
17
-
18
-
19
-
20
-
21
-
22
-
23
-
24
-
25
-
26
-
27
-
28
-
29
-
30
-
31
-
32
-
33
-
34
-
35
-
36
-
37
-
38
-
39
-
40
-
41
-
42
-
43
-
44
-
45
-
46
-
47
-
48
-
49
-
50
-
51
-
52
-
53
-
54
-
55
-
56
-
57
-
58
-
59
-
60
-
61
-
62
-
63
-
64
-
65
-
66
-
67
-
68
-
69
-
70
-
71
-
72
-
73
-
 74
74 -
 75
75 -
 76
76 -
 77
77 -
 78
78 -
 79
79 -
 80
80 -
 81
81 -
 82
82 -
 83
83 -
 84
84 -
85
-
86
-
87
-
88
-
89
-
90
-
91
-
92
-
93
-
94
-
95
-
96
-
97
-
98
-
99
-
100
-
101
-
102
-
103
-
104
-
105
-
106
-
107
-
108
-
109
-
110
-
111
-
112
-
113
-
114
-
115
-
116
-
117
-
118
-
119
-
120
-
121
-
122
-
123
-
124
-
125
-
126
-
127
-
128
-
129
-
130
-
131
-
132
-
133
-
134
-
135
-
136
-
137
-
138
-
139
-
140
-
141
-
142
-
143
-
144
-
145
-
146
-
147
-
148
-
149
-
150
-
151
-
152
-
153
-
154
-
155
-
156
 |
 |
