Lenovo ThinkCentre Edge 91 (English) User Guide - Page 53
To replace an optical drive, do the following
 |
View all Lenovo ThinkCentre Edge 91 manuals
Add to My Manuals
Save this manual to your list of manuals |
Page 53 highlights
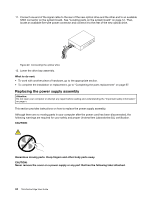
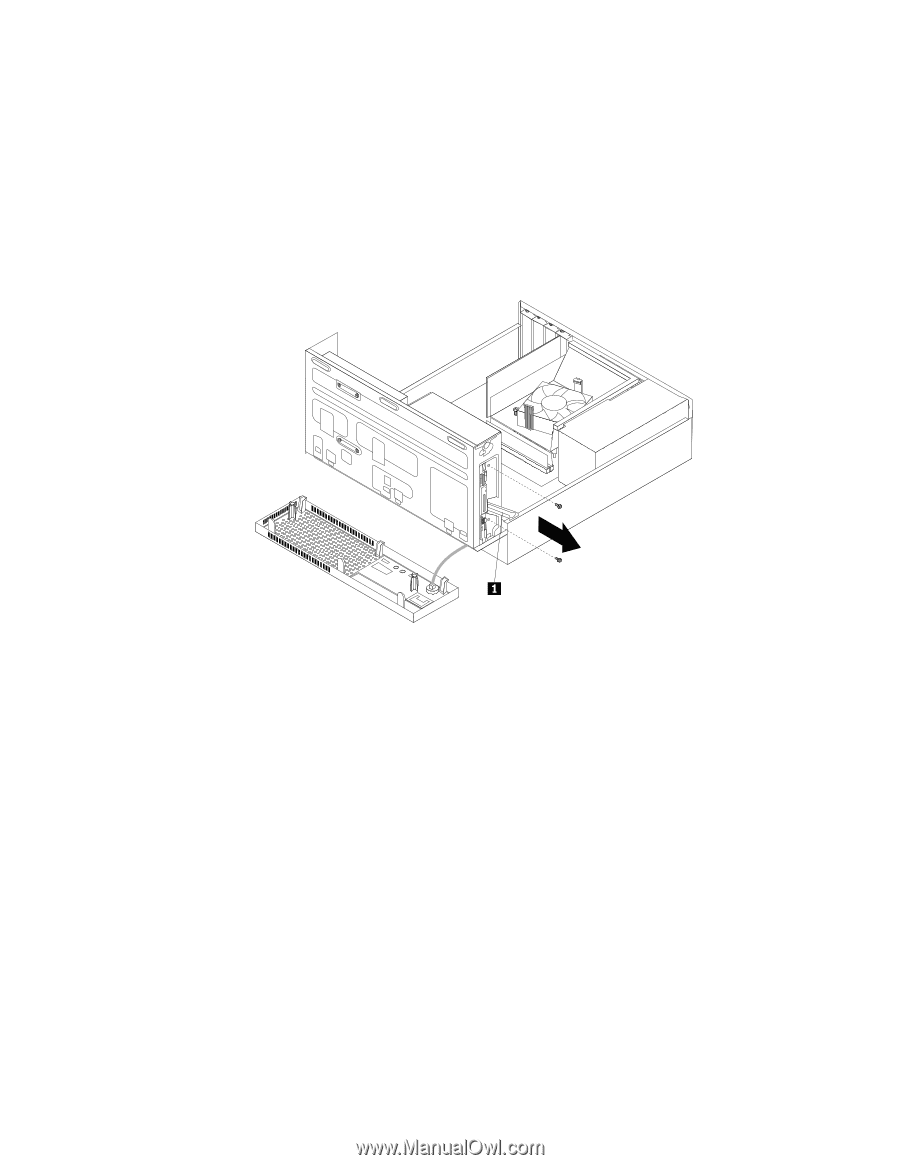
To replace an optical drive, do the following: 1. Turn off the computer and disconnect all power cords from electrical outlets. 2. Remove the computer cover. See "Removing the computer cover" on page 30. 3. Remove the front bezel. See "Removing and reinstalling the front bezel" on page 30. 4. Pivot the drive bay assembly upward. See "Accessing the system board components and drives" on page 32 5. Disconnect the signal cable and the power cable from the optical drive. 6. Hold the optical drive and remove the two screws that secure the optical drive. Figure 24. Removing the optical drive Chapter 5. Installing or replacing hardware 41
-
 1
1 -
2
-
3
-
4
-
5
-
6
-
7
-
8
-
9
-
10
-
11
-
12
-
13
-
14
-
15
-
16
-
17
-
18
-
19
-
20
-
21
-
22
-
23
-
24
-
25
-
26
-
27
-
28
-
29
-
30
-
31
-
32
-
33
-
34
-
35
-
36
-
37
-
38
-
39
-
40
-
41
-
42
-
43
-
44
-
45
-
46
-
47
-
 48
48 -
 49
49 -
 50
50 -
 51
51 -
 52
52 -
 53
53 -
 54
54 -
 55
55 -
 56
56 -
 57
57 -
 58
58 -
59
-
60
-
61
-
62
-
63
-
64
-
65
-
66
-
67
-
68
-
69
-
70
-
71
-
72
-
73
-
74
-
75
-
76
-
77
-
78
-
79
-
80
-
81
-
82
-
83
-
84
-
85
-
86
-
87
-
88
-
89
-
90
-
91
-
92
-
93
-
94
-
95
-
96
-
97
-
98
-
99
-
100
-
101
-
102
-
103
-
104
-
105
-
106
-
107
-
108
-
109
-
110
-
111
-
112
-
113
-
114
-
115
-
116
-
117
-
118
-
119
-
120
-
121
-
122
-
123
-
124
-
125
-
126
-
127
-
128
-
129
-
130
-
131
-
132
 |
 |
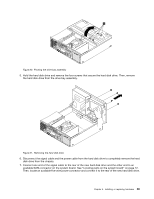
To replace an optical drive, do the following:
1. Turn off the computer and disconnect all power cords from electrical outlets.
2. Remove the computer cover. See “Removing the computer cover” on page 30.
3. Remove the front bezel. See “Removing and reinstalling the front bezel” on page 30.
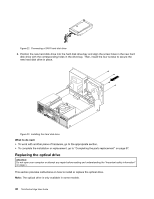
4. Pivot the drive bay assembly upward. See “Accessing the system board components and drives”
on page 32
5. Disconnect the signal cable and the power cable from the optical drive.
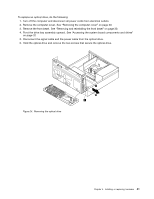
6. Hold the optical drive and remove the two screws that secure the optical drive.
Figure 24. Removing the optical drive
Chapter 5
.
Installing or replacing hardware
41