Lenovo ThinkPad 770 TP 770X On-line User's Guide that came preloaded on the sy - Page 25
Using the Capture Function, video equipment for better picture quality. - power supply
 |
View all Lenovo ThinkPad 770 manuals
Add to My Manuals
Save this manual to your list of manuals |
Page 25 highlights
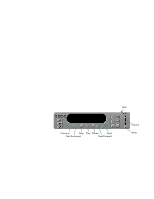
Using the Capture Function Note: The capture function is available if you install the DVD and Enhanced Video Adapter, supplied as an option, in your computer. If you install the optional DVD and Enhanced Video Adapter in your computer, you can use the capture applications supported by Video for Windows. You can also overlay motion video from the video-in port by using applications supported by the MCI (Media Control Interface) overlay. Notes: Only one capture window can be open at a time. When you use video capture with the overlay screen on, the captured screen might appear distorted. However, the data is correctly captured. To capture motion video, do the following: 1 Power off the computer. 2 Connect the video in-out cable to the video-in connector ( ) on the computer; then connect your video equipment. Notes: If you are using video equipment with an S-video output, connect the S-video connector of the video in-out cable to the S-video-out connector of your video equipment for better picture quality. If you are not using video equipment with an S-video output, connect the video in-out cable to the video-out connector of your video equipment. 3 Connect the audio cable to the microphone jack on the computer; then connect the cable to the audio-output connectors of your video equipment. If your video equipment has only one audio-output connector, use the left-audio connector of the audio cable. 4 Check the Enhanced Video status as follows: Chapter 2. Using Audio, Modem, Capture, and DVD Features 17
-
 1
1 -
2
-
3
-
4
-
5
-
6
-
7
-
8
-
9
-
10
-
11
-
12
-
13
-
14
-
15
-
16
-
17
-
18
-
19
-
 20
20 -
 21
21 -
 22
22 -
 23
23 -
 24
24 -
 25
25 -
 26
26 -
 27
27 -
 28
28 -
 29
29 -
 30
30 -
31
-
32
-
33
-
34
-
35
-
36
-
37
-
38
-
39
-
40
-
41
-
42
-
43
-
44
-
45
-
46
-
47
-
48
-
49
-
50
-
51
-
52
-
53
-
54
-
55
-
56
-
57
-
58
-
59
-
60
-
61
-
62
-
63
-
64
-
65
-
66
-
67
-
68
-
69
-
70
-
71
-
72
-
73
-
74
-
75
-
76
-
77
-
78
-
79
-
80
-
81
-
82
-
83
-
84
-
85
-
86
-
87
-
88
-
89
-
90
-
91
-
92
-
93
-
94
-
95
-
96
-
97
-
98
-
99
-
100
-
101
-
102
-
103
-
104
-
105
-
106
-
107
-
108
-
109
-
110
-
111
-
112
-
113
-
114
-
115
-
116
-
117
-
118
-
119
-
120
-
121
-
122
-
123
-
124
-
125
-
126
-
127
-
128
-
129
-
130
-
131
-
132
-
133
-
134
-
135
-
136
-
137
-
138
-
139
-
140
-
141
-
142
-
143
-
144
-
145
-
146
-
147
-
148
-
149
-
150
-
151
-
152
-
153
-
154
-
155
-
156
-
157
-
158
-
159
-
160
-
161
-
162
-
163
-
164
-
165
-
166
-
167
-
168
-
169
-
170
-
171
-
172
-
173
-
174
-
175
-
176
-
177
-
178
-
179
-
180
-
181
-
182
-
183
-
184
-
185
-
186
-
187
-
188
-
189
-
190
-
191
-
192
-
193
-
194
-
195
-
196
-
197
-
198
-
199
-
200
-
201
-
202
-
203
-
204
-
205
-
206
-
207
-
208
-
209
-
210
-
211
-
212
-
213
-
214
-
215
-
216
-
217
-
218
-
219
-
220
-
221
-
222
-
223
-
224
-
225
-
226
-
227
-
228
-
229
 |
 |
