Lexmark 34S0600 User Manual - Page 137
Ordering a photoconductor kit, Ordering a maintenance kit, Replacing supplies
 |
View all Lexmark 34S0600 manuals
Add to My Manuals
Save this manual to your list of manuals |
Page 137 highlights
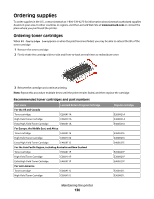
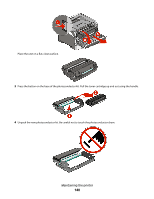
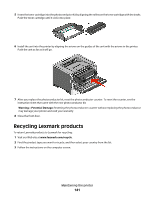
Part name Extra High Yield Toner Cartridge Lexmark Return Program Cartridge E460X11L Regular cartridge E460X21L Ordering a photoconductor kit Depending on your printer model, the printer issues a message or a light sequence to let you know the photoconductor kit is near its end of life. At this time, order a photoconductor kit. You can also see the status of the photoconductor kit by printing a network setup page. Part name Photoconductor kit Part number E260X22G Ordering a maintenance kit 80 Routine maintenance needed appears on the display after 120,000 pages have printed to let you know it is time to replace printer maintenance items. Order a maintenance kit when this message first appears. The maintenance kit contains all the items necessary to replace the fuser and transfer roller. Notes: • The maintenance kit may not be available in all geographies. • Using certain types of paper or specialty media may require more frequent replacement of the maintenance kit. See the following table for the maintenance kit part number for your printer: Part name Maintenance kit * Designed for use only in Japan Part number 40X5402 (100 V)* 40X5400 (115 V) 40X5401 (230 V) Replacing supplies Replacing the toner cartridge When 88 Cartridge low appears, or when you experience faded print, remove the toner cartridge. Firmly shake it side-to-side and front-to-back several times to redistribute the toner, and then reinsert it and continue printing. When shaking the cartridge no longer improves the print quality, replace the toner cartridge. Note: You can check to see approximately how much toner is left in your cartridge by printing a menu settings page. Maintaining the printer 137
-
 1
1 -
2
-
3
-
4
-
5
-
6
-
7
-
8
-
9
-
10
-
11
-
12
-
13
-
14
-
15
-
16
-
17
-
18
-
19
-
20
-
21
-
22
-
23
-
24
-
25
-
26
-
27
-
28
-
29
-
30
-
31
-
32
-
33
-
34
-
35
-
36
-
37
-
38
-
39
-
40
-
41
-
42
-
43
-
44
-
45
-
46
-
47
-
48
-
49
-
50
-
51
-
52
-
53
-
54
-
55
-
56
-
57
-
58
-
59
-
60
-
61
-
62
-
63
-
64
-
65
-
66
-
67
-
68
-
69
-
70
-
71
-
72
-
73
-
74
-
75
-
76
-
77
-
78
-
79
-
80
-
81
-
82
-
83
-
84
-
85
-
86
-
87
-
88
-
89
-
90
-
91
-
92
-
93
-
94
-
95
-
96
-
97
-
98
-
99
-
100
-
101
-
102
-
103
-
104
-
105
-
106
-
107
-
108
-
109
-
110
-
111
-
112
-
113
-
114
-
115
-
116
-
117
-
118
-
119
-
120
-
121
-
122
-
123
-
124
-
125
-
126
-
127
-
128
-
129
-
130
-
131
-
 132
132 -
 133
133 -
 134
134 -
 135
135 -
 136
136 -
 137
137 -
 138
138 -
 139
139 -
 140
140 -
 141
141 -
 142
142 -
143
-
144
-
145
-
146
-
147
-
148
-
149
-
150
-
151
-
152
-
153
-
154
-
155
-
156
-
157
-
158
-
159
-
160
-
161
-
162
-
163
-
164
-
165
-
166
-
167
-
168
-
169
-
170
-
171
-
172
-
173
-
174
-
175
-
176
-
177
-
178
-
179
-
180
-
181
-
182
-
183
 |
 |
