Lexmark 352dn Menus and Messages Guide - Page 33
Engine Code CFC Failure, Remove Cartridge - photoconductor
 |
UPC - 734646013352
View all Lexmark 352dn manuals
Add to My Manuals
Save this manual to your list of manuals |
Page 33 highlights
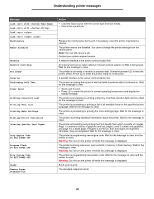
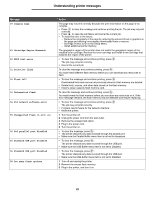
Understanding printer messages Message 58 Too many trays attached 80 Scheduled maintenance 81 Engine Code CFC Failure 84 Photoconduct life warning 84 Replace Photoconductor 84 PC unit abnormal 88 Toner low 200 Paper jam Remove Cartridge 201 Paper jam Remove Cartridge 202 Paper jam Open rear door 231 Paper jam Open rear door 23x Paper jam Open rear door 234 Paper jam Check duplex 235 Paper jam Unsupported size 24x Paper jam Check tray 251 Paper jam Check man feeder 900-999 Service Action 1 Turn off and unplug the printer. 2 Remove the excess trays. 3 Plug in the printer, and turn it on. • To clear the message, and continue printing, press . • Replace the maintenance items and if necessary, reset the printer maintenance counter. The microcode to be programmed in the engine flash code module has failed a CRC check. Press GO to clear the message. The microcode data will be discarded and must be re-transmitted from the host. • To clear the message, and continue printing, press . • Replace the photoconductor unit. • To clear the message, and continue printing, press . • Replace the photoconductor unit. • Replace the photoconductor unit. • Replace the toner cartridge. • To clear the message, and continue printing, press . 1 Clear the paper path. 2 Press to resume printing. 1 Clear the paper path. 2 Press to resume printing. 1 Clear the paper path. 2 Press to resume printing. 1 Clear the paper path. 2 Press to resume printing. 1 Clear the paper path. 2 Press to resume printing. 1 Clear the paper path. 2 Press to resume printing. 1 Clear the paper path. 2 Press to resume printing. 3 Check the paper size to insure that it is supported by the printer. 1 Clear the paper path. 2 Press to resume printing. 1 Clear the paper path. 2 Press to resume printing. 1 Turn the printer off. 2 Unplug the power cord from the wall. 3 Check all cable connections. 4 Plug in the power cord. 5 Turn the printer back on. If the service message recurs, call for service, and report the message number and description of the problem. 33
-
 1
1 -
2
-
3
-
4
-
5
-
6
-
7
-
8
-
9
-
10
-
11
-
12
-
13
-
14
-
15
-
16
-
17
-
18
-
19
-
20
-
21
-
22
-
23
-
24
-
25
-
26
-
27
-
 28
28 -
 29
29 -
 30
30 -
 31
31 -
 32
32 -
 33
33 -
 34
34 -
 35
35 -
 36
36
 |
 |
