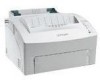
Lexmark E312L User's Guide - Page 17
Connecting the printer to your computer, Using a parallel, interface cable - parts
 |
View all Lexmark E312L manuals
Add to My Manuals
Save this manual to your list of manuals |
Page 17 highlights
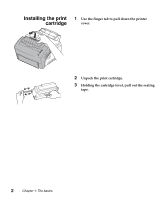
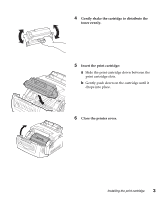
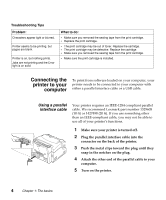
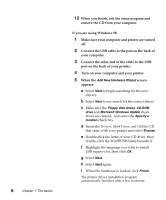
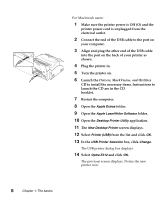
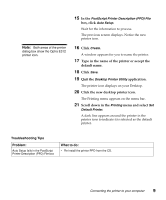
Troubleshooting Tips Problem: Characters appear light or blurred. Printer seems to be printing, but pages are blank. Printer is on, but nothing prints. Jobs are not printing and the Error light is on solid. What to do: • Make sure you removed the sealing tape from the print cartridge. • Replace the print cartridge. • The print cartridge may be out of toner. Replace the cartridge. • The print cartridge may be defective. Replace the cartridge. • Make sure you removed the sealing tape from the print cartridge. • Make sure the print cartridge is installed. Connecting the printer to your computer To print from software loaded on your computer, your printer needs to be connected to your computer with either a parallel interface cable or a USB cable. Using a parallel interface cable Your printer requires an IEEE-1284 compliant parallel cable. We recommend Lexmark part number 1329605 (10 ft) or 1427498 (20 ft). If you use something other than an IEEE-compliant cable, you may not be able to use all of your printer's functions. 1 Make sure your printer is turned off. 2 Plug the parallel interface cable into the connector on the back of the printer. 3 Push the metal clips toward the plug until they snap in the notches on the plug. 4 Attach the other end of the parallel cable to your computer. 5 Turn on the printer. 4 Chapter 1: The basics
-
 1
1 -
2
-
3
-
4
-
5
-
6
-
7
-
8
-
9
-
10
-
11
-
 12
12 -
 13
13 -
 14
14 -
 15
15 -
 16
16 -
 17
17 -
 18
18 -
 19
19 -
 20
20 -
 21
21 -
 22
22 -
23
-
24
-
25
-
26
-
27
-
28
-
29
-
30
-
31
-
32
-
33
-
34
-
35
-
36
-
37
-
38
-
39
-
40
-
41
-
42
-
43
-
44
-
45
-
46
-
47
-
48
-
49
-
50
-
51
-
52
-
53
-
54
-
55
-
56
-
57
-
58
-
59
-
60
-
61
-
62
-
63
-
64
-
65
-
66
-
67
-
68
-
69
-
70
-
71
-
72
-
73
-
74
-
75
-
76
-
77
-
78
-
79
-
80
-
81
-
82
-
83
-
84
-
85
-
86
-
87
-
88
-
89
-
90
-
91
-
92
-
93
-
94
-
95
-
96
-
97
-
98
-
99
-
100
-
101
-
102
-
103
-
104
-
105
-
106
-
107
-
108
-
109
-
110
-
111
-
112
-
113
-
114
-
115
-
116
 |
 |
