Lexmark MX722 Quick Reference - Page 2
Loading paper
 |
View all Lexmark MX722 manuals
Add to My Manuals
Save this manual to your list of manuals |
Page 2 highlights
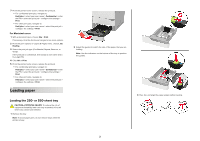
7 From the printer home screen, release the print job. • For confidential print jobs, navigate to: Held jobs > select your user name > Confidential > enter the PIN > select the print job > configure the settings > Print • For other print jobs, navigate to: Held jobs > select your user name > select the print job > configure the settings > Print For Macintosh users 1 With a document open, choose File > Print. If necessary, click the disclosure triangle to see more options. 2 From the print options or Copies & Pages menu, choose Job Routing. 3 Select the print job type (Confidential, Repeat, Reserve, or Verify). If the print job is confidential, then assign a user name and a four‑digit PIN. 4 Click OK or Print. 5 From the printer home screen, release the print job. • For confidential print jobs, navigate to: Held jobs > select your user name > Confidential > enter the PIN > select the print job > configure the settings > Print • For other print jobs, navigate to: Held jobs > select your user name > select the print job > configure the settings > Print Loading paper Loading the 250‑ or 550‑sheet tray CAUTION-POTENTIAL INJURY: To reduce the risk of equipment instability, load each tray separately. Keep all other trays closed until needed. 1 Remove the tray. Note: To avoid paper jams, do not remove trays while the printer is busy. 2 Adjust the guides to match the size of the paper that you are loading. Note: Use the indicators on the bottom of the tray to position the guides. 3 Flex, fan, and align the paper edges before loading. 2
-
 1
1 -
 2
2 -
 3
3 -
 4
4 -
 5
5 -
 6
6 -
 7
7 -
 8
8 -
9
-
10
-
11
-
12
 |
 |
