Lexmark T652DTN Help Menu Pages - Page 31
Loading the standard or optional 250-sheet or 550-sheet tray
 |
UPC - 734646317368
View all Lexmark T652DTN manuals
Add to My Manuals
Save this manual to your list of manuals |
Page 31 highlights
Printing guide Page 31 of 42 Printing guide This section explains how to load the 250-, 500-, and 2000-sheet trays. It also includes information about setting the Paper Size and Paper Type. Loading the standard or optional 250-sheet or 550-sheet tray Although the 250-sheet tray and the 550-sheet tray are different in appearance, they require the same process for loading paper. Use these instructions to load paper in either tray: 1 Pull the tray out. Note: Do not remove trays while a job prints or while Busy appears on the display. Doing so may cause a jam. 2 Squeeze the width guide tab inward as shown, and move the width guide to the correct position for the paper size being loaded. 1 2
-
 1
1 -
2
-
3
-
4
-
5
-
6
-
7
-
8
-
9
-
10
-
11
-
12
-
13
-
14
-
15
-
16
-
17
-
18
-
19
-
20
-
21
-
22
-
23
-
24
-
25
-
 26
26 -
 27
27 -
 28
28 -
 29
29 -
 30
30 -
 31
31 -
 32
32 -
 33
33 -
 34
34 -
 35
35 -
 36
36 -
37
-
38
-
39
-
40
-
41
-
42
 |
 |

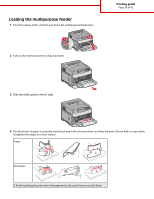
Printing guide
This section explains how to load the 250-, 500-, and 2000-sheet trays. It also includes information about setting the Paper
Size and Paper Type.
Loading the standard or optional 250-sheet or 550-sheet tray
Although the 250-sheet tray and the 550-sheet tray are different in appearance, they require the same process for loading
paper. Use these instructions to load paper in either tray:
1
Pull the tray out.
Note:
Do not remove trays while a job prints or while
Busy
appears on the display. Doing so may cause a jam.
2
Squeeze the width guide tab inward as shown, and move the width guide to the correct position for the paper size being
loaded.
2
1
Printing guide
Page 31 of 42