Lexmark T652DTN Help Menu Pages - Page 32
Printing guide
 |
UPC - 734646317368
View all Lexmark T652DTN manuals
Add to My Manuals
Save this manual to your list of manuals |
Page 32 highlights
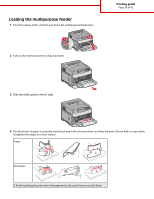
Printing guide Page 32 of 42 3 Squeeze the length guide tab inward as shown, and slide the guide to the correct position for the paper size being loaded. 1 2 3 Note: Use the size indicators on the bottom of the tray to help position the guides. 4 Flex the sheets back and forth to loosen them, and then fan them. Do not fold or crease the paper. Straighten the edges on a level surface. 5 Load the paper stack: • Print side facedown for single-sided printing • Print side faceup for duplex printing Note: Paper must be loaded differently in the trays if an optional StapleSmart Finisher is installed. Without an optional StapleSmart Finisher With an optional StapleSmart Finisher LETTERHEAD LETTERHEAD Single-sided printing Single-sided printing
-
 1
1 -
2
-
3
-
4
-
5
-
6
-
7
-
8
-
9
-
10
-
11
-
12
-
13
-
14
-
15
-
16
-
17
-
18
-
19
-
20
-
21
-
22
-
23
-
24
-
25
-
26
-
 27
27 -
 28
28 -
 29
29 -
 30
30 -
 31
31 -
 32
32 -
 33
33 -
 34
34 -
 35
35 -
 36
36 -
 37
37 -
38
-
39
-
40
-
41
-
42
 |
 |

3
Squeeze the length guide tab inward as shown, and slide the guide to the correct position for the paper size being loaded.
3
1
2
Note:
Use the size indicators on the bottom of the tray to help position the guides.
4
Flex the sheets back and forth to loosen them, and then fan them. Do not fold or crease the paper. Straighten the edges
on a level surface.
5
Load the paper stack:
•
Print side facedown for single-sided printing
•
Print side faceup for duplex printing
Note:
Paper must be loaded differently in the trays if an optional StapleSmart Finisher is installed.
Without an optional StapleSmart Finisher
With an optional StapleSmart Finisher
LETTERHEAD
Single-sided printing
LETTERHEAD
Single-sided printing
Printing guide
Page 32 of 42