Linksys WRV54G Cisco WRV54G Wireless-G VPN Broadband Router User Guide - Page 123
Configuring the Key Management Settings
 |
UPC - 745883556687
View all Linksys WRV54G manuals
Add to My Manuals
Save this manual to your list of manuals |
Page 123 highlights
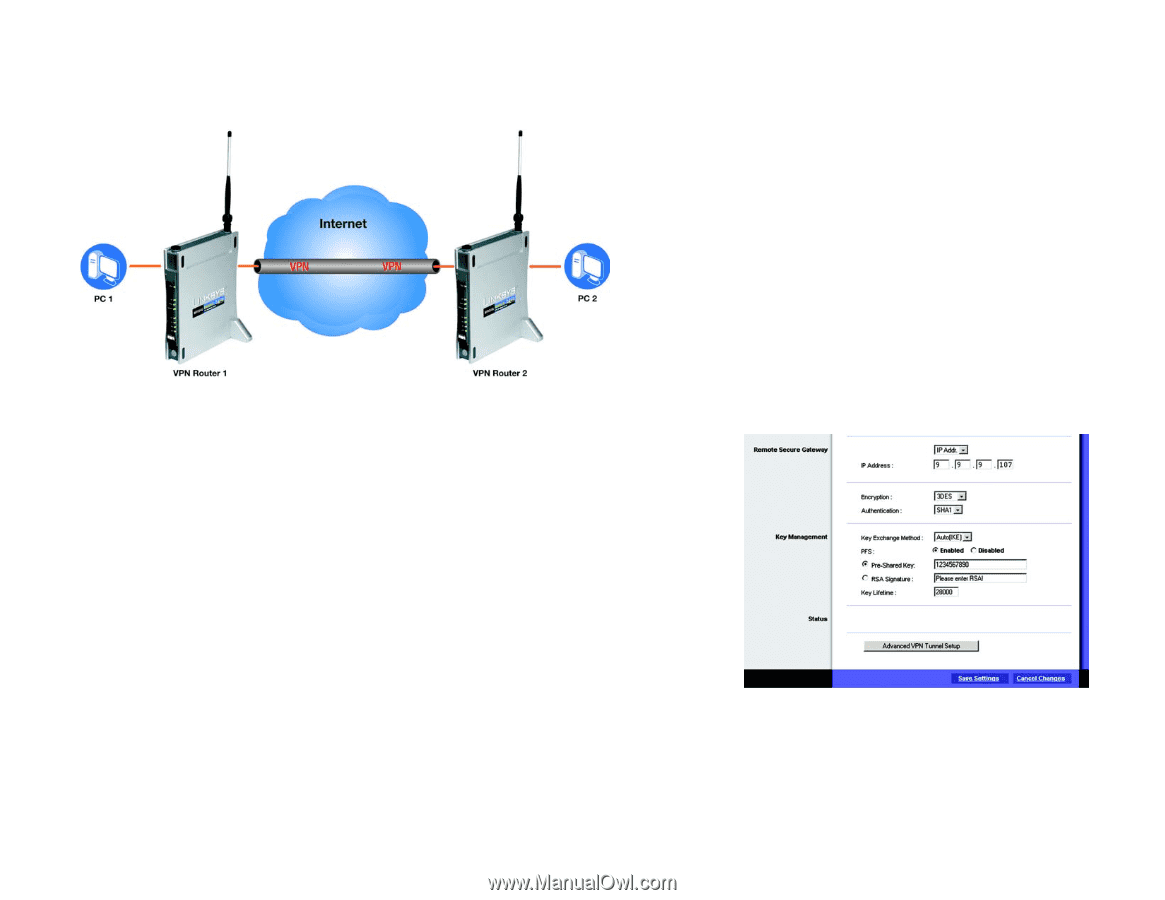
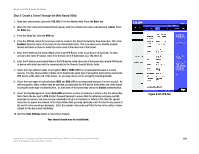
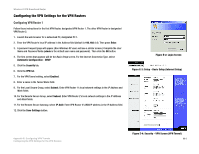
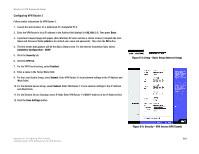
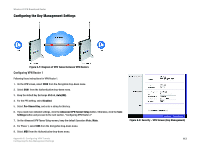
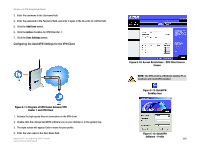
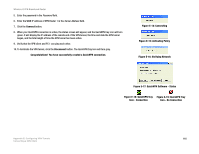
Wireless-G VPN Broadband Router Configuring the Key Management Settings Figure E-7: Diagram of VPN Tunnel between VPN Routers Configuring VPN Router 1 Following these instructions for VPN Router 1. 1. On the VPN screen, select 3DES from the Encryption drop-down menu. 2. Select SHA1 from the Authentication drop-down menu. 3. Keep the default Key Exchange Method, Auto(IKE). 4. For the PFS setting, select Enabled. 5. Select Pre-Shared Key, and enter a string for this key. 6. If you need more detailed settings, click the Advanced VPN Tunnel Setup button. Otherwise, click the Save Settings button and proceed to the next section, "Configuring VPN Router 2." 7. On the Advanced VPN Tunnel Setup screen, keep the default Operation Mode, Main. 8. For Phase 1, select DES from the Encryption drop-down menu. 9. Select MD5 from the Authentication drop-down menu. Appendix E: Configuring VPN Tunnels Configuring the Key Management Settings Figure E-8: Security - VPN Screen (Key Management) 113
-
 1
1 -
2
-
3
-
4
-
5
-
6
-
7
-
8
-
9
-
10
-
11
-
12
-
13
-
14
-
15
-
16
-
17
-
18
-
19
-
20
-
21
-
22
-
23
-
24
-
25
-
26
-
27
-
28
-
29
-
30
-
31
-
32
-
33
-
34
-
35
-
36
-
37
-
38
-
39
-
40
-
41
-
42
-
43
-
44
-
45
-
46
-
47
-
48
-
49
-
50
-
51
-
52
-
53
-
54
-
55
-
56
-
57
-
58
-
59
-
60
-
61
-
62
-
63
-
64
-
65
-
66
-
67
-
68
-
69
-
70
-
71
-
72
-
73
-
74
-
75
-
76
-
77
-
78
-
79
-
80
-
81
-
82
-
83
-
84
-
85
-
86
-
87
-
88
-
89
-
90
-
91
-
92
-
93
-
94
-
95
-
96
-
97
-
98
-
99
-
100
-
101
-
102
-
103
-
104
-
105
-
106
-
107
-
108
-
109
-
110
-
111
-
112
-
113
-
114
-
115
-
116
-
117
-
 118
118 -
 119
119 -
 120
120 -
 121
121 -
 122
122 -
 123
123 -
 124
124 -
 125
125 -
 126
126 -
 127
127 -
 128
128 -
129
-
130
-
131
-
132
-
133
-
134
-
135
-
136
-
137
-
138
-
139
-
140
-
141
-
142
-
143
-
144
-
145
 |
 |