MSI MS-7222-020 User Guide
MSI MS-7222-020 - PM8PM-L Motherboard - Micro ATX Manual
 |
View all MSI MS-7222-020 manuals
Add to My Manuals
Save this manual to your list of manuals |
MSI MS-7222-020 manual content summary:
- MSI MS-7222-020 | User Guide - Page 1
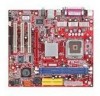
PM8PM MS-7222 (v1.X) Micro-ATX Mainboard G52-72221X1 i - MSI MS-7222-020 | User Guide - Page 2
radio frequency energy and, if not installed and used in accordance with the instruction manual, may cause harmful interference to radio limits. VOIR LA NOTICE D'INSTALLATION AVANT DE RACCORDER AU RESEAU. Micro-Star International MS-7222 This device complies with Part 15 of the FCC Rules. Operation - MSI MS-7222-020 | User Guide - Page 3
is the intellectual property of MICRO-STAR INTERNATIONAL. We take every of their respective owners. AMD, Athlon™, Athlon™ XP, Thoroughbred™, and Duron™ are registered trademarks of AMD registered trademarks of the Personal Computer Memory Card International Association. Revision History Revision - MSI MS-7222-020 | User Guide - Page 4
guide, BIOS updates, driver updates, and other information: http://www.msi.com.tw & http://www.msi. com.tw/program/service/faq/faq/esc_faq_list.php † Contact our technical staff at: [email protected] Safety Instructions 1. Always read the safety instructions carefully. 2. Keep this User's Manual - MSI MS-7222-020 | User Guide - Page 5
WEEE Statement v - MSI MS-7222-020 | User Guide - Page 6
vi - MSI MS-7222-020 | User Guide - Page 7
vii - MSI MS-7222-020 | User Guide - Page 8
Mainboard Specifications 1-2 Mainboard Layout 1-4 Packing Contents 1-5 MSI Special Feature 1-6 Chapter 2. Hardware Setup 2-1 Quick Components Guide 2-2 Central Processing Unit: CPU 2-3 Introduction to LGA 775 CPU 2-3 CPU & Cooler Installation 2-4 Memory Audio Panel Audio Connector: JAUDIO1 - MSI MS-7222-020 | User Guide - Page 9
Management Features 3-17 PNP/PCI Configurations 3-20 H/W Monitor 3-22 Load Optimized Defaults 3-24 BIOS Setting Password 3-24 Chapter 4. Introduction to Realtek ALC655 4-1 Installing the Audio Driver 4-2 Using 4- or 6-Channel Audio Function 4-4 Testing the Connected Speakers 4-9 Playing - MSI MS-7222-020 | User Guide - Page 10
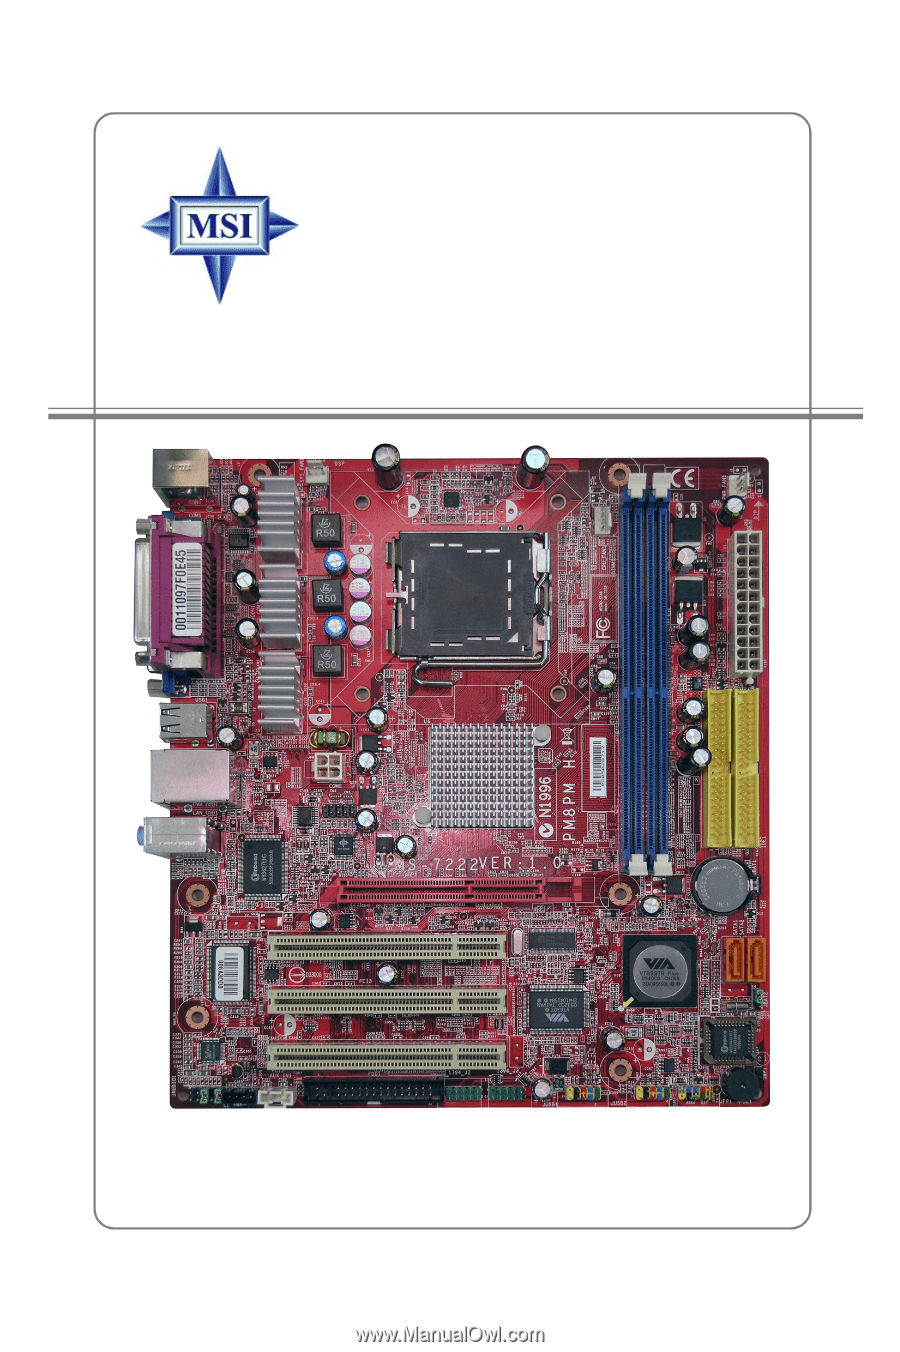
you for choosing the PM8PM(MS-7222 v1.X) Series ATX mainboard. The PM8PM mainboard is based on VIA® P4M800 Pro and VIA® VT8237R Plus chipset for optimal system efficiency. Designed to fit the advanced Intel® Pentium 4 Prescott LGA775 processor, the PM8PM mainboard delivers a high performance and - MSI MS-7222-020 | User Guide - Page 11
MS-7222 Micro-ATX Mainboard Mainboard Specifications CPU* † Supports Intel® Pentium® 4/ Prescott (LGA 775) processor. † FSB @ 1066/800/533MHz. † Supports Intel P4 Prescott CPU up to 3.8GHz, and Intel P4 Prescott Celeron CPU. † Supports Dual Core CPU (2.8G only) † Supports Cedarmill CPU Chipset † VIA - MSI MS-7222-020 | User Guide - Page 12
. Dimension † Micro-ATX Form Factor: 245mm x 220mm. Mounting † 6 standard mounting holes. *For the latest information about CPU, please visit http://www.msi.com.tw/program/ products/mainboard/mbd/pro_mbd_cpu_support.php ** For the updated supporting memory modules, please visit http://www.msi.com.tw - MSI MS-7222-020 | User Guide - Page 13
AGP Slot RTL8100C AC97 JAUDIO01 CD_IN1 PCI Slot 1 PCI Slot 2 PCI Slot 3 VIA VT6307 (Optional) FDD 1 (Optional) (Optional) 1394_J2 1394_J3 JUSB1 BATT + VIA VT8237R PLUS BIOS JUSB2 JFP1 PM8PM (MS-7222 v1.X) Micro-ATX Mainboard IDE 2 IDE 1 SATA1 JBAT2 SATA2 JWP1 1-4 - MSI MS-7222-020 | User Guide - Page 14
Packing Contents Getting Started MSI motherboard MSI Driver/Utility CD SATA Cable Power Cable COM2 Bracket (Optional) Round Cable for IDE Devices (Optional) User's Guide Back IO Shield Round Cable for Floppy Disk (Optional) * The pictures are for reference only. Your packing contents may - MSI MS-7222-020 | User Guide - Page 15
MS-7222 Micro-ATX Mainboard MSI Special Feature The Core Center is a new utility you can find in , 3.3V, +5V and 12V. In the right side it shows the current PC hardware status such as the CPU & system temperatures and all fans speeds. When you click the red triangles in the left and right sides, two - MSI MS-7222-020 | User Guide - Page 16
Memory Voltage and AGP Voltage by clicking the radio button next to each item and make it available (the radio here you can configure the PC hardware status such as CPU & system temperatures and fan speeds. You may use MSI Reminds You... Items shown on Core Center vary depending on your system status. - MSI MS-7222-020 | User Guide - Page 17
Chapter 2. Hardware Setup Hardware Setup This chapter tells you how to install the CPU, memory modules, and expansion cards, as well as how to setup the jumpers on the mainboard. Also, it provides the instructions on connecting the peripheral devices, such as the mouse, keyboard, etc. While doing - MSI MS-7222-020 | User Guide - Page 18
MS-7222 Micro-ATX Mainboard Quick Components Guide JPW2, p.2-8 SYS_FAN1, p.2-13 CPU_FAN1, p.2-13 DDR DIMMs, p.2-7 Back Panel I/O, p.2-9 CONN1, p.2-8 COM2, p.2-14 AGP, p.2- 1 3 9 4 _ J 2 ,3 , JUSB1,2 p.2-13 p.2-19 p.2-18 IDE1, p.2-14 SATA1,2, p.2-15 JBAT2, p.2-20 JPW1, p.2-20 JFP1, p.2-16 2-2 - MSI MS-7222-020 | User Guide - Page 19
CPU The mainboard supports Intel® Pentium 4 Prescott processor. The mainboard uses a CPU socket called LGA775. When you are installing the CPU, make sure to install the cooler to prevent overheating. If you do not have the CPU of CPU. Overclocking This motherboard is designed to support overclocking. - MSI MS-7222-020 | User Guide - Page 20
MS-7222 Micro-ATX Mainboard CPU & Cooler Installation When you are installing the CPU, make sure the CPU has a cooler attached on the top to prevent overheating. If you do not have the cooler, contact your dealer to purchase and install them before - MSI MS-7222-020 | User Guide - Page 21
are matched. alignment key 7. Visually inspect if the CPU is seated well into the socket. If not, take out the CPU with pure vertical motion and reinstall. 8. Cover the load plate onto the package. MSI Reminds You... 1. Confirm if your CPU cooler is firmly installed before turning on your system - MSI MS-7222-020 | User Guide - Page 22
MS-7222 Micro-ATX Mainboard 9. Press down the load lever lightly onto the load plate, and then secure the lever with the hook under retention tab. 10. Align the holes on the mainboard with the heatsink. Push down the cooler until its four clips get wedged into the holes of the mainboard. 11. - MSI MS-7222-020 | User Guide - Page 23
your system and your mainboard might be damaged. Introduction to DDR2 SDRAM DDR2 is a new technology of memory module, and its speed memory, but will require some changes as the technology is not backwardly compatible and only motherboards specifically designed for DDR2 memory will be able to support - MSI MS-7222-020 | User Guide - Page 24
MS-7222 Micro-ATX Mainboard Power Supply The mainboard supports ATX power supply for the power system. Before inserting the power supply connector, always make sure that all components are installed properly to ensure that no damage will be caused. ATX 24-Pin Power Connector: CONN1 The mainboard - MSI MS-7222-020 | User Guide - Page 25
the following connectors: Mouse Parallel LAN L-In (optional) Keyboard COM Port VGA Port USB Ports L-Out Mic Mouse/Keyboard Connector The mainboard provides a standard PS/2® mouse/keyboard mini DIN connector for attaching a PS/2® mouse/keyboard. You can plug a PS/2® mouse/keyboard directly - MSI MS-7222-020 | User Guide - Page 26
MS-7222 Micro-ATX Mainboard Serial Port Connector The mainboard offers one 9-pin male DIN connector as To Send Ring Indicate LAN (RJ-45) Jack (optional) The mainboard provides 1 standard RJ-45 jack for connection to single Local Area Network (LAN). This LAN enables data to be transferred at 1000 - MSI MS-7222-020 | User Guide - Page 27
Hardware Setup USB Connectors The mainboard provides an OHCI (Open Host Controller Interface) Universal player, Tape player, or other audio devices. Mic is a connector for microphones. Line In Line Out MIC MSI Reminds You... For the advanced functions of the audio codec, please refer to Chapter 4: - MSI MS-7222-020 | User Guide - Page 28
MS-7222 Micro-ATX Mainboard Parallel Port Connector: LPT1 The mainboard provides a 25-pin female centronic connector as LPT. A parallel port is a standard printer port that supports In 18 GND Ground 19 GND Ground 20 GND Ground 21 GND Ground 22 GND Ground 23 GND Ground 24 GND Ground - MSI MS-7222-020 | User Guide - Page 29
Disk Drive Connector: FDD1 The mainboard provides a standard floppy disk drive connector that supports 360K, 720K, 1.2M, 1. CPU fan control. Control SENSOR +12V GND CPU_FAN1 Sensor +12V GND SYS_FAN1 MSI Reminds You... 1. Always consult the vendors for proper CPU cooling fan. 2. CPU_FAN1 supports - MSI MS-7222-020 | User Guide - Page 30
MS-7222 Micro-ATX Mainboard Hard Disk Connectors: IDE1, IDE2 The mainboard has one 32-bit Ultra DMA 66/100 IDE controller integrated in ICH6, which supports PIO & Bus Master operation modes and it can connect up to two Ultra ATA drives. IDE2 IDE1 IDE1 (Primary IDE Connector) IDE1 can connect a - MSI MS-7222-020 | User Guide - Page 31
of this mainboard supports two serial ATA connectors SATA1, SATA2. SATA1, SATA2 are dual high-speed Serial ATA interface ports. Each supports 1st ATA ports Take out the dust cover and connect to the hard disk devices MSI Reminds You... Please do not fold the serial ATA cable in a 90-degree angle - MSI MS-7222-020 | User Guide - Page 32
MS-7222 Micro-ATX Mainboard Front Panel Connectors: JFP1 The mainboard provides one front panel connector for electrical connection to the front panel switches and LEDs. JFP1 is compliant with Intel® Front Panel I/O Connectivity Design Guide for CD-ROM and AUX audio connector. L GND R CD_IN1 2-16 - MSI MS-7222-020 | User Guide - Page 33
audio connector allows you to connect to the front panel audio and is compliant with Intel® Front Panel I/O Connectivity Design Guide audio signal to front panel 10 AUD_RET_L Left channel audio signal return from front panel MSI Reminds You... If you don't want to connect to the front audio - MSI MS-7222-020 | User Guide - Page 34
MS-7222 Micro-ATX Mainboard Front USB Connectors: JUSB1 & JUSB2 The mainboard provides two standard USB 2.0 pin Key (no pin) 8 GND 10 USBOC Connected to JUSB1 or JUSB2 USB 2.0 Bracket (Optional) MSI Reminds You... Note that the pins of VCC and GND must be connected correctly, or itmay cause - MSI MS-7222-020 | User Guide - Page 35
Hardware Setup IEEE 1394 Connectors (optional): 1394_J2/ 1394_J3 The mainboard provides two 1394 pin headers that allows you to connect IEEE 1394 ports via an external IEEE1394 bracket (optional). 9 1 10 2 1394_J2,1394_J3 Connected to 1394 - MSI MS-7222-020 | User Guide - Page 36
MS-7222 Micro-ATX Mainboard Jumpers The motherboard provides the following jumpers for you to set the computer's function. This section will explain how to change your motherboard's function through the use of jumpers. Clear CMOS Jumper: JBAT2 There is a CMOS RAM on board that has a power supply - MSI MS-7222-020 | User Guide - Page 37
Slots The mainboard provides one -bit channel for the graphics controller to directly access main memory. The slot supports 8x/4x AGP card. AGP Slot PCI (Peripheral Component for the expansion card, such as jumpers, switches or BIOS configuration. PCI Slots PCI Interrupt Request Routing The IRQ - MSI MS-7222-020 | User Guide - Page 38
the memory count. It is usually in the format: example: A7222IMS 12.0 102305 where: 1st digit refers to BIOS maker as A=AMI(R); W=AWARD(R) 2nd - 5th digit refers to the model number. 6th digit refers to the chipset vendor. 7th-8th digit refers to the customer, MS=all standard customers. V2.0 refers - MSI MS-7222-020 | User Guide - Page 39
MS-7222 Micro-ATX Mainboard Entering Setup Power on the computer and the system will start POST ( preset Optimal Defaults of the BIOS setup program provide optimal performance settings for all devices and the system. MSI Reminds You... The items under each BIOS category described in this chapter - MSI MS-7222-020 | User Guide - Page 40
Use this menu for basic system configurations, such as time, date etc. Advanced BIOS Features Use this menu to setup the items of AMI® special enhanced features. Advanced entry appears if your system supports PnP/PCI. H/W Monitor This entry shows the status of your CPU, fan, warning for overall system - MSI MS-7222-020 | User Guide - Page 41
MS-7222 Micro-ATX Mainboard Load Optimized Defaults Use this menu to load the default values set by the mainboard manufacturer specifically for optimal performance of the mainboard. BIOS Setting Password Use this menu to set the password for BIOS. Save & Exit Setup Save changes to CMOS and exit - MSI MS-7222-020 | User Guide - Page 42
BIOS Setup Standard CMOS Features The items in Standard CMOS Features Menu includes some The format is . day Day of the week, from Sun to Sat, determined by BIOS. Read only. month The month from Jan. through Dec. date The date from 1 to 31 can be keyed by numeric function - MSI MS-7222-020 | User Guide - Page 43
MS-7222 Micro-ATX Mainboard DMA Mode This item allows you to enable or disable the DMA (Direct Memory Memory/BIOS Version This item shows the memory status and BIOS version of your system (read only). **CPU Information** Genuine Intel (R)/CPU ID/uCode ID/CPU Frequency The three items show the CPU - MSI MS-7222-020 | User Guide - Page 44
BIOS Features BIOS Setup Quick Booting Setting the item to [Enabled] allows the system to boot within 5 seconds since it will skip some check items. Setting options: [Enabled], [Disabled]. CPU as two logical processors that can execute instructions simultaneously. In this way, the system - MSI MS-7222-020 | User Guide - Page 45
MS-7222 Micro-ATX Mainboard MSI Reminds You... Enabling the functionality of Hyper-Threading Technology for your com- puter system requires ALL of the following platform Components: * CPU: An Intel® Pentium® 4 Processor with HT Technology; * Chipset: An Intel® Chipset that supports HT - MSI MS-7222-020 | User Guide - Page 46
BIOS Setup Advanced Chipset Features MSI Reminds You... Change these settings only if you are familiar with the 333 [6:5], DDR 400 [1:1], DDR 433, DDR 450, DDR 466, DDR 500, DDR 533. MSI Reminds You... The value plus a ratio (CPU: DDR) with parentheses means the nonsynchronous overclocking. 3-9 - MSI MS-7222-020 | User Guide - Page 47
MS-7222 Micro-ATX Mainboard DRAM Timing Selects whether DRAM timing is controlled by the SPD (Serial Presence Detect) EEPROM on the DRAM module. Setting to [Auto By SPD] enables the following fields automatically to be determined by BIOS based on the configurations on the SPD. Selecting [Manual] - MSI MS-7222-020 | User Guide - Page 48
BIOS Setup RAM can be allocated to AGP for video purposes. The aperture is a portion of the PCI memory address range dedicated to graphics memory 3.0 card supports it. Setting options: [8x], [4x]. AGP Driving Control This field is used to adjust the AGP driving force. Selecting [Manual] allows you - MSI MS-7222-020 | User Guide - Page 49
MS-7222 Micro-ATX Mainboard AGP Driving Value This item specifies an AGP driving force. AGP Fast Write The item enables or disables the AGP Fast Write feature. The Fast Write technology allows CPU to write directly into the graphics controller without passing anything through system memory and - MSI MS-7222-020 | User Guide - Page 50
BIOS Setup VLink 8X Supported This item enables or disables the 8X VLink Data Rate. Setting options: [Enabled], [Disabled]. DRDY_Timing This item allows you to set the DRDY timing. Setting options: [Slowest], [Default], [Optimize]. 3-13 - MSI MS-7222-020 | User Guide - Page 51
MS-7222 Micro-ATX Mainboard Integrated Peripherals VIA OnChip PCI Device Press and the following sub-menu appears. USB Controller This setting is used to enable/disable the onboard USB host controller. Setting options: [Disabled], [Enabled]. USB Device Legacy Support Set to [Enabled] if you - MSI MS-7222-020 | User Guide - Page 52
driver installed, such as DOS and SCO Unix. Set to [Disabled] only if you want to use any USB device other than the USB mouse. Setting options: [Disabled], [Enabled]. Onboard AC97 Controller This item is used to enable or disable the onboard Audio controller. Selecting [Enabled] allows the mainboard - MSI MS-7222-020 | User Guide - Page 53
MS-7222 Micro-ATX Mainboard I/O Devices Configuration Press to enter the sub-menu and the following message will be displayed on the screen: "EPP Mode Select." At this time either [EPP 1.7] spec or [EPP 1.9] spec can be chosen. ECP Mode Use DMA The ECP mode has to use the DMA channel, so - MSI MS-7222-020 | User Guide - Page 54
allows BIOS to call VGA BIOS to initialize the VGA card when system wakes up (resumes) from S3 sleep state. The system resume time is shortened when you disable the function, but system will need an AGP driver to initialize the VGA card. Therefore, if the AGP driver of the card does not support the - MSI MS-7222-020 | User Guide - Page 55
MS-7222 Micro-ATX Mainboard Suspend Time Out (Minute) If system activity is not detected for the length of time specified in this field, all devices except CPU will be shut off. Settings: [Disabled], [1], [2], [4], [8], [10], [20 the system from S3 (Suspend to RAM) sleep state. Setting options: [ - MSI MS-7222-020 | User Guide - Page 56
BIOS Setup Resume From S3 By PS/2 Mouse This setting only works Resume From S3 By PS/2 KB is set to [Hot Key]. This setting determines - MSI MS-7222-020 | User Guide - Page 57
MS-7222 Micro-ATX Mainboard PNP/PCI Configurations This section describes configuring the PCI bus system and PnP (Plug & Play) feature. PCI, or Peripheral Component Interconnect, is a system which allows I/O devices to operate at speeds nearing the speed the CPU . Setting options: [0]~ [255]. 3-20 - MSI MS-7222-020 | User Guide - Page 58
Press and the following sub-menu appears. BIOS Setup IRQ 3/4/5/7/9/10/11/14/15 These items specify the an IRQ from the pool of available IRQs passed to devices that are configurable by the system BIOS. The available IRQ pool is determined by reading the ESCD NVRAM. If more IRQs must be - MSI MS-7222-020 | User Guide - Page 59
MS-7222 Micro-ATX Mainboard H/W Monitor This section shows the status of your CPU, fan, overall system status, etc. Monitor function is available only if there is hardware monitoring mechanism onboard. CPU Shutdown Temperature If the CPU temperature reaches the upper limit preset in this setting, - MSI MS-7222-020 | User Guide - Page 60
Press and the following sub-menu appears. BIOS Setup CPU/System Temperature, CPU/System FAN Speed, CPU Vcore, 12V, 5V, 5V SB, 3.3V These items display the current status of all of the monitored hardware devices/ components such as CPU voltages, temperatures and all fans' speeds. 3-23 - MSI MS-7222-020 | User Guide - Page 61
MS-7222 Micro-ATX Mainboard Load Optimized Defaults The two options on the main menu allow users to restore all of the BIOS settings to the Optimized values. The Optimized Defaults are the default values set by the mainboard manufacturer specifically for optimal performance of the mainboard. When - MSI MS-7222-020 | User Guide - Page 62
Chapter 2. Hardware Setup Introduction to Realtek ALC655 The motherboard is equipped with Realtek ALC655 chip, which provides support for 6-channel audio output, including 2 Front, 2 Rear, 1 Center and 1 Subwoofer channel. ALC655 allows the board to attach 4 or 6 speakers for better surround sound - MSI MS-7222-020 | User Guide - Page 63
MS-7222 Micro-ATX Mainboard Installing the Audio Driver You need to install the driver for Realtek ALC655 chip to function properly before you can get access to 4-/6-channel audio operations. Follow the procedures described below to install the drivers for different operating systems. Installation - MSI MS-7222-020 | User Guide - Page 64
Introduction to Realtek ALC655 3. Click Next to start installing files into the system. 4. Click Finish to restart the system. Select this option 4-3 - MSI MS-7222-020 | User Guide - Page 65
MS-7222 Micro-ATX Mainboard Using 4- or 6-Channel Audio Function After installing the audio driver, you are able to use the 4-/6-channel audio feature now. To enable 4- or 6-channel audio operation, first connect 4 or 6 speakers to the appropriate audio connectors, and then select 4- or 6-channel - MSI MS-7222-020 | User Guide - Page 66
Introduction to Realtek ALC655 3 2 4 5 6 4-5 - MSI MS-7222-020 | User Guide - Page 67
MS-7222 Micro-ATX Mainboard Connecting the Speakers When you have set the Multi-Channel Audio Function mode properly in the software utility, connect your speakers to the correct phone jacks in accordance with the setting in software utility. n 2-Channel Mode - MSI MS-7222-020 | User Guide - Page 68
to Realtek ALC655 n 4-Channel Mode for 4-Speaker Output The audio jacks on the back panel always provide 2-channel analog audio output function, however these audio jacks can be transformed to 4- or 6channel analog audio jacks by selecting the corresponding multi-channel operation from No. of - MSI MS-7222-020 | User Guide - Page 69
MS-7222 Micro-ATX Mainboard n 6-Channel Mode for 6-Speaker Output Refer to the following function when 4-Channel Mode for 6-Speaker Output is 1 selected. MSI Reminds You... If the Center and Subwoofer speaker exchange their audio channels when you play video or music on the computer, a - MSI MS-7222-020 | User Guide - Page 70
the bad speakers with good ones. Testing Each Speaker 1. Click the audio icon screen. from the window tray at the lower-right corner of by clicking it. Front Left Center Front Right Rear Right Rear Left Subwoofer MSI Reminds You... 6 speakers appear on the "Speaker Test" window only when - MSI MS-7222-020 | User Guide - Page 71
MS-7222 Micro-ATX Mainboard 4. While you are testing the speakers in 6-Channel Mode, if the sound coming from the center speaker and subwoofer is swapped, you should select Swap Center/ Subwoofer Output to readjust these two channels. Select this function 4-10 - MSI MS-7222-020 | User Guide - Page 72
remove human voice (lyrics) and leave melody for you to sing the song. Note that this function applies only for 2-channel audio operation. Playing KaraOK 1. Click the audio icon screen. from the window tray at the lower-right corner of the 2. In the Sound Effect tab, select Voice Cancellation - MSI MS-7222-020 | User Guide - Page 73
the ATA interface. SATA hard drives Audio Function deliver blistering transfer speeds of BIOS) 10. Supports hot-swap failed disk drive in RAID 1 array. 11. ATA SMART function support. 12. Microsoft Windows 98, Me, NT4.0, 2000, XP operating systems support. 13. Event log for easy troubleshooting - MSI MS-7222-020 | User Guide - Page 74
MS-7222 Micro-ATX Mainboard Introduction This section gives a brief introduction on the RAID-related background knowledge and a brief introduction on VIA SATA RAID Host Controller. For users wishing to install their VIA SATA RAID driver and RAID software, proceed to Driver does not support fault - MSI MS-7222-020 | User Guide - Page 75
the system powers on during the POST (Power-On Self Test) process, press key to enter the BIOS configuration. The Serial ATA RAID volume may be configured using the VIA Tech. RAID BIOS. Always use the arrow keys to navigate the main menu, use up and down arrow key to select - MSI MS-7222-020 | User Guide - Page 76
MS-7222 Micro-ATX Mainboard Create Disk Array Use the up and down arrow keys to select the Create Array command and press . MSI Reminds You... The "Channel", Create only or Create and duplicate. Create only will allow BIOS to only create an array. The data on the mirroring drive may be - MSI MS-7222-020 | User Guide - Page 77
, there are two methods to create a disk array. One method is "Auto Setup" and the other one is "Select Disk Drives". Auto Setup allows BIOS to select the disk drives and create arrays automatically, but it does not duplicate the mirroring drives even if the user selected Create and duplicate - MSI MS-7222-020 | User Guide - Page 78
MS-7222 Micro-ATX Mainboard MSI Reminds You... Even though 64KB is the recommended setting for most users, you should choose the block size value which is best suited to your - MSI MS-7222-020 | User Guide - Page 79
VIA VT8237R/ VT8237R Plus SATA RAID Introduction Create and Delete Spare Hard Drive If a RAID 1 array is created and there are drives that do not belong to other arrays, the one that has a capacity which is equal to or greater than the array capacity can be selected as a spare drive for the RAID 1 - MSI MS-7222-020 | User Guide - Page 80
MS-7222 Micro-ATX Mainboard Duplicate Critical RAID 1 Array When booting up the system, BIOS will detect if the RAID 1 array has any inconsistencies between user data and backup data. If BIOS detects any inconsistencies, the status of the disk array will be marked as critical, and BIOS will prompt - MSI MS-7222-020 | User Guide - Page 81
good one. If your computer does not support APM, you must turn off your computer manually. After replacing the hard drive, boot into BIOS and select Choose replacement drive and rebuild to hard drive. 4. Continue to boot: This item enables BIOS to skip the problem and continue booting into OS. 5-9 - MSI MS-7222-020 | User Guide - Page 82
MS-7222 Micro-ATX Mainboard Installing RAID Software & Drivers Install Driver in Windows OS † New Windows OS (2000/XP/NT4) Installation The following details the installation of the drivers while installing Windows XP. 1. Start the installation: Boot from the CD-ROM. Press F6 when the message "Press - MSI MS-7222-020 | User Guide - Page 83
that enables high-performance RAID 0 arrays in the Windows* XP operating system. This version of VIA SATA RAID Driver contains the following key features: † Serial ATA RAID driver for Windows XP † VIA SATA RAID utility † RAID0 and RAID1 functions Insert the MSI CD and click on the VIA SATA/IDE RAID - MSI MS-7222-020 | User Guide - Page 84
MS-7222 Micro-ATX Mainboard Put a check mark in the check box to install the feature you want. Then click Next button to proceed the installation. Finally, click "Finish" to complete the installation. 5-12 - MSI MS-7222-020 | User Guide - Page 85
VIA VT8237R/ VT8237R Plus SATA RAID Introduction Using VIA RAID Tool Once the installation is complete, go to Start ---> Programs --->VIA ---> RAID ---> raid_tool.exe to enable VIA RAID Tool. After the software is finished installation, it will automati- cally started every time Windows is - MSI MS-7222-020 | User Guide - Page 86
MS-7222 Micro-ATX Mainboard Click on or button to determine the viewing type of left window pane. There are two viewing types: By controllers and by device. Click on - MSI MS-7222-020 | User Guide - Page 87
VIA VT8237R/ VT8237R Plus SATA RAID Introduction You may also use the same --RAID 1. or button to view the statuses of Array 0- Click on the plus (+) symbol next to Array 0---RAID 1 to see the details of each disk. 5-15
-
 1
1 -
 2
2 -
 3
3 -
 4
4 -
 5
5 -
 6
6 -
 7
7 -
8
-
9
-
10
-
11
-
12
-
13
-
14
-
15
-
16
-
17
-
18
-
19
-
20
-
21
-
22
-
23
-
24
-
25
-
26
-
27
-
28
-
29
-
30
-
31
-
32
-
33
-
34
-
35
-
36
-
37
-
38
-
39
-
40
-
41
-
42
-
43
-
44
-
45
-
46
-
47
-
48
-
49
-
50
-
51
-
52
-
53
-
54
-
55
-
56
-
57
-
58
-
59
-
60
-
61
-
62
-
63
-
64
-
65
-
66
-
67
-
68
-
69
-
70
-
71
-
72
-
73
-
74
-
75
-
76
-
77
-
78
-
79
-
80
-
81
-
82
-
83
-
84
-
85
-
86
-
87
 |
 |
G52-72221X1
MS-7222 (v1.X) Micro-ATX Mainboard
PM8PM