MSI MS-7222-020 User Guide - Page 78
Delete Disk Array
 |
View all MSI MS-7222-020 manuals
Add to My Manuals
Save this manual to your list of manuals |
Page 78 highlights
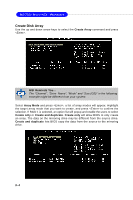
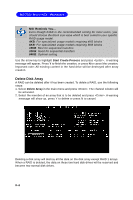
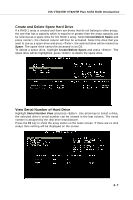
MS-7222 Micro-ATX Mainboard MSI Reminds You... Even though 64KB is the recommended setting for most users, you should choose the block size value which is best suited to your specific RAID usage model. 4KB: For specialized usage models requiring 4KB blocks 8KB: For specialized usage models requiring 8KB blocks 16KB: Best for sequential transfers 32KB: Good for sequential transfers 64KB: Optimal setting Use the arrow key to highlight Start Create Process and press . A warning message will appear, Press Y to finish the creation, or press N to cancel the creation. Important note: All existing content in the hard drive will be destroyed after array creation. Delete Disk Array A RAID can be deleted after it has been created. To delete a RAID, use the following steps: 1. Select Delete Array in the main menu and press . The channel column will be activated. 2. Select the member of an array that is to be deleted and press . A warning message will show up, press Y to delete or press N to cancel. Deleting a disk array will destroy all the data on the disk array except RAID 1 arrays. When a RAID is deleted, the data on these two hard disk drives will be reserved and become two normal disk drives. 5-6
-
 1
1 -
2
-
3
-
4
-
5
-
6
-
7
-
8
-
9
-
10
-
11
-
12
-
13
-
14
-
15
-
16
-
17
-
18
-
19
-
20
-
21
-
22
-
23
-
24
-
25
-
26
-
27
-
28
-
29
-
30
-
31
-
32
-
33
-
34
-
35
-
36
-
37
-
38
-
39
-
40
-
41
-
42
-
43
-
44
-
45
-
46
-
47
-
48
-
49
-
50
-
51
-
52
-
53
-
54
-
55
-
56
-
57
-
58
-
59
-
60
-
61
-
62
-
63
-
64
-
65
-
66
-
67
-
68
-
69
-
70
-
71
-
72
-
 73
73 -
 74
74 -
 75
75 -
 76
76 -
 77
77 -
 78
78 -
 79
79 -
 80
80 -
 81
81 -
 82
82 -
 83
83 -
84
-
85
-
86
-
87
 |
 |
