Marantz SR4400 User Guide - Page 19
Speaker Setup
 |
View all Marantz SR4400 manuals
Add to My Manuals
Save this manual to your list of manuals |
Page 19 highlights
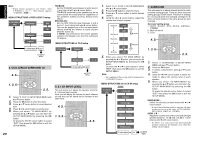
ENGLISH Notes: • When a DTS-LD or DTS-CD is playing, this setup is not available. This is to avoid noise being generated from the analog input. • If "Dx-AUTO" is selected and a DVD, compact disc or LD is fast forwarded during playback, decoded signals may produce a skipping sound. In such cases, change the setting to DIGITAL. • Same digital input function cannot be set. In this case, the previous setting is set to ANALOG. Same digital input number cannot be set in Digital AUTO mode and Digital Fixed mode. For example, D1AUTO and DIG.1 are not set at same time. 2. SPEAKER SETUP After you have installed the SR4400, connected all the components, and determined the speaker layout, it is now time to perform the settings in the Speaker Setup menu for the optimum sound acoustics for your environment and speaker layout. Before you perform the following settings, it is important that you first determine the following characteristics: SPEAKER SIZE When setting the speaker size in the SPEAKER SIZE sub-menu, use the guidelines given below. Large: The complete frequency range for the channel you are setting will be output from the speaker. Small: Frequencies of the channel you are setting lower than approx. 100Hz will be output from the subwoofer. If the Subwoofer is set to "NONE" and the front speakers are set to "Large," then the sound may be output from both the left and right speakers. 4. 6. AUX TV VOL. SLEEP AMP MUTE MAIN VOL. 1. 3. 5. OSD MENU OK SETUP/ T.TONE S-DIRECT AUTO 1 NIGHT CSII 4 MENU OFF DTS 2 3 EX/ES DSP 5 6 2. 6. 1. Select "2.SPEAKER" in SETUP MAIN MENU with or cursor button, 2. Press the OK button to enter the menu. The first sub-menu item is "Speaker Size" setup. 3. Press or cursor button to select the each speaker. 4. Press or cursor button to select the setting of size to each speaker. 5. If you finish these setup, press the or cursor button to select "NEXT". 6. Press the OK button to enter the next "Speaker Distance" setup. Or press the or cursor button to select "EXIT" then press the OK button to exit the SETUP MENU. Or press the or cursor button to select "TO MAIN MENU" then press the OK button to return the SETUP MAIN MENU. MENU STRUCTURE of Speaker Size setup Speaker Size 2.SPEAKER Speaker Size setup SUBW YES Select when a subwoofer is connected. NONE Select when a subwoofer is not connected. SPEAKER DISTANCE Use this parameter to specify the distance of each speaker's position from the listening position. The delay time is automatically calculated according to these distances. Begin by determining the ideal or most commonly used seating position in the room. This is important for the timing of the acoustics to create the proper sound space that the SR4400 and today's sound systems are able to produce. Note that the speakers that you selected "None" for in the Speaker Config sub-menu will not appear here. AUX AMP 3. 5. TV VOL. SLEEP MUTE MAIN VOL. 2. 4. OSD MENU OK L & R CENTER SL & SR SURR.B SMALL LARGE SMALL LARGE NONE SMALL LARGE NONE YES NONE Select if the front speakers are small sized. Select if the front speakers are large sized. Select if the center speaker is small sized. Select if the center speaker is large sized. Select if no center speaker is connected. Select if the surround left and right speakers are small sized. Select if the surround left and right speakers are large sized. Select if no surround left and right speakers are connected. Select when a surround back speaker is connected. Select when a surround back speaker is not connected. SETUP/ T.TONE S-DIRECT AUTO 1 MENU OFF DTS 2 3 5. NIGHT CSII EX/ES DSP 1. 4 5 6 Enter to the "Speaker Distance setup" from the previous "Speaker Size setup". 2. Press or cursor button to select the each speaker. 3. Press or cursor button to set the distance from your listening position for each speaker. 4. After finishing the Speaker Distance setup, press the or cursor button to select "NEXT". 5. Press the OK button to enter the next "Speaker Level" setup. Or press the or cursor button to select "EXIT" then press the OK button to exit the SETUP MENU. Or press the or cursor button to select "TO MAIN MENU" then press the OK button to return the SETUP MAIN MENU. Or press the or cursor button to select "RETURN" then press the OK button to return the previous "Speaker Distance" setup. NEXT EXIT TO MAIN MENU Speaker Distance setup exit SETUP MENU MAIN MENU 17
-
 1
1 -
2
-
3
-
4
-
5
-
6
-
7
-
8
-
9
-
10
-
11
-
12
-
13
-
 14
14 -
 15
15 -
 16
16 -
 17
17 -
 18
18 -
 19
19 -
 20
20 -
 21
21 -
 22
22 -
 23
23 -
 24
24 -
25
-
26
-
27
-
28
-
29
-
30
-
31
-
32
-
33
-
34
-
35
-
36
 |
 |
