Maytag MGC5536BDS Installation Manual - Page 12
Holding, To Countertop, To Remove, Cooktop, Servicing, Service-Parts, Information
 |
View all Maytag MGC5536BDS manuals
Add to My Manuals
Save this manual to your list of manuals |
Page 12 highlights
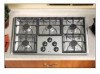
Holding Unit Down To Countertop To hold the cooktop to the counter top, two hold down brackets have been provided. Utilize the hold-down brackets, one on the left and one on the right side of unit to secure the unit to the counter top. Additional hold-down brackets may be added to the front and/or rear. Contact your dealer or authorized service agency. Position the cooktop in the cutout opening. Open cabinet doors and locate screw holes at right and left side of unit bottom. Holes are half way between front and rear of unit and approximately 1 114" from each side. Thread the long hold-down screws into the hold-down brackets. Tighten hold-down screws to snug the unit top down against the counter top. See figures 18 and 19. Do not overtighten. FIGURE 18 BURNER BOX BRACKET SCREW FIGURE 19 How To Remove Cooktop For Servicing Follow this procedure to remove the cooktop for servicing: 1. Shut off gas supply to the cooktop. 2. Disconnect electrical supply to appliance, if equipped. 3. Disconnect gas supply tubing to appliance. 4. Remove hold down brackets. (See figure 19). 5. Reverse the procedure to reinstall. If gas line has been disconnected, check for gas leaks after reconnection. NOTE: A qualified servicer should disconnect and reconnect the gas supply. The servicer MUST follow installation instructions provided with the gas appliance connector and the warning label attached to the connector. Service-Parts Information When your cooktop requires service or replacement parts, contact your dealer or authorized service agency. Please give the complete model and serial numbers of the unit located on the cooktop model number plate. 12
-
 1
1 -
2
-
3
-
4
-
5
-
6
-
 7
7 -
 8
8 -
 9
9 -
 10
10 -
 11
11 -
 12
12 -
 13
13 -
 14
14 -
 15
15 -
 16
16 -
 17
17 -
18
-
19
-
20
-
21
-
22
-
23
-
24
-
25
-
26
-
27
-
28
-
29
-
30
-
31
-
32
-
33
-
34
-
35
-
36
 |
 |
