Netgear PS121 PS121v2 Reference Manual - Page 19
Installation, Install the Print Server and Set up One PC - setup
 |
UPC - 606449034684
View all Netgear PS121 manuals
Add to My Manuals
Save this manual to your list of manuals |
Page 19 highlights
Installation NETGEAR USB Multifunction Printer Server PS121v2 User Manual First, install and set up the print server and a single PC. Then set up additional PCs to work with the print server. Note: For TCP/IP LPR printer installation, see "Installation for TCP/IP LPR Printing" on page 2-6 Install the Print Server and Set up One PC 1. Power on your computer, let the operating system boot up completely, and log in as needed. 2. Insert the Resource CD for the PS121v2 into your CD drive. The CD main page opens. 3. Click Install and Set Up the Print Server with This PC to start the installation wizard. Figure 2-2 Installation and Setup 2-3 v2.0, April 2007
-
 1
1 -
2
-
3
-
4
-
5
-
6
-
7
-
8
-
9
-
10
-
11
-
12
-
13
-
 14
14 -
 15
15 -
 16
16 -
 17
17 -
 18
18 -
 19
19 -
 20
20 -
 21
21 -
 22
22 -
 23
23 -
 24
24 -
25
-
26
-
27
-
28
-
29
-
30
-
31
-
32
-
33
-
34
-
35
-
36
-
37
-
38
-
39
-
40
-
41
-
42
-
43
-
44
-
45
-
46
-
47
-
48
-
49
-
50
-
51
-
52
 |
 |

NETGEAR USB Multifunction Printer Server PS121v2 User Manual
Installation and Setup
2-3
v2.0, April 2007
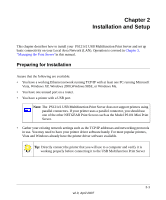
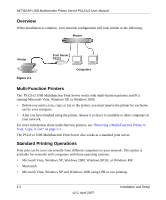
Installation
First, install and set up the print server and a single PC. Then set up additional PCs to work with
the print server.
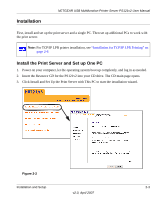
Install the Print Server and Set up One PC
1.
Power on your computer, let the operating system boot up completely, and log in as needed.
2.
Insert the
Resource CD
for the PS121v2 into your CD drive. The CD main page opens.
3.
Click Install and Set Up the Print Server with This PC to start the installation wizard.
Note:
For TCP/IP LPR printer installation, see
“Installation for TCP/IP LPR Printing” on
page 2-6
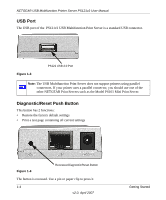
Figure 2-2