Netgear PS121 PS121v2 Reference Manual - Page 33
In the Printer Address field, type the IP address of the USB Multifunction Print Server., Generic - ps121v2 windows 8
 |
UPC - 606449034684
View all Netgear PS121 manuals
Add to My Manuals
Save this manual to your list of manuals |
Page 33 highlights
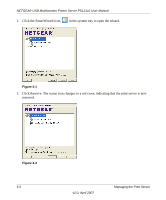
NETGEAR USB Multifunction Printer Server PS121v2 User Manual 5. If your printer model does not appear, click the Generic button. 6. Click OK to return to the Untitled 1 window. 7. In the LPR Printer Selection box, click Change... 8. In the Printer Address field, type the IP address of the USB Multifunction Print Server. You can leave the Queue Name blank. 9. Click Verify to make sure your computer can see the printer. You should see the IP address displayed above the button. If no IP Address appears, check that you have correctly typed the queue name or IP Address. 10. Click OK to return to the Untitled 1 window. 11. At the bottom of the Untitled 1 dialog box, click Create.... 12. When prompted, rename the printer with a descriptive name and click Save. A printer icon should now appear on your desktop. 13. Quit the Desktop Printer Utility. Installation and Setup v2.0, April 2007 2-17
-
 1
1 -
2
-
3
-
4
-
5
-
6
-
7
-
8
-
9
-
10
-
11
-
12
-
13
-
14
-
15
-
16
-
17
-
18
-
19
-
20
-
21
-
22
-
23
-
24
-
25
-
26
-
27
-
 28
28 -
 29
29 -
 30
30 -
 31
31 -
 32
32 -
 33
33 -
 34
34 -
 35
35 -
 36
36 -
 37
37 -
 38
38 -
39
-
40
-
41
-
42
-
43
-
44
-
45
-
46
-
47
-
48
-
49
-
50
-
51
-
52
 |
 |
