Netgear WNR2000v3 WNR2000v3 Setup Manual
Netgear WNR2000v3 - N300 Wireless Router Manual
 |
View all Netgear WNR2000v3 manuals
Add to My Manuals
Save this manual to your list of manuals |
Netgear WNR2000v3 manual content summary:
- Netgear WNR2000v3 | WNR2000v3 Setup Manual - Page 1
N300 Wireless Router WNR2000v3 Setup Manual NETGEAR, Inc. 350 E. Plumeria Drive San Jose, CA 95134 USA August 2010 208-10658-01 v1.0 - Netgear WNR2000v3 | WNR2000v3 Setup Manual - Page 2
, Inc. All rights reserved. Trademarks NETGEAR, NETGEAR genie, and the NETGEAR logo are trademarks of NETGEAR. Inc. Microsoft, Windows, and Windows NT are registered trademarks of Microsoft Corporation. Wi-Fi Protected Setup is a trademark of the Wi-Fi Alliance. Other brand and product names are - Netgear WNR2000v3 | WNR2000v3 Setup Manual - Page 3
Your Wireless Network 21 Setting Your SSID and Wireless Security 22 Using Push 'N' Connect (WPS) to Configure Your Wireless Network 23 Troubleshooting...26 Basic Setup Checklist ...26 Checking Basic Router Functions 27 Troubleshooting Login Problems 29 Checking the Internet Service Connection - Netgear WNR2000v3 | WNR2000v3 Setup Manual - Page 4
32 Using the Ping Utility to Troubleshoot 32 Testing the Path from Your Computer to Your Router 32 Testing the Path from a Computer to the Internet 33 Technical Specifications ...34 Default Configuration Settings 34 Restoring the Default Password and Configuration Settings 36 Related Documents - Netgear WNR2000v3 | WNR2000v3 Setup Manual - Page 5
: • The N300 Wireless Router • A snap-on stand for your wireless router • An AC power adapter (varies by region) • A yellow Ethernet cable • NETGEAR Installation Guide • The Resource CD, which includes: - The NETGEAR genie™ Installation Assistant (Autorun.exe) - A PDF version of this manual - A link - Netgear WNR2000v3 | WNR2000v3 Setup Manual - Page 6
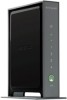
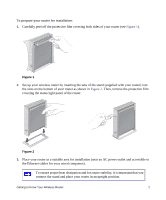
Carefully peel off the protective film covering both sides of your router (see Figure 1). Figure 1 2. Set up your wireless router by inserting the tabs of the stand (supplied with your router) into the slots on the bottom of your router as shown in Figure 2. Then, remove the protective film covering - Netgear WNR2000v3 | WNR2000v3 Setup Manual - Page 7
conditions. Table 1. Status Light Descriptions Label 1. Power Activity Solid Amber Solid Green Off Description The router is performing the power-on self-test diagnostic. The power is on and the router is ready. Power is not being supplied to the router. Getting to Know Your Wireless Router 3 - Netgear WNR2000v3 | WNR2000v3 Setup Manual - Page 8
Off 5. Push 'N' Connect Solid Green Off Description No IP address acquired. The wireless router has acquired an Internet address. No Ethernet cable is connected to the modem. The wireless interface is enabled. The wireless interface is turned off. The local port is connected to a 100 Mbps device - Netgear WNR2000v3 | WNR2000v3 Setup Manual - Page 9
Viewed from top to bottom, the rear panel contains the following elements: 1. Wireless On/Off button. 2. Restore factory settings button. Press for approximately 5 seconds to reset the router to the factory default settings. 3. Four Local Area Network (LAN) 10/100 Mbps Ethernet ports for connecting - Netgear WNR2000v3 | WNR2000v3 Setup Manual - Page 10
Label The label on the back of the wireless router shows the router's MAC address, serial number, security PIN, and factory default login information. 1. The ports on the router are color-coded to distinguish your Internet port from the other four ports that connect to the wired computer(s) on - Netgear WNR2000v3 | WNR2000v3 Setup Manual - Page 11
support staff. Corporate network settings or Virtual Private Network (VPN) client software might conflict with the default settings of a home router. If you are unsure about whether there might be a conflict, use a different computer. • Manual Setup: If you cannot or prefer not to use the NETGEAR - Netgear WNR2000v3 | WNR2000v3 Setup Manual - Page 12
the NETGEAR genie" on page 9). • The router includes an update feature that lets you check for and install updates. You must log in to the router to use this feature see "Setting Up Your Router for Internet Access" on page 17, or the online User Manual). Getting to Know Your Wireless Router 8 - Netgear WNR2000v3 | WNR2000v3 Setup Manual - Page 13
ISP. Using the NETGEAR genie The NETGEAR NETGEAR genie takes you through the procedure to connect your router, modem, and PC(s). It then helps you to configure your wireless settings and enable wireless security for your network. The NETGEAR genie guides you through the setup process by automating - Netgear WNR2000v3 | WNR2000v3 Setup Manual - Page 14
Access" on page 17, or the online User Manual). 3. Follow the remaining instructions and prompts. The NETGEAR genie guides you through installing your router, connecting your router to the Internet, configuring your wireless network settings, and selecting the optimum security protection for - Netgear WNR2000v3 | WNR2000v3 Setup Manual - Page 15
to change the settings after installing and configuring your router using the NETGEAR genie, you must open a browser window and log in to the router. You will also be prompted to check for new router firmware. For more information, see "Configuring Your Wireless Network" on page 21. Installing Your - Netgear WNR2000v3 | WNR2000v3 Setup Manual - Page 16
Service Provider (ISP). • The configuration information your ISP gave you. Depending on how your Internet account was set up, you might need the following information to set up your wireless router and access the Internet: - Host and domain name - Internet login name and password (frequently - Netgear WNR2000v3 | WNR2000v3 Setup Manual - Page 17
router. Then, skip to step 5 in the following procedure NETGEAR does not recommend or support adding a NETGEAR router behind another router, or replacing a gateway with a NETGEAR router. To connect the wireless router connect it to the router later. A B Figure 7 Manually Installing Your Router 13 - Netgear WNR2000v3 | WNR2000v3 Setup Manual - Page 18
your NETGEAR product. Securely insert one end of the Ethernet cable into your modem (C) and the other end into the Internet port of the wireless router on the router, such as port 4 (E), as shown in Figure 9. Internet A 1 2 E 3 4 Figure 9 7. Connect any additional wired PCs to your router by - Netgear WNR2000v3 | WNR2000v3 Setup Manual - Page 19
8. Review that your network is now set up (as shown in Figure 10); you are ready to start your network. Internet •• the end of the power adapter's cord into the wall or a power strip, and into the power adapter outlet of your wireless router (F). Wait 1 minute. Manually Installing Your Router 15 - Netgear WNR2000v3 | WNR2000v3 Setup Manual - Page 20
go to the Internet Explorer Tools menu, Internet Options, Connections tab and select "Never dial a connection." Verifying Your Connection Verify that your router is connected correctly by checking the wireless router status lights (as illustrated in Figure 12). Manually Installing Your Router 16 - Netgear WNR2000v3 | WNR2000v3 Setup Manual - Page 21
configuring your wireless router manually, you must log in to your wireless router to set it up initially and to make any changes to your wireless router's settings later. The factory default state is reset when you use the Restore Factory Settings button. See "Restoring the Default Password and - Netgear WNR2000v3 | WNR2000v3 Setup Manual - Page 22
not the same as any user name or password you might use to log in to your Internet connection. The Firmware Upgrade Assistant screen will display. 3. Click Yes to check for new firmware (recommended). The router will automatically check the NETGEAR database for a new firmware image file. If no new - Netgear WNR2000v3 | WNR2000v3 Setup Manual - Page 23
. If you need assistance, follow the Basic Settings Help screens on the router interface or see the online User Manual for this wireless router. For more information about configuring settings, see "Configuring Your Wireless Network" on page 21. 7. Click Apply to save your settings and complete - Netgear WNR2000v3 | WNR2000v3 Setup Manual - Page 24
the correct options and typed everything correctly. • Contact your ISP to verify that you have the correct configuration information. • Read "Troubleshooting" on page 26. If problems persist, register your NETGEAR product and contact NETGEAR Technical Support. Manually Installing Your Router 20 - Netgear WNR2000v3 | WNR2000v3 Setup Manual - Page 25
network and router. To configure the wireless network, you can either manually specify your network name (SSID) and your wireless security settings (see "Setting Your SSID and Wireless Security" on page 22) or, if the clients in your network are WPS capable, you can use Wi-Fi Protected Setup (WPS - Netgear WNR2000v3 | WNR2000v3 Setup Manual - Page 26
, check each wireless adapter to determine which wireless security option it supports. To set up basic wireless connectivity: 1. Log in to the Router by going to http://www.routerlogin.net or http://www.routerlogin.com and entering the default user name admin and default password password, or using - Netgear WNR2000v3 | WNR2000v3 Setup Manual - Page 27
'N' Connect (WPS) to Configure Your Wireless Network If your wireless clients support Wi-Fi Protected Setup (WPS), you can use this feature to connect the wireless client securely and easily to the router. Look for the symbol on your client device.1 NETGEAR's Push 'N' Connect feature is based on - Netgear WNR2000v3 | WNR2000v3 Setup Manual - Page 28
is in its default state), WPS automatically configures the SSID and wireless security settings for the router and then transmits these settings to the wireless device, such as a wireless PC. The first method is explained here. For more information on the second method, see the User Manual. If your - Netgear WNR2000v3 | WNR2000v3 Setup Manual - Page 29
For more information on setting up your wireless network and configuring your wireless security settings, see the User Manual. A link to the online User Manual is on your Resource CD. Configuring Your Wireless Network 25 - Netgear WNR2000v3 | WNR2000v3 Setup Manual - Page 30
Checklist to make sure that you have connected and set up your router correctly. If your basic setup is correct, then look for your problem in one of the subsequent sections. For more information, refer to the online User Manual. A link to this document is included on the Resource CD, and is also - Netgear WNR2000v3 | WNR2000v3 Setup Manual - Page 31
that you are using the power adapter supplied by NETGEAR for this product. If the error persists, you have a hardware problem and should contact technical support. • Power Light Blinks Green Slowly and Continuously. The router firmware is corrupted. To restore your firmware: Troubleshooting 27 - Netgear WNR2000v3 | WNR2000v3 Setup Manual - Page 32
.168.1.1. This procedure is explained in "Restoring the Default Password and Configuration Settings" on page 36. If the error persists, you might have a hardware problem and should contact technical support. • Internet Light Stays Amber. When the router is turned on, the Internet light turns amber - Netgear WNR2000v3 | WNR2000v3 Setup Manual - Page 33
Ethernet cables like the cable that was supplied with the wireless router. See "Connecting Your Wireless Router" on page 13 for instructions. For more information on WPS functionality and advanced features, see the online User Manual. Troubleshooting Login Problems If you are unable to log in to the - Netgear WNR2000v3 | WNR2000v3 Setup Manual - Page 34
that an IP address is shown for the Internet Port. If 0.0.0.0 is shown, your wireless router has not obtained an IP address from your service provider. If your router is unable to obtain an IP address from the your service provider, the problem might be one of the following: Troubleshooting 30 - Netgear WNR2000v3 | WNR2000v3 Setup Manual - Page 35
after several minutes, you might be using an incorrect service name, user name, or password. There also might be a provisioning problem with your ISP. Unless you connect manually, the wireless router will not authenticate using PPPoE until data is transmitted to the network. Troubleshooting 31 - Netgear WNR2000v3 | WNR2000v3 Setup Manual - Page 36
might not have the wireless router configured as its default gateway. Reboot the computer and verify that the wireless router address (192.168.1.1) is listed by your computer as the default gateway address. Using the Ping Utility to Troubleshoot Most computers and routers have a diagnostic utility - Netgear WNR2000v3 | WNR2000v3 Setup Manual - Page 37
the instructions in "Basic Setup Checklist" driver software and TCP/IP software are both installed and configured on your computer. - Verify that the IP addresses for your router your computer and the wireless router works correctly, test your router listed as the default gateway. Troubleshooting 33 - Netgear WNR2000v3 | WNR2000v3 Setup Manual - Page 38
for the N300 Wireless Router Model WNR2000v3. Table 2. Home Router Default Configuration Settings Feature Default Setting Router Login Router Login URL http://www. routerlogin.net; http://www.routerlogin.com; or http://192.168.1.1 Login Name (case sensitive) admin Login Password (case - Netgear WNR2000v3 | WNR2000v3 Setup Manual - Page 39
Table 2. Home Router Default Configuration Settings (continued) Feature Default Setting Wireless Wireless Communication SSID Name Security Broadcast SSID Enabled NETGEAR Disabled Enabled Transmission Speed Country/Region RF Channel Operating Mode Data Rate Autoa United States (North America - Netgear WNR2000v3 | WNR2000v3 Setup Manual - Page 40
Restoring the Default Password and Configuration Settings You can restore the factory default configuration settings that reset the router's user name to admin, the password to password, and the IP address to 192.168.1.1. This procedure will erase all the current configuration settings and restore - Netgear WNR2000v3 | WNR2000v3 Setup Manual - Page 41
provides links to reference documents that you can use to gain a more complete understanding of the technologies used in your NETGEAR product. Table 3. Related Documents Document Link Internet Networking and TCP/IP Addressing Preparing a Computer for Network Access Glossary http://documentation - Netgear WNR2000v3 | WNR2000v3 Setup Manual - Page 42
support service. Product updates and Web support are always available by going to: http://www.NETGEAR.com/support. Setup documentation is available on the CD, on the support website, and on the documentation website. When the wireless router in accordance with the instructions, may cause harmful
-
 1
1 -
 2
2 -
 3
3 -
 4
4 -
 5
5 -
 6
6 -
 7
7 -
8
-
9
-
10
-
11
-
12
-
13
-
14
-
15
-
16
-
17
-
18
-
19
-
20
-
21
-
22
-
23
-
24
-
25
-
26
-
27
-
28
-
29
-
30
-
31
-
32
-
33
-
34
-
35
-
36
-
37
-
38
-
39
-
40
-
41
-
42
 |
 |
August 2010
208-10658-01
v1.0
NETGEAR
, Inc.
350 E. Plumeria Drive
San Jose, CA 95134 USA
N300 Wireless Router
WNR2000v3 Setup
Manual