Netgear WNR2000v3 WNR2000v3 Setup Manual - Page 11
Installing Your Wireless Router, NETGEAR genie Setup, Manual Setup - vpn
 |
View all Netgear WNR2000v3 manuals
Add to My Manuals
Save this manual to your list of manuals |
Page 11 highlights
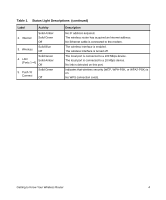
Installing Your Wireless Router To help you set up your router and get on the Internet quickly, the Resource CD contains a NETGEAR genie™ Installation Assistant. The Installation Assistant walks you through the steps required to connect your router, modem, and PC(s); configure your wireless settings; and enable wireless security for your network. When you have finished, you will be Internet ready! NETGEAR does not recommend or support adding a NETGEAR router behind another router, or replacing a gateway with a NETGEAR router. If you have a Linux system, you need to use the manual installation method (see "Manually Installing Your Router" on page 12). You can set up your wireless router using one of two methods: • NETGEAR genie Setup: The NETGEAR genie Installation Assistant setup is available on your Resource CD. See "Installing Your Router Using the NETGEAR genie" on page 9 to use the NETGEAR genie Installation Assistant. - This is the easiest option. The wizard guides you through the setup process. It automates many of the steps and verifies that the steps have been successfully completed. Before running the NETGEAR genie Installation Assistant on a corporate PC to set up your home router, check with your company's network support staff. Corporate network settings or Virtual Private Network (VPN) client software might conflict with the default settings of a home router. If you are unsure about whether there might be a conflict, use a different computer. • Manual Setup: If you cannot or prefer not to use the NETGEAR genie Installation Assistant, see "Manually Installing Your Router" on page 12. For example, if you are using a Linux operating system or are technically knowledgeable, select this option. If you choose to use this option and install your router manually, for best results, install and set up your router in this order: 1. Install and connect your wireless router to your network (see "Connecting Your Wireless Router" on page 13). 2. Set up your wireless router for Internet access (see "Setting Up Your Router for Internet Access" on page 17). 3. Configure your wireless network and select wireless security settings to protect your wireless network (see "Configuring Your Wireless Network" on page 21). Getting to Know Your Wireless Router 7
-
 1
1 -
2
-
3
-
4
-
5
-
 6
6 -
 7
7 -
 8
8 -
 9
9 -
 10
10 -
 11
11 -
 12
12 -
 13
13 -
 14
14 -
 15
15 -
 16
16 -
17
-
18
-
19
-
20
-
21
-
22
-
23
-
24
-
25
-
26
-
27
-
28
-
29
-
30
-
31
-
32
-
33
-
34
-
35
-
36
-
37
-
38
-
39
-
40
-
41
-
42
 |
 |