Nikon 29842-9425-19 D80 User's Manual - Page 105
Illumination All Modes
 |
UPC - 689466033342
View all Nikon 29842-9425-19 manuals
Add to My Manuals
Save this manual to your list of manuals |
Page 105 highlights
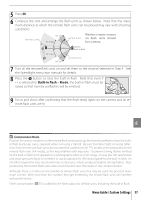
3 Position the subject in the center of the frame and press the shutter-release button halfway to focus. Check that the flash-ready indicator ( ) is displayed in the viewfinder. 4 Press the FUNC. button. The flash will emit a monitor preflash to determine the appropriate flash level. Flash output will be locked at this level and a flash-value lock icon will appear in the viewfinder. 5 Recompose the photograph. 6 Press the shutter-release button the rest of the way down to shoot. If desired, additional pictures can be taken without releasing FV lock. 7 Press the FUNC. button to release FV lock and confirm that the icon is no longer displayed in viewfinder. 17: Illumination (All Modes) If Off (the default option) is selected, the control panel backlight (LCD illuminator) will turn on only when the power switch is rotated to . If On is selected, the backlight will remain on while the exposure meters are active (note that this will increase the drain on the battery). Using FV Lock with Optional Speedlights FV lock is also available with SB-800, SB-600, and SB-R200 Speedlights (available separately). Set the Speedlight to TTL mode (the SB-800 can also be used in AA and A modes; see the Speedlight manual for details). While FV lock is in effect, flash output will automatically be adjusted for changes in Speedlight zoom head position. When Commander mode is selected for Custom Setting 22 (Built-in flash; 96), FV lock can be used with remote SB-800, SB-600, or SB-R200 flash units if (a) any of the built-in flash, flash group A, or flash group B is in TTL mode, or (b) a flash group is composed entirely of SB-800 Speedlights in TTL or AA mode. Using FV Lock with the Built-in Flash When the built-in flash is used alone, FV lock is only available if TTL (the default setting) is selected for Custom Setting 22 (Built-in flash; 95). Menu Guide / Custom Settings 93
-
 1
1 -
2
-
3
-
4
-
5
-
6
-
7
-
8
-
9
-
10
-
11
-
12
-
13
-
14
-
15
-
16
-
17
-
18
-
19
-
20
-
21
-
22
-
23
-
24
-
25
-
26
-
27
-
28
-
29
-
30
-
31
-
32
-
33
-
34
-
35
-
36
-
37
-
38
-
39
-
40
-
41
-
42
-
43
-
44
-
45
-
46
-
47
-
48
-
49
-
50
-
51
-
52
-
53
-
54
-
55
-
56
-
57
-
58
-
59
-
60
-
61
-
62
-
63
-
64
-
65
-
66
-
67
-
68
-
69
-
70
-
71
-
72
-
73
-
74
-
75
-
76
-
77
-
78
-
79
-
80
-
81
-
82
-
83
-
84
-
85
-
86
-
87
-
88
-
89
-
90
-
91
-
92
-
93
-
94
-
95
-
96
-
97
-
98
-
99
-
 100
100 -
 101
101 -
 102
102 -
 103
103 -
 104
104 -
 105
105 -
 106
106 -
 107
107 -
 108
108 -
 109
109 -
 110
110 -
111
-
112
-
113
-
114
-
115
-
116
-
117
-
118
-
119
-
120
-
121
-
122
-
123
-
124
-
125
-
126
-
127
-
128
-
129
-
130
-
131
-
132
-
133
-
134
-
135
-
136
-
137
-
138
-
139
-
140
-
141
-
142
-
143
-
144
-
145
-
146
-
147
-
148
-
149
-
150
-
151
-
152
-
153
-
154
-
155
-
156
-
157
-
158
-
159
-
160
-
161
-
162
 |
 |
