Oki B4300 Guide: User's B4200/B4300 - Page 23
B4300, Operator panel, Panel elements, setting for each menu item.
 |
View all Oki B4300 manuals
Add to My Manuals
Save this manual to your list of manuals |
Page 23 highlights
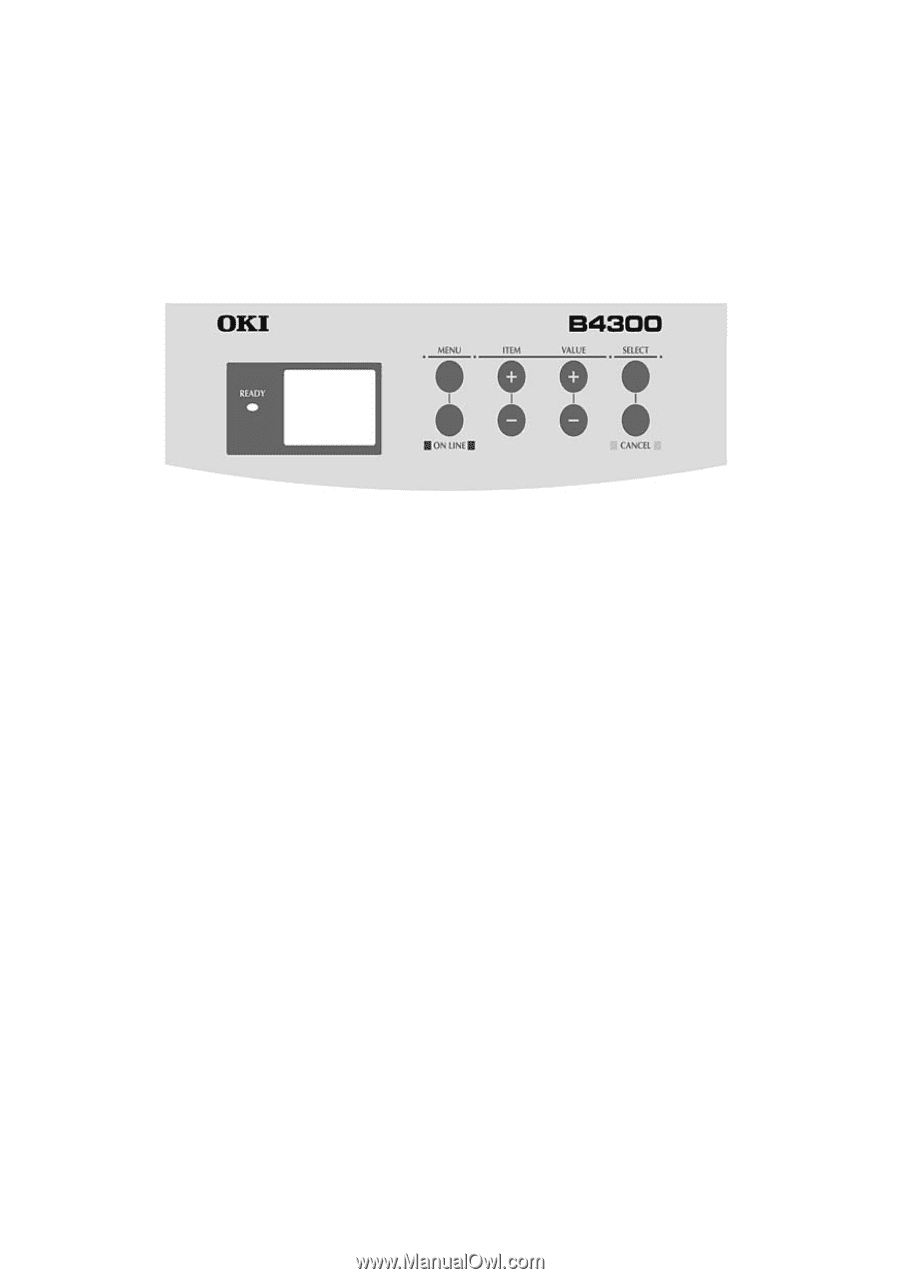
B4300 OPERATOR PANEL The B4300 operator panel consists of a menu driven control panel, an LCD display and a LED indicator. PANEL ELEMENTS 1. Ready indicator (green). ON - ready to receive data. FLASHING indicates processing data or error. 2. Liquid crystal display. (LCD) panel. Two rows of up to 8 alphanumeric digits displaying print status, menu items in menu mode and error messages. 3. Menu button. Press briefly to enter the MENU mode. Press briefly again to select the next menu. Press for more than 2 seconds to scroll through the different menus. 4. Item (+) button. Press briefly to scroll forward to the next menu item. 5. Value (+) button. Press briefly to scroll forward to the next value setting for each menu item. 6. Select button. Press briefly to select the menu, item or value indicated on the LCD panel. 7. Cancel button. Press to cancel a print job. 8. Value (-) button. Press briefly to scroll backward to the previous value setting for each menu item. OPERATOR PANELS > 23
-
 1
1 -
2
-
3
-
4
-
5
-
6
-
7
-
8
-
9
-
10
-
11
-
12
-
13
-
14
-
15
-
16
-
17
-
 18
18 -
 19
19 -
 20
20 -
 21
21 -
 22
22 -
 23
23 -
 24
24 -
 25
25 -
 26
26 -
 27
27 -
 28
28 -
29
-
30
-
31
-
32
-
33
-
34
-
35
-
36
-
37
-
38
-
39
-
40
-
41
-
42
-
43
-
44
-
45
-
46
-
47
-
48
-
49
-
50
-
51
-
52
-
53
-
54
-
55
-
56
-
57
-
58
-
59
-
60
-
61
-
62
-
63
-
64
-
65
-
66
-
67
-
68
-
69
-
70
-
71
-
72
-
73
-
74
-
75
-
76
-
77
-
78
-
79
-
80
-
81
-
82
-
83
-
84
-
85
-
86
-
87
-
88
-
89
-
90
 |
 |