Olympus C2040Z C-2040 Zoom Reference Manual - Page 165
Printing some images enlarged Trimmed print order
 |
UPC - 050332132382
View all Olympus C2040Z manuals
Add to My Manuals
Save this manual to your list of manuals |
Page 165 highlights
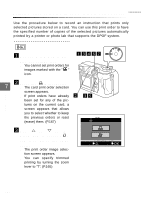
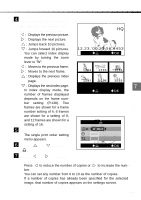
Printing some images enlarged (Trimmed print order) This function allows you to enlarge and print a portion of a picture. A/S/M P P Print settings 1 In the card order screen, select single print ordering and press the [OK] button. (P.162) q The print order image 246 OFF OWER/MOD 3 E DIAL selection screen appears. 2 Use the Arrow pad to display the picture for which you want to set the print order. : Displays the previous picture. : Displays the next picture. 1578 7 : Jumps back 10 pictures. : Jumps forward 10 pictures. 3 Turn the zoom lever to "T". q The trimming mode screen x5 HQ appears and the selected cursor is displayed in green. 4 Move the cursor to set the top left corner of the image you want to print. q Use and on the Arrow 12.23.'00 21:56 6453 CANCEL SET OK pad to move the cursor up and down, and and to move the cursor left and right. q Turning the zoom lever to "W" moves the cursor towards the top left corner. Turning the zoom lever to "T" moves the cursor towards the bottom Trimming mode screen right corner. 5 When you have set the cursor position, press the [OK] button. 165
-
 1
1 -
2
-
3
-
4
-
5
-
6
-
7
-
8
-
9
-
10
-
11
-
12
-
13
-
14
-
15
-
16
-
17
-
18
-
19
-
20
-
21
-
22
-
23
-
24
-
25
-
26
-
27
-
28
-
29
-
30
-
31
-
32
-
33
-
34
-
35
-
36
-
37
-
38
-
39
-
40
-
41
-
42
-
43
-
44
-
45
-
46
-
47
-
48
-
49
-
50
-
51
-
52
-
53
-
54
-
55
-
56
-
57
-
58
-
59
-
60
-
61
-
62
-
63
-
64
-
65
-
66
-
67
-
68
-
69
-
70
-
71
-
72
-
73
-
74
-
75
-
76
-
77
-
78
-
79
-
80
-
81
-
82
-
83
-
84
-
85
-
86
-
87
-
88
-
89
-
90
-
91
-
92
-
93
-
94
-
95
-
96
-
97
-
98
-
99
-
100
-
101
-
102
-
103
-
104
-
105
-
106
-
107
-
108
-
109
-
110
-
111
-
112
-
113
-
114
-
115
-
116
-
117
-
118
-
119
-
120
-
121
-
122
-
123
-
124
-
125
-
126
-
127
-
128
-
129
-
130
-
131
-
132
-
133
-
134
-
135
-
136
-
137
-
138
-
139
-
140
-
141
-
142
-
143
-
144
-
145
-
146
-
147
-
148
-
149
-
150
-
151
-
152
-
153
-
154
-
155
-
156
-
157
-
158
-
159
-
 160
160 -
 161
161 -
 162
162 -
 163
163 -
 164
164 -
 165
165 -
 166
166 -
 167
167 -
 168
168 -
 169
169 -
 170
170 -
171
-
172
-
173
-
174
-
175
-
176
-
177
-
178
-
179
-
180
-
181
-
182
-
183
-
184
-
185
-
186
-
187
-
188
-
189
-
190
-
191
-
192
-
193
-
194
-
195
-
196
-
197
-
198
-
199
-
200
-
201
-
202
-
203
-
204
-
205
-
206
-
207
-
208
-
209
-
210
-
211
-
212
-
213
-
214
-
215
-
216
-
217
-
218
-
219
-
220
-
221
-
222
-
223
-
224
 |
 |
