Optoma HD7100 User Manual - Page 18
Connecting the Projector to a Computer - projector manual
 |
UPC - 796435218140
View all Optoma HD7100 manuals
Add to My Manuals
Save this manual to your list of manuals |
Page 18 highlights
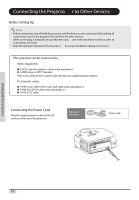
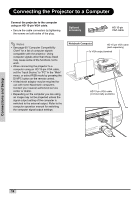
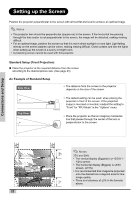
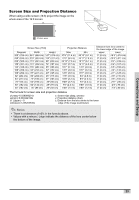
Connecting the Projector to a Computer Connect the projector to the computer using an HD 15-pin VGA cable. • Secure the cable connectors by tightening the screws on both sides of the plug. Optional accessory HD 15-pin VGA cable Notes • See page 60 "Computer Compatibility Chart" for a list of computer signals compatible with the projector. Using computer signals other than those listed may cause some of the functions not to work. • When connecting the projector to a computer using an HD 15-pin VGA cable, set the "Input Source" to "PC" in the "Main" menu, or select RGB mode by pressing the DVI/PC button on the remote control. • A Macintosh adaptor may be required for use with some Macintosh computers. Contact your nearest authorized service center or dealer. • Depending on the computer you are using, an image may not be projected unless the signal output setting of the computer is switched to the external output. Refer to the computer operation manual for switching the computer signal output settings. Notebook Computer HD 15-pin VGA cable (sold separately) To VGA output terminal DVI PC VIDEO S-VIDEO Y Pr/Cr Pb/Cb Y Pr/Cr Pb/Cb RS-232 Made in Taiwan WARNING DNDKDeooeoevnnnepoooratttitntudoslsiesueeaacrssththstaive0snem.ynu3btnoiflliboetajotenaitocen(tnay1sr0sctwlhoocarmmtostpeu), orgolanhofmersvnppientasnacatneieldxraacbtoiieeonbptnyjwte/mhetchoetoselniesnlsvtae.emexnntptvitloicarhottianhosmensmeissnluotcn.tostvilaetnrhdweynheihlaearvereesptslouabfcfjiienccgiet ntohtrleywlcaaomllo.ple. d down. HD 15-pin VGA cable (commercially available) DVI PC Y Pr/Cr Pb/Cb Made in Taiwan vitlcoiarhottiahnosemnsmeissnluotcn.tostvi laetnrhdwe ynheihl aearvreeesptsl oau bcf fijinecgci et the ntly lcaomople. d or wall. down. Connections and Setup 18
-
 1
1 -
2
-
3
-
4
-
5
-
6
-
7
-
8
-
9
-
10
-
11
-
12
-
 13
13 -
 14
14 -
 15
15 -
 16
16 -
 17
17 -
 18
18 -
 19
19 -
 20
20 -
 21
21 -
 22
22 -
 23
23 -
24
-
25
-
26
-
27
-
28
-
29
-
30
-
31
-
32
-
33
-
34
-
35
-
36
-
37
-
38
-
39
-
40
-
41
-
42
-
43
-
44
-
45
-
46
-
47
-
48
-
49
-
50
-
51
-
52
-
53
-
54
-
55
-
56
-
57
-
58
-
59
-
60
-
61
-
62
-
63
-
64
 |
 |
