Optoma HD7100 User Manual - Page 25
Projection from behind the screen - projector mount
 |
UPC - 796435218140
View all Optoma HD7100 manuals
Add to My Manuals
Save this manual to your list of manuals |
Page 25 highlights
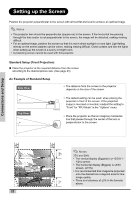
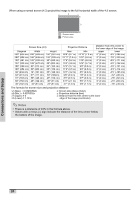
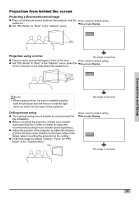
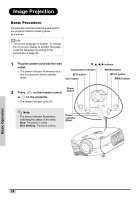
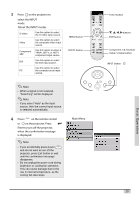
Connections and Setup Projection from behind the screen Projecting a Reversed/Inverted Image „ Place a translucent screen between the projector and the When using the default setting. audience. TOn-screen Display „ Set "PRJ Mode" to "Rear" in the "Options" menu. Projection using a mirror The image is reversed. „ Place a mirror (normal flat type) in front of the lens. When using the default setting. „ Set "PRJ Mode" to "Rear" in the "Options" menu, when the TOn-screen Display mirror is placed on the side where the audience is. Info • When using a mirror, be sure to carefully position both the projector and the mirror so that the light does not shine into the eyes of the audience. The image is reversed. Ceiling-mount setup „ The optional ceiling-mount bracket is recommended for this installation. „ Before mounting the projector, contact your nearest Authorized Service Center or Dealer to obtain the recommended ceiling-mount bracket (sold separately). „ Adjust the position of the projector to match the distance (Z) from the lens center position to the lower edge of the image, when mounting the projector on the ceiling. „ Invert the image by setting "Ceiling + Front" for "PRJ Mode" in the "Options Menu". When using the default setting. TOn-screen Display The image is reversed. 25
-
 1
1 -
2
-
3
-
4
-
5
-
6
-
7
-
8
-
9
-
10
-
11
-
12
-
13
-
14
-
15
-
16
-
17
-
18
-
19
-
 20
20 -
 21
21 -
 22
22 -
 23
23 -
 24
24 -
 25
25 -
 26
26 -
 27
27 -
 28
28 -
 29
29 -
 30
30 -
31
-
32
-
33
-
34
-
35
-
36
-
37
-
38
-
39
-
40
-
41
-
42
-
43
-
44
-
45
-
46
-
47
-
48
-
49
-
50
-
51
-
52
-
53
-
54
-
55
-
56
-
57
-
58
-
59
-
60
-
61
-
62
-
63
-
64
 |
 |
