Panasonic HVX200A Getting Started Guide - Page 5
Other Useful Camera Buttons/ Functions - user manual
 |
UPC - 791871303351
View all Panasonic HVX200A manuals
Add to My Manuals
Save this manual to your list of manuals |
Page 5 highlights
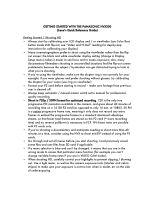
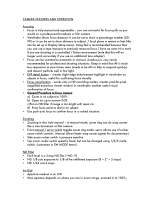
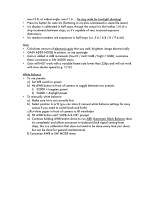
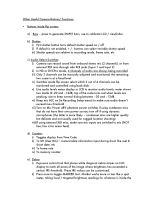
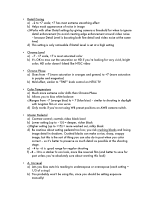
Other Useful Camera Buttons/ Functions: • Buttons inside flip screen: a) Bars - press to generate SMPTE bars, use to calibrate LCD / viewfinder b) Shutter: i) First shutter button turns default shutter speed on / off ii) If default is not enabled, + / - buttons can select variable shutter speed iii) Shutter speeds are relative to recording mode, frame rate, etc c) Audio Select Switches: i) Camera can record sound from onboard stereo mic (2 channels), or from external XLR mics through side XLR jacks (Input 1 and Input 2) ii) In HD or DVCPro mode, 4 channels of audio are always being recorded iii) Only 2 channels can be manually adjusted and monitored; the remaining two come in at a fixed level iv) Switches inside flip screen select which 2 out of 4 channels can be monitored and controlled using back dials v) Use audio levels meter display in LCD to monitor audio levels; meter shows two marks @ -20 and -12dB; top of the scale turns red when levels are peaking; aim to keep normal dialog between -20 and -12dB vi) Keep mic ALC on (in Recording Setup menu) to make sure audio doesn't exceed max threshold vii) Turn on Mic Power 48V phantom power switches if using condenser mics that do not have their own power source; turn off if using dynamic microphones (the latter is more likely - condenser mics are higher quality but delicate and not usually used for rugged location shooting) viii)If using external XLR mics, make sure mic inputs are switched to mic (NOT line; line is for mixer feed) d) Counter: i) Toggles display from Time Code ii) To UB (User Bits) = customizable information input during shoot like reel #, shoot date, etc iii) To frame rate iv) To memory counter e) Zebra i) Exposure control tool that places white diagonal zebra stripes on LCD display to mark all areas of the image where brightness has exceeded a certain IRE threshold. These IRE values can be customized. ii) Press once to toggle MARKER tool. Marker works more or less like a spot meter, taking local / targeted brightness readings for whatever is inside the
-
 1
1 -
 2
2 -
 3
3 -
 4
4 -
 5
5 -
 6
6 -
 7
7 -
 8
8 -
 9
9 -
 10
10 -
 11
11 -
12
-
13
-
14
 |
 |