Panasonic KXTG5243 5.8ghz Cdl Multi H/s - Page 62
Initial setting, Set answering, Set mailbox2&3, Mailbox2 :22, Mailbox Features
 |
View all Panasonic KXTG5243 manuals
Add to My Manuals
Save this manual to your list of manuals |
Page 62 highlights
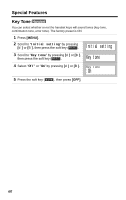
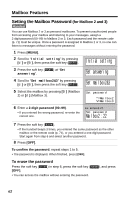
Mailbox Features Setting the Mailbox Password (for Mailbox 2 and 3) Handset You can use Mailbox 2 or 3 as personal mailboxes. To prevent unauthorized people from accessing your mailbox and listening to your messages, assign a 2-digit password (00-99) to Mailbox 2 or 3. Each password and the remote code (p. 71) must be unique. Once a password is assigned to Mailbox 2 or 3, no one can listen to messages without entering the password. 1 Press [MENU]. 2 Scroll to "Initial setting" by pressing [d] or [B], then press the soft key ( SELECT ). Initial setting 3 Press the soft key ( SELECT ) at "Set answering". Set answering Set mailbox2&3 4 Scroll to "Set mailbox2&3" by pressing [d] or [B], then press the soft key ( SELECT ). 5 Select the mailbox by pressing [B] (Mailbox 2) or [d] (Mailbox 3). Set password ^=Mailbox2 V=Mailbox3 6 Enter a 2-digit password (00-99). • If you entered the wrong password, re-enter the correct one. Ex. Entered 22. Set password Mailbox2 :22 7 Press the soft key ( SAVE ). • If the handset beeps 3 times, you entered the same password as the other mailbox or the remote code (p. 71), or you entered a one-digit password. Start again from step 6 and select another password. 8 Press [OFF]. To confirm the password, repeat steps 1 to 5. • The password is displayed. When finished, press [OFF]. To erase the password Press the soft key ( CLEAR ) in step 6, press the soft key ( SAVE ), and press [OFF]. • You can access the mailbox without entering the password. 62
-
 1
1 -
2
-
3
-
4
-
5
-
6
-
7
-
8
-
9
-
10
-
11
-
12
-
13
-
14
-
15
-
16
-
17
-
18
-
19
-
20
-
21
-
22
-
23
-
24
-
25
-
26
-
27
-
28
-
29
-
30
-
31
-
32
-
33
-
34
-
35
-
36
-
37
-
38
-
39
-
40
-
41
-
42
-
43
-
44
-
45
-
46
-
47
-
48
-
49
-
50
-
51
-
52
-
53
-
54
-
55
-
56
-
 57
57 -
 58
58 -
 59
59 -
 60
60 -
 61
61 -
 62
62 -
 63
63 -
 64
64 -
 65
65 -
 66
66 -
 67
67 -
68
-
69
-
70
-
71
-
72
-
73
-
74
-
75
-
76
-
77
-
78
-
79
-
80
-
81
-
82
-
83
-
84
-
85
-
86
-
87
-
88
-
89
-
90
-
91
-
92
-
93
-
94
-
95
-
96
-
97
-
98
-
99
-
100
-
101
-
102
-
103
-
104
 |
 |
