Panasonic KXTG5583 KXTG5583 User Guide - Page 56
SET DATE & TIME, Registering the handset, Time adjustment Caller ID, subscribers only
 |
View all Panasonic KXTG5583 manuals
Add to My Manuals
Save this manual to your list of manuals |
Page 56 highlights
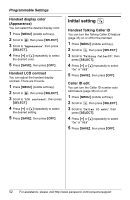
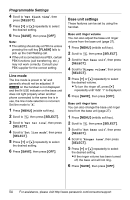
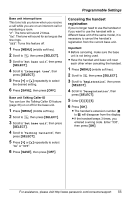
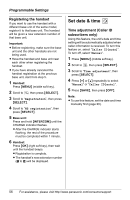
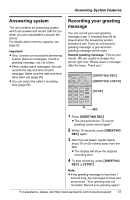
Programmable Settings Registering the handset If you want to use the handset with a different base unit of the same model, register it to that base unit. The handset will be given a new extension number of that base unit. Important: L Before registering, make sure the base unit and the other handsets are not being used. L Have the handset and base unit near each other when registering the handset. L If you have already canceled the handset registration at the previous base unit, start from step 5. 1 Handset: Press {MENU} (middle soft key). 2 Scroll to N, then press {SELECT}. 3 Scroll to "Registration", then press {SELECT}. 4 Scroll to "HS registration", then press {SELECT}. 5 Base unit: Press and hold {INTERCOM} until the CHARGE indicator flashes. L After the CHARGE indicator starts flashing, the rest of the procedure must be completed within 1 minute. 6 Handset: Press {OK} (right soft key), then wait until the handset beeps. L Registration is complete. L The handset's new extension number (! to )) will be displayed. Set date & time O Time adjustment (Caller ID subscribers only) Using this feature, the unit's date and time setting will be automatically adjusted when caller information is received. To turn this feature on, select "Caller ID[auto]". To turn off, select "Manual". 1 Press {MENU} (middle soft key). 2 Scroll to O, then press {SELECT}. 3 Scroll to "Time adjustment", then press {SELECT}. 4 Press {V} or {^} repeatedly to select "Manual" or "Caller ID[auto]". 5 Press {SAVE}, then press {OFF}. Note: L To use this feature, set the date and time manually first (page 20). 56 For assistance, please visit http://www.panasonic.com/consumersupport
-
 1
1 -
2
-
3
-
4
-
5
-
6
-
7
-
8
-
9
-
10
-
11
-
12
-
13
-
14
-
15
-
16
-
17
-
18
-
19
-
20
-
21
-
22
-
23
-
24
-
25
-
26
-
27
-
28
-
29
-
30
-
31
-
32
-
33
-
34
-
35
-
36
-
37
-
38
-
39
-
40
-
41
-
42
-
43
-
44
-
45
-
46
-
47
-
48
-
49
-
50
-
 51
51 -
 52
52 -
 53
53 -
 54
54 -
 55
55 -
 56
56 -
 57
57 -
 58
58 -
 59
59 -
 60
60 -
 61
61 -
62
-
63
-
64
-
65
-
66
-
67
-
68
-
69
-
70
-
71
-
72
-
73
-
74
-
75
-
76
-
77
-
78
-
79
-
80
-
81
-
82
-
83
-
84
-
85
-
86
-
87
-
88
-
89
-
90
-
91
-
92
-
93
-
94
-
95
-
96
 |
 |