Panasonic KXTG5583 KXTG5583 User Guide - Page 78
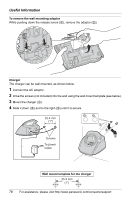
Wall mount template for the charger, To remove the wall mounting adaptor, Charger
 |
View all Panasonic KXTG5583 manuals
Add to My Manuals
Save this manual to your list of manuals |
Page 78 highlights
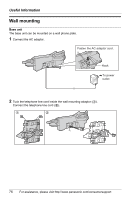
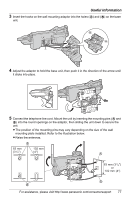
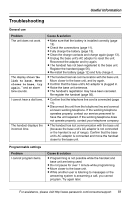
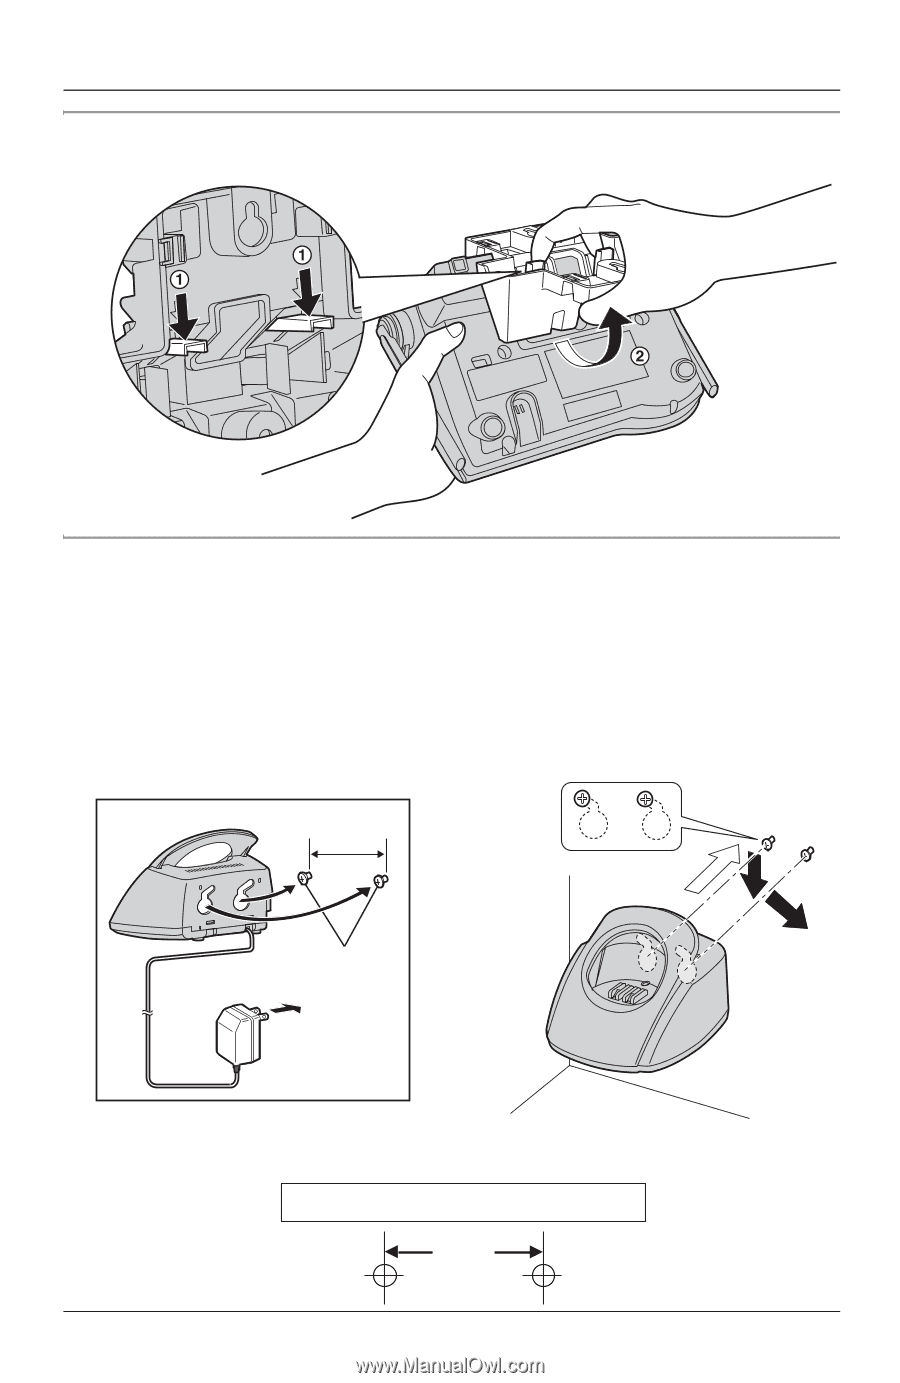
Useful Information To remove the wall mounting adaptor While pushing down the release levers (1), remove the adaptor (2). Charger The charger can be wall mounted, as shown below. 1 Connect the AC adaptor. 2 Drive the screws (not included) into the wall using the wall mount template (see below). 3 Mount the charger (1). 4 Slide it down (2) and to the right (3) until it is secure. 25.4 mm (1") Screws To power outlet 1 2 3 Wall mount template for the charger 25.4 mm (1") 78 For assistance, please visit http://www.panasonic.com/consumersupport
-
 1
1 -
2
-
3
-
4
-
5
-
6
-
7
-
8
-
9
-
10
-
11
-
12
-
13
-
14
-
15
-
16
-
17
-
18
-
19
-
20
-
21
-
22
-
23
-
24
-
25
-
26
-
27
-
28
-
29
-
30
-
31
-
32
-
33
-
34
-
35
-
36
-
37
-
38
-
39
-
40
-
41
-
42
-
43
-
44
-
45
-
46
-
47
-
48
-
49
-
50
-
51
-
52
-
53
-
54
-
55
-
56
-
57
-
58
-
59
-
60
-
61
-
62
-
63
-
64
-
65
-
66
-
67
-
68
-
69
-
70
-
71
-
72
-
 73
73 -
 74
74 -
 75
75 -
 76
76 -
 77
77 -
 78
78 -
 79
79 -
 80
80 -
 81
81 -
 82
82 -
 83
83 -
84
-
85
-
86
-
87
-
88
-
89
-
90
-
91
-
92
-
93
-
94
-
95
-
96
 |
 |
Useful Information
78
For assistance, please visit http://www.panasonic.com/consumersupport
Wall mount template for the charger
25.4 mm
(1")
To remove the wall mounting adaptor
While pushing down the release levers (
1
), remove the adaptor (
2
).
Charger
The charger can be wall mounted, as shown below.
1
Connect the AC adaptor.
2
Drive the screws (not included) into the wall using the wall mount template (see below).
3
Mount the charger (
1
).
4
Slide it down (
2
) and to the right (
3
) until it is secure.
1
2
3
25.4 mm
Screws
To power
outlet
(1")