Panasonic KXTG5767 KXTG5761 User Guide - Page 30
Phonebook, Set Light-up ID
 |
View all Panasonic KXTG5767 manuals
Add to My Manuals
Save this manual to your list of manuals |
Page 30 highlights
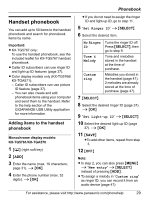
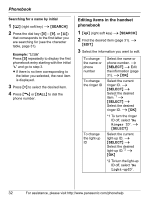
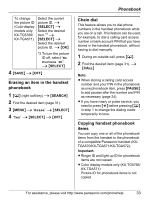
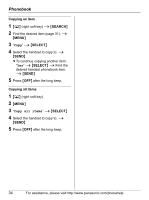
Phonebook L If you select "No Ringer ID" (default), the handset uses the ringer tone you selected on page 45 when a call is received from that caller. 8 Select the desired ringer ID (page 37). i {OK} 9 "Set Light-up ID" i {SELECT} L If you select "No Light-upID" (default), the handset uses the ringer indicator color you selected on page 45 when a call is received from that caller. 10 Select the desired light-up ID (page 37). i {OK} 11 "Set Picture ID" i {SELECT} Color display models: KX-TG5766/KX-TGA571 1 {C} (right soft key) 2 {ADD} 3 Enter the name (max. 16 characters; page 31). i {OK} 4 Enter the phone number (max. 32 digits). i {OK} L If you do not need to assign the ringer ID, light-up ID, and picture ID, go to step 15. 5 "Set Ringer ID" i {SELECT} 6 Select the desired item. No Ringer ID Tone & Melody Custom ring Turns the ringer ID off. Press {SELECT}, then go to step 9. Tone and melodies stored in the handset at the time of purchase. Melodies you stored in the handset (page 47). 2 melodies are already stored at the time of purchase (page 47). 12 Select the desired item. No Picture ID Sample pictures Turns the picture ID off. Press {SELECT}, then go to step 15. Images stored in the handset at the time of purchase. My Images you stored in pictures the handset. 13 {SELECT} 14 Select the desired picture ID (page 37). i {OK} 15 {SAVE} LTo add other items, repeat from step 3. 16 {OFF} Note: L In step 2, you can also press {MENU} i "New entry" i {SELECT} instead of pressing {ADD}. L To assign a melody in "Custom ring" as ringer ID, you can record it from an audio device (page 47) or copy it from your computer (refer to the help section of the GIGARANGE USB Utility application). 7 {SELECT} 30 For assistance, please visit http://www.panasonic.com/phonehelp
-
 1
1 -
2
-
3
-
4
-
5
-
6
-
7
-
8
-
9
-
10
-
11
-
12
-
13
-
14
-
15
-
16
-
17
-
18
-
19
-
20
-
21
-
22
-
23
-
24
-
 25
25 -
 26
26 -
 27
27 -
 28
28 -
 29
29 -
 30
30 -
 31
31 -
 32
32 -
 33
33 -
 34
34 -
 35
35 -
36
-
37
-
38
-
39
-
40
-
41
-
42
-
43
-
44
-
45
-
46
-
47
-
48
-
49
-
50
-
51
-
52
-
53
-
54
-
55
-
56
-
57
-
58
-
59
-
60
-
61
-
62
-
63
-
64
-
65
-
66
-
67
-
68
-
69
-
70
-
71
-
72
-
73
-
74
-
75
-
76
 |
 |
