Panasonic PV GS19 Digital Video Camera - Page 10
QUICK GUIDE, Inserting a Card, Recording on a Tape, Using the Viewfinder, Using the Battery - a v cable
 |
UPC - 037988977994
View all Panasonic PV GS19 manuals
Add to My Manuals
Save this manual to your list of manuals |
Page 10 highlights
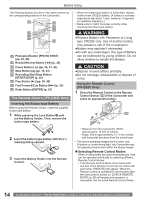
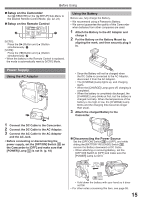
Before Using Quick Guide Using the Battery 1 Attach the Battery to the AC Adaptor and charge it. Inserting a Card 1 Place your Thumb on the [OPEN▼] 1 Knob and pull the LCD Monitor 2 out in the direction of the arrow. 2 • Before use, fully charge the Battery. • Since the Battery will not be charged when the DC Cable is connected to the AC Adaptor, disconnect it from the AC Adaptor. • The [CHARGE] Lamp lights up, and charging starts. • When the [CHARGE] Lamp goes off, charging is completed. 2 Attach the charged Battery to the Camcorder. 1 2 Slide the [◄OPEN] Lever 3 to open the Card Slot Cover 4 . 3 While holding the Memory Card with its cut corner facing right 5 insert it into the Card Slot 6 . 4 Close the Card Slot Cover 4 securely. 3 6 4 5 Using the Viewfinder Before using the Viewfinder, adjust the field of view so that the displays inside the Viewfinder become clear and easy to read. 1 Pull the Viewfinder. Inserting a Cassette 1 Slide the [OPEN/EJECT] Lever 1 toward the front and pull down to fully open the Cassette Compartment Cover. • To protect the tape, if the cover is not fully opened, the cassette holder cannot be ejected. 2 After the Cassette Holder is opened, insert a Cassette. 2 Adjust by turning the Eyepiece Corrector Knob 1 . 1 1 3 Close the Cassette Holder by pressing the [PUSH] mark 2 . 4 Only after the Cassette Holder is completely housed, close the Cassette Compartment Cover by pressing the mark 3 . Recording on a Tape 1 Set the [OFF/ON] Switch 1 to [ON]. • The [POWER] Lamp 2 lights up. 1 2 2 3 10 For assistance, please call : 1-800-211-PANA(7262) or, contact us via the web at: http://www.panasonic.com/contactinfo
-
 1
1 -
2
-
3
-
4
-
 5
5 -
 6
6 -
 7
7 -
 8
8 -
 9
9 -
 10
10 -
 11
11 -
 12
12 -
 13
13 -
 14
14 -
 15
15 -
16
-
17
-
18
-
19
-
20
-
21
-
22
-
23
-
24
-
25
-
26
-
27
-
28
-
29
-
30
-
31
-
32
-
33
-
34
-
35
-
36
-
37
-
38
-
39
-
40
-
41
-
42
-
43
-
44
-
45
-
46
-
47
-
48
-
49
-
50
-
51
-
52
-
53
-
54
-
55
-
56
-
57
-
58
-
59
-
60
-
61
-
62
-
63
-
64
-
65
-
66
-
67
-
68
-
69
-
70
-
71
-
72
-
73
-
74
-
75
-
76
-
77
-
78
-
79
-
80
 |
 |
