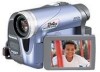
Panasonic PV GS19 Digital Video Camera - Page 40
PLAYING BACK ON YOUR TV, If the image or audio from this, Camcorder is not output on the TV - av cable
 |
UPC - 037988977994
View all Panasonic PV GS19 manuals
Add to My Manuals
Save this manual to your list of manuals |
Page 40 highlights
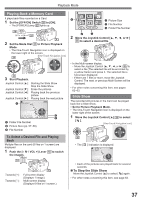
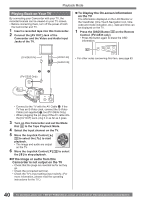
Playback Mode Playing Back on Your TV By connecting your Camcorder with your TV, the recorded scenes can be viewed on your TV screen. • Before connecting them, turn off the power of both the Camcorder and TV. 1 Insert a recorded tape into this Camcorder. 2 Connect the [AV OUT] Jack of the Camcorder and the Video and Audio Input Jacks of the TV. „ To Display the On-screen Information on the TV The information displayed on the LCD Monitor or the Viewfinder (One-Touch Navigation icon, time code and mode indication, etc.), date and time can be displayed on the TV. 1 Press the [OSD] Button 42 on the Remote Control. (PV-GS35 only) • Press the button again to erase the OSD information. [S-VIDEO IN] 42 [VIDEO IN] [AUDIO IN] • For other notes concerning this item, see page 63. 2 1 (PV-GS35 Only) MIC A/V • Connect to the TV with the AV Cable 1 . If the TV has an S-Video Jack, connect the S-Video Cable (not supplied) 2 , too (PV-GS35 Only). • When plugging the pin plug of the AV cable into the [AV OUT] Jack, plug it in as far as it goes. 3 Turn on this Camcorder and set the Mode Dial 34 to the Tape Playback Mode. 4 Select the input channel on the TV. 5 Move the Joystick Control [▲] 35 to select the [ ] to start playback. • The image and audio are output on the TV. 6 Move the Joystick Control [▼] 35 to select the [ ] to stop playback. „ If the image or audio from this Camcorder is not output on the TV • Check that the plugs are inserted as far as they go. • Check the connected terminal. • Check the TV's input setting (input switch). (For more information, please read the operating instructions for the TV.) 40 For assistance, please call : 1-800-211-PANA(7262) or, contact us via the web at: http://www.panasonic.com/contactinfo
-
 1
1 -
2
-
3
-
4
-
5
-
6
-
7
-
8
-
9
-
10
-
11
-
12
-
13
-
14
-
15
-
16
-
17
-
18
-
19
-
20
-
21
-
22
-
23
-
24
-
25
-
26
-
27
-
28
-
29
-
30
-
31
-
32
-
33
-
34
-
 35
35 -
 36
36 -
 37
37 -
 38
38 -
 39
39 -
 40
40 -
 41
41 -
 42
42 -
 43
43 -
 44
44 -
 45
45 -
46
-
47
-
48
-
49
-
50
-
51
-
52
-
53
-
54
-
55
-
56
-
57
-
58
-
59
-
60
-
61
-
62
-
63
-
64
-
65
-
66
-
67
-
68
-
69
-
70
-
71
-
72
-
73
-
74
-
75
-
76
-
77
-
78
-
79
-
80
 |
 |
