Panasonic PV GS19 Digital Video Camera - Page 33
MANUAL SHUTTER SPEED ADJUSTMENT, To Resume Automatic Adjustment, About White Balance Sensor
 |
UPC - 037988977994
View all Panasonic PV GS19 manuals
Add to My Manuals
Save this manual to your list of manuals |
Page 33 highlights
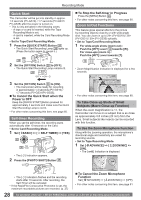
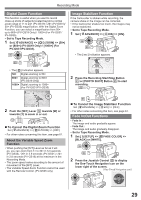
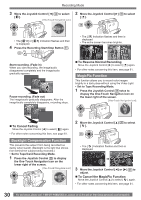
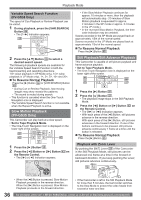
Recording Mode 3 Move the Joystick Control [◄] or [►] 35 until the [ ] Indication is displayed. SP 3h59m59s29f R2:00 ► 3/3 12:34:56AM JAN 2 2005 4 Point the Camcorder at a full-screen white subject. 5 Move the Joystick Control [▲] 35 until the [ ] Indication stops flashing. „ To Resume Automatic Adjustment Move the Joystick Control [◄] or [►] 35 until the [ ] Indication appears. Or, set the [AUTO/ MANUAL/FOCUS] Switch to [AUTO]. About White Balance Sensor The White Balance Sensor 15 determines the nature of the light source during recording. 15 • Do not cover the White Balance Sensor with your hand during recording because White Balance will not function normally. 1) The effective range of Automatic White Balance Adjustment on this Camcorder 2) Blue sky 3) Cloudy sky (rain) 4) TV screen 5) Sunlight 6) White fluorescent lamp 7) Halogen light bulb 8) Incandescent light bulb 9) Sunrise or sunset 10) Candlelight • For other notes concerning this item, see page 62. Manual Shutter Speed Adjustment Useful for recording fast-moving subjects. • Set to Tape/Card Recording Mode. 1 Set the [AUTO/MANUAL/FOCUS] Switch 26 to [MANUAL]. [One-Touch Navigation icon] 3/3 26 • The [ ] Indication and the One-Touch Navigation icon appears. 2 Move the Joystick Control [▼] 35 until the Shutter Speed Indication appears. SP 3h59m59s29f R2:00 ►1/60 Outside of the effective range of Automatic White Balance Adjustment, the image will become reddish or bluish. Even within the effective range of Automatic White Balance Adjustment, the Automatic White Balance Adjustment may not function properly if there is more than one light source. In this case, adjust the White Balance. 35 3/3 12:34:56AM JAN 2 2005 3 Move the Joystick Control [◄] or [►] 35 to adjust the shutter speed. „ Range of Shutter Speed Adjustment 1/60-1/8000 s in Tape Recording Mode 1/60-1/500 s in Card Recording Mode The standard shutter speed is 1/60 s when the EIS is OFF. Selecting a speed closer to [1/8000] causes the shutter speed to be faster. „ To Resume Automatic Adjustment Set the [AUTO/MANUAL/FOCUS] Switch to [AUTO]. • For other notes concerning this item, see page 62. 33
-
 1
1 -
2
-
3
-
4
-
5
-
6
-
7
-
8
-
9
-
10
-
11
-
12
-
13
-
14
-
15
-
16
-
17
-
18
-
19
-
20
-
21
-
22
-
23
-
24
-
25
-
26
-
27
-
 28
28 -
 29
29 -
 30
30 -
 31
31 -
 32
32 -
 33
33 -
 34
34 -
 35
35 -
 36
36 -
 37
37 -
 38
38 -
39
-
40
-
41
-
42
-
43
-
44
-
45
-
46
-
47
-
48
-
49
-
50
-
51
-
52
-
53
-
54
-
55
-
56
-
57
-
58
-
59
-
60
-
61
-
62
-
63
-
64
-
65
-
66
-
67
-
68
-
69
-
70
-
71
-
72
-
73
-
74
-
75
-
76
-
77
-
78
-
79
-
80
 |
 |
