Panasonic SA-XR57K Receiver - Page 15
Select [SPEAKERS A]., Confirming audio output from speakers and adjusting volumes
 |
UPC - 037988253685
View all Panasonic SA-XR57K manuals
Add to My Manuals
Save this manual to your list of manuals |
Page 15 highlights
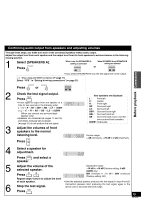
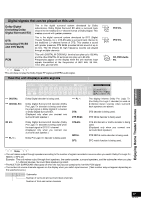
Before playback Connections Confirming audio output from speakers and adjusting volumes Through these steps, you make sure each of the connected speakers makes audio output. Adjust the output level from each speaker and the output level from the front speakers to achieve balance in the listeningviewing position. 1 Select [SPEAKERS A]. SPEAKERS Press A When only the SPEAKERS A setting is selected SPEAKERS A When SPEAKERS A and SPEAKERS B settings are selected or SPEAKERS AB • If you select SPEAKERS B only, the test signal will not be output. When using a BI-WIRE connection (á page 11) Select "YES " in "Setting bi-wiring connections" (á page 31). 2 3 SPEAKERS SPEAKERS Press A or B Check the test signal output. Press TEST • A test signal is output from one speaker at a time for two seconds in the following order. L → C → R → RS → SBR → SBL → LS → SUBW or L → C → R → RS → SB → LS → SUBW (When you connect one surround back speaker only) • Speakers not connected (á pages 11 and 14) and others manually set as absent (á page 31) do not produce the test signal. Adjust the volumes of front speakers to the normal listening level. SPEAKERS BI-WIRE AB Press VOLUME How speakers are displayed L : Front left C : Center R : Front right RS : Surround right LS : Surround left SBR : Surround back right SBL : Surround back left SB : Surround back (If you connect one surround back speaker) SUBW : Subwoofer Volume range: -- dB (minimum), -79 dB to 0 dB (maximum) 4 5 6 Select a speaker for adjustment. Press LEVEL and select a speaker. Adjust the volume of the selected speaker. Press Repeat steps 4 and 5 to adjust the level of each speaker. Stop the test signal. Press TEST Adjustment range: -10 dB to +10 dB (Factory setting: 0 dB) SUBW only: MIN (minimum) ↔ 1 to 19 ↔ MAX (maximum) (Factory setting: 10 ) • Only the adjusted speaker produces the test signal in steps 4 and 5. Connected speakers start producing the test signal again in the above order 2 seconds after both steps. 15 RQT8549
-
 1
1 -
2
-
3
-
4
-
5
-
6
-
7
-
8
-
9
-
 10
10 -
 11
11 -
 12
12 -
 13
13 -
 14
14 -
 15
15 -
 16
16 -
 17
17 -
 18
18 -
 19
19 -
 20
20 -
21
-
22
-
23
-
24
-
25
-
26
-
27
-
28
-
29
-
30
-
31
-
32
-
33
-
34
-
35
-
36
-
37
-
38
-
39
-
40
 |
 |
