Panasonic SA-XR57K Receiver - Page 33
Setting ADVANCED, low volume
 |
UPC - 037988253685
View all Panasonic SA-XR57K manuals
Add to My Manuals
Save this manual to your list of manuals |
Page 33 highlights
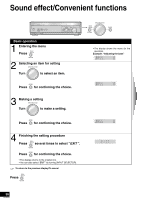
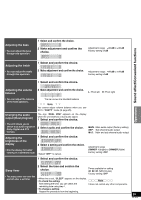
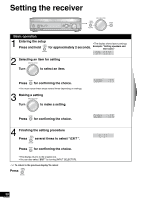
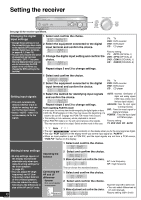
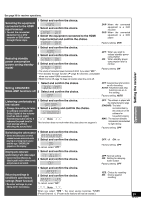
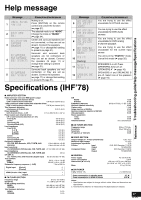
See page 30 for receiver operations. Selecting the equipment connected to the HDMI input terminal • You set the connected equipment as a DVD recorder or DVD player through these steps. 1 Select and confirm the choice. 2 Select and confirm the choice. 3 Select the equipment connected to the HDMI input terminal and confirm the choice. DVR : When the connected equipment is a DVD recorder DVD : When the connected equipment is a DVD player Factory setting: DVR 1 Select and confirm the choice. Operations Setting the receiver Before use Reducing standby power consumption (power saving standby mode) 2 Select and confirm the choice. 3 Select and confirm the choice. OFF : When you wish to reduce standby power consumption ON : When standby power consumption level is normal • The volume of consumed power becomes 0.25 W if you select "OFF ". • The standby through function (á page 5) becomes unavailable when you make HDMI connections. • HDAVI Control (á page 19) does not function when the unit is off. Factory setting: ON 1 Select and confirm the choice. Setting ADVANCED DUAL AMP functions off 2 Select and confirm the choice. OFF :Advanced dual amp functions are off in this setting. AUTO :Advanced dual amp functions are on in this setting. Factory setting: AUTO Listening comfortably at low volume • Change this setting to listen to software recorded with Dolby Digital at low volume (such as late at night) maintaining audio clarity. It reduces the peak level in loud scenes without affecting the sound field. 1 Select and confirm the choice. 2 Select a setting and confirm the choice. Note This function does not work when disc data does not support it. Switching the attenuator 1 Select and confirm the choice. • Switch the attenuator on when sounds become distorted while playing an analog input source 2 Select and confirm the choice. and the sign "OVERFLOW " appears on the display. To cancel, select "OFF ". Delaying audio output and synchronizing it with video output • Correct the time difference by delaying audio output when sounds and pictures do not match. 1 Select and confirm the choice. 2 Select and confirm the choice. 1 Select and confirm the choice. OFF : The software is played with the original dynamic range STANDARD : The level recommended by the producer of the software for household viewing MAX : The maximum allowable compression (recommended for night viewing) Factory setting: OFF OFF : off ON : on Factory setting: OFF OFF :Normal setting ON : Setting for delaying audio output Factory setting: OFF Returning settings to conditions upon factory settings (Reset function) • Re-enter settings to your liking when necessary. 2 Select and confirm the choice. YES : Choice for resetting NO : Choice against resetting To cancel, select "NO ". Note When you select "YES ", the input source becomes TUNER (Preset Channel 1). (Preset radio stations will not be erased.) 33 RQT8549
-
 1
1 -
2
-
3
-
4
-
5
-
6
-
7
-
8
-
9
-
10
-
11
-
12
-
13
-
14
-
15
-
16
-
17
-
18
-
19
-
20
-
21
-
22
-
23
-
24
-
25
-
26
-
27
-
 28
28 -
 29
29 -
 30
30 -
 31
31 -
 32
32 -
 33
33 -
 34
34 -
 35
35 -
 36
36 -
 37
37 -
 38
38 -
39
-
40
 |
 |
