Panasonic SA-XR57K Receiver - Page 4
Control Guide - video inputs
 |
UPC - 037988253685
View all Panasonic SA-XR57K manuals
Add to My Manuals
Save this manual to your list of manuals |
Page 4 highlights
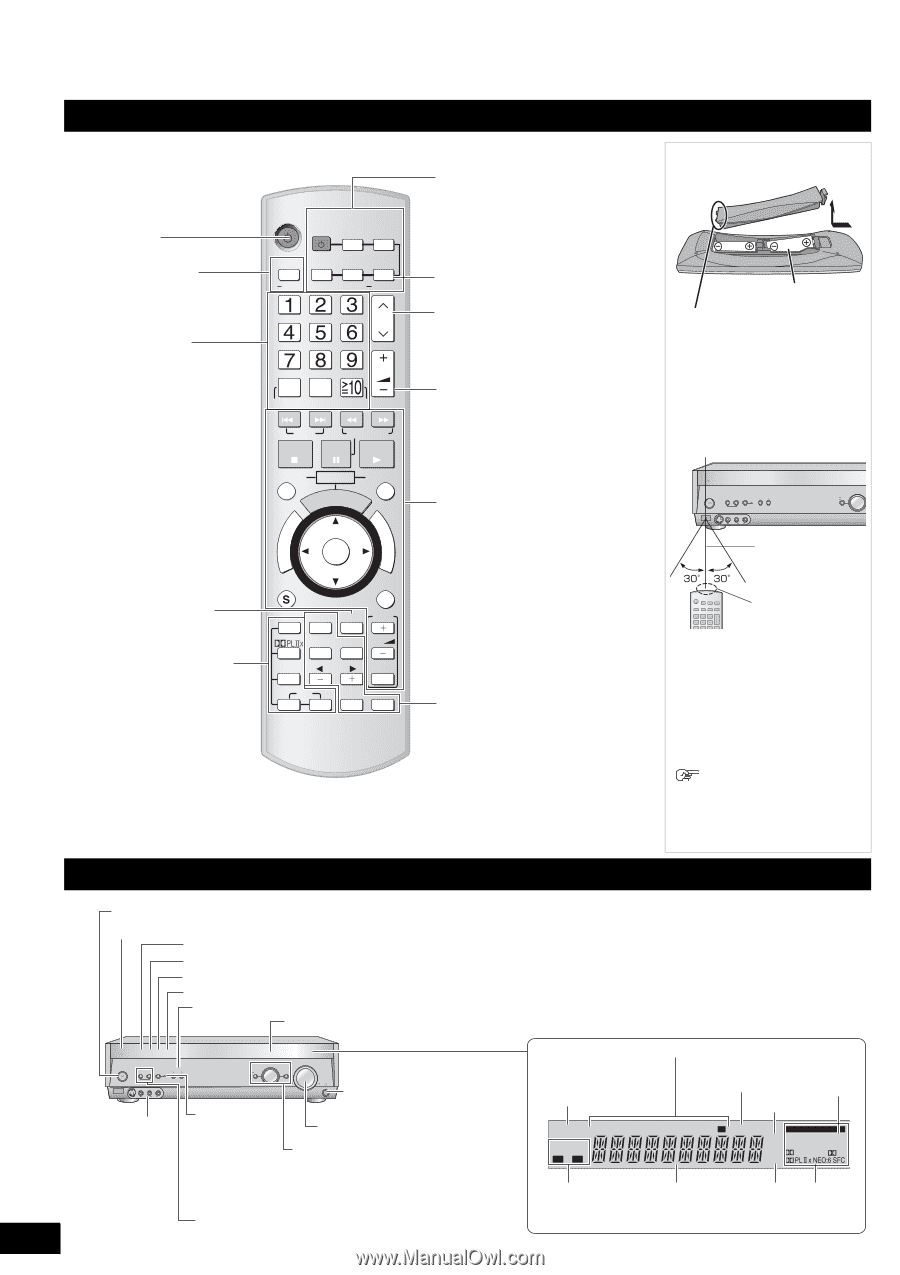
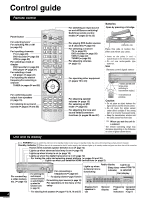
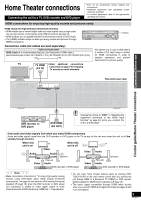
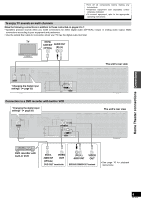
Control guide Remote control Power button RECEIVER AV SYSTEM RECORDER TV DVD For selecting tuner/ For switching FM or AM (á page 34) For inputting channels TV (á page 20) DVD recorder (á page 20) VCR (á page 22) For selecting a track or chapter DVD recorder (á page 20) DVD player (á page 21) For selecting a track CD player (á page 22) For inputting the station frequency/For selecting a channel TUNER (á pages 34 and 35) TUNER CD BAND PLAYER VCR DVD ANALOG 6CH CH 0 DISC DIRECT TUNING VOLUME ENTER SKIP SLOW/SEARCH STOP PAUSE PLAY DRIVE SELECT DVD RECORDER CM SKIP ONE TOUCH PLAY ENTER DIRECT NAVITGOAPTOMRENU FUNCTIONS For confirming audio output from speakers (á page 15) For listening to surround sounds (á pages 24 and 25) SUB MENU RETURN SUBWOOFER TEST TV OFF LEVEL EFFECT VOL NEO : 6 TV/VIDEO SFC MUSIC MOVIE DIMMER MUTING Unit and its display For switching an input source on and off/Source switching/ Switching remote control modes (á pages 20 to 23) Batteries Open by pressing a lid edge. For playing DVD-Audio sources on 6 channels (á page 18) For selecting a channel TV (á page 20) DVD recorder (á page 20) VCR (á page 22) TUNER (á page 35) For adjusting volumes (á page 15) (R6/LR6, AA) Place this side in before the other side when you close. • Insert so the poles (+ and -) match those in the remote control. • Do not use rechargeable type batteries. Use Remote control signal sensor For operating other equipment (á pages 19 to 23) For adjusting speaker volumes (á page 15) For selecting an SFC mode (á page 25) For adjusting the tone and sound fields/Convenient functions (á pages 26 and 27) AUTO SPEAKER ADVANCED WIRELESS DETECTOR DUAL AMP BI-AMP READY HDMI POWER SPEAKERS MULTI CH A B SURROUND TUNE MENU SETUP INPUT SELECTOR AUTO SPEAKER DETECTOR AUX RETURN S VIDEO IN VIDEO IN L AUDIO IN R 7 meters (23 feet) (the range varies according to transmission angles.) Transmission window Caution • Do not place an object between the signal sensor and the remote control. • Do not place the signal sensor under direct sunlight or the strong light of an inverter fluorescent lamp. • Keep the transmission window and the unit's sensor free from dust. When you set the unit in a cabinet The remote controlling range may decrease depending on the thickness or colors of glass cabinet doors. [8, POWER] Press to switch the unit from on to standby mode or vice versa. In standby mode, the unit is still consuming a small amount of power. Standby indicator [^] When the unit is connected to the AC mains supply, this indicator lights up in standby mode and goes out when the unit is turned on. Flashes when automatic speaker detection is on (á page 14) Lights up when advanced dual amp is on (á page 18) Lights up when bi-amp is on (á page 18) Lights up when the digital transceiver is in (á page 12) For tuning the radio and selecting preset stations (á pages 34 and 35) Lights up when you establish HDMI connections (á page 5) AUTO SPEAKER ADVANCED WIRELESS DETECTOR DUAL AMP BI-AMP READY POWER SPEAKERS MULTI CH A B SURROUND AUTO SPEAKER DETECTOR AUX S VIDEO IN VIDEO IN L AUDIO IN R TUNE For connecting a video camera etc. (á page 13) 4 RQT8549 HDMI MENU SETUP INPUT SELECTOR ENTER VOLUME RETURN For connecting a For switching the headphone (á page 27) multi-channel surround function on and off (lights up when the function is on) (á page 16) For adjusting volumes (á pages 16 and 27) For switching input sources (á page 16) For operations in the menu or the setup For selecting front speakers (á pages 14 to 16, 18 and 27) Radio display Lights up Lights up when 2-channel mix is functioning Sleep timer when PCM FIX indicator is selected Unit display 2CH MIX TUNED SPEAKERS BI-WIRE AB MONO ST M SLEEP DIGITAL INPUT inft PCM DTS 96/24DTS-ES kHz DIGITAL EX EX MHz Displays front speakers in use General display Frequency Input signals for unit digital sounds indicators (á page 17)
-
 1
1 -
 2
2 -
 3
3 -
 4
4 -
 5
5 -
 6
6 -
 7
7 -
 8
8 -
 9
9 -
 10
10 -
11
-
12
-
13
-
14
-
15
-
16
-
17
-
18
-
19
-
20
-
21
-
22
-
23
-
24
-
25
-
26
-
27
-
28
-
29
-
30
-
31
-
32
-
33
-
34
-
35
-
36
-
37
-
38
-
39
-
40
 |
 |