Panasonic SA-XR57K Receiver - Page 18
Playback Options - receiver
 |
UPC - 037988253685
View all Panasonic SA-XR57K manuals
Add to My Manuals
Save this manual to your list of manuals |
Page 18 highlights
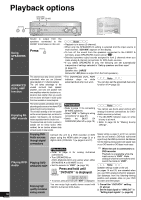
Playback options SPEAKERS A B ADVANCED DUAL AMP [BI-AMP] AUTO SPEAKER ADVANCED WIRELESS DETECTOR DUAL AMP BI-AMP READY POWER SPEAKERS MULTI CH A B SURROUND AUTO SPEAKER DETECTOR AUX S VIDEO IN VIDEO IN L AUDIO IN R TUNE HDMI MENU SETUP INPUT SELECTOR ENTER RETURN VOLUME RECEIVER AV SYSTEM RECORDER TV DVD TUNER CD BAND PLAYER VCR DVD ANALOG 6CH Using SPEAKERS B ADVANCED DUAL AMP function Enjoying BIAMP sounds Sound is output from the speakers connected to the FRONT B terminals on this unit. SPEAKERS Press B The advanced dual amp function activates automatically when you use 2-channel stereo playback or 5.1-channel playback. The unit takes advantage of the unused surround back speaker amplifier, and runs one speaker with two amplifiers when this function is on. Advanced dual amplifier offers you sounds that are clearer and higher in audio quality than those available in normal playback. This function activates automatically when you play analog audio sources or two-channel PCM signals through bi-wiring connections. The unit takes advantage of the front speaker and the surround speaker amps, and drives the speakers' high-frequency and low-frequency sections separately when this function is on. The advanced dual amp function (á above) is available with the bi-amp function. When combined, the two functions enhance clarity and audio quality of stereo sounds. Note • Playback is in stereo (2-channel). • When only the SPEAKERS B setting is selected and the input source is multi-channel, "2CH MIX" appears on the display. • To turn off the sound from the speakers connected to the FRONT A terminals, press [SPEAKERS A] and cancel " A ". • Selected speakers output sounds assigned to front 2 channels when you make analog 6-channel connections for DVD-Audio sources. • If you select SPEAKERS B only, the following are set automatically irrespective of settings selected in "Setting speakers and their sizes" (á page 31). Speaker size: LARGE Subwoofer: NO (Bass is output from the front speakers.) • The [ADVANCED DUAL AMP] indicator stays on while advanced dual amp is at work. Note You can also set the advanced dual amp function off (á page 33). • Refer to page 11 for connecting BI-WIRE speakers. • Select "YES " in "Setting bi-wiring connections" (á page 31). • Switch the [MULTI CH SURROUND] effect off (á page 16). Note You cannot use the bi-amp function with analog 6-channel connections for DVDAudio sources (á below). • The [BI-AMP] indicator stays on while bi-amp is at work. • Refer to page 32 for "Making bi-amp settings". Enjoying DVDAudio sources through digital connections Connect the unit to a DVD recorder or DVD player using the HDMI cable (á page 5) or a digital cable (COAXIAL 1) (á pages 6 and 7). Speaker settings (á pages 14 and 31) are canceled when the unit receives a DVD-Audio multi-channel signal through the HDMI input terminal. Set distances from the listening-viewing position and speaker sizes on your DVD recorder or DVD player in such cases. Playing DVDAudio 18 RQT8549 Playing DVD ANALOG 6CH Enjoying high quality 2-channel analog sounds • Refer to page 8 for analog 6-channel connections. • Turn SPEAKERS on. (DVD ANALOG 6CH only works when either SPEAKERS A or BI-WIRE is on.) • Set the selector to "DVD ". (á page 16) PLAYER Press and hold until DVD "DVD 6CH " is displayed. ANALOG 6CH • To cancel, press and hold until "DVD " is displayed. You can enjoy high quality stereo sound with 192 kHz 2-channel DVD-Audio. When the unit is connected to a DVD recorder Playback is unavailable while the input source is "DVR ". Make analog 6-channel connections and switch the mode to "DVD ". Note Speaker settings made on the unit (á pages 14 and 31) are canceled when you use DVD analog 6-channel playback. Set distances from the listening-viewing position and speaker sizes on your DVD recorder and DVD player. 1. Cancel the "DVD 6CH " setting. (á above) 2. Set the input signal to "ANALOG " in "Setting input signals". (á page 32)
-
 1
1 -
2
-
3
-
4
-
5
-
6
-
7
-
8
-
9
-
10
-
11
-
12
-
 13
13 -
 14
14 -
 15
15 -
 16
16 -
 17
17 -
 18
18 -
 19
19 -
 20
20 -
 21
21 -
 22
22 -
 23
23 -
24
-
25
-
26
-
27
-
28
-
29
-
30
-
31
-
32
-
33
-
34
-
35
-
36
-
37
-
38
-
39
-
40
 |
 |
