Panasonic SAHT830V SAHT830V User Guide - Page 11
The Remote Control, Plug-in Auto Tuning
 |
View all Panasonic SAHT830V manuals
Add to My Manuals
Save this manual to your list of manuals |
Page 11 highlights
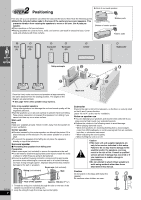
\ VHS TV INPUT SELECTOR DVD/VHS FM/AM DVD VHS TV TUNER 1 4 PICTURE MODE 7 SETUP DISC 23 56 89 ENTER 0 S10 CH VOLUME SKIP SLOW/SEARCH OPEN/CLOSE/EJECT JET REW POWER /I TOP MENU NAVI DIRECT NAVIGATOR STATUS/ FUNCTIONS ENTER MENU PLAY LIST RETURN DVD/VHS MENU CH 7 STEP Plug-in Auto Tuning After plugging the unit into your household AC outlet and pressing [Í] to turn the unit on for the first time, the unit automatically tunes in all the channels it can receive and sets the clock. The unit determines the type of transmission, TV or CATV, as follows: TV: when there are less than 5 CATV channels. CATV: when there are 5 or more CATV channels. Preparation ≥Confirm that the antenna is connected correctly. ≥Turn on the television and select the video input for the VHS. ≥Press [VHS] to put the remote control in VHS mode. Press [Í] to turn on the unit. Plug-in Auto Tuning starts and the unit puts the stations it can receive into channels (l 37, Channel range). 2 AUTO CHANNEL SET PROCEEDING OPEN/CLOSE DISC CHECK H.BASS STOP PLAY -DEMO /REW FF/ STOP PLAY PHONES REC CH DOWN EJECT VOLUME UP 6 STEP The remote control END :MENU The unit starts auto clock setting when finished, then displays the time. [Note] If auto tuning stops partway (by changing the source, turning the unit off, or due to a power failure). 1 Disconnect the AC power supply cord on the main unit and then reconnect it. 2 Turn on the main unit. Remote control Batteries ∫ Batteries 2 R6/LR6, AA, UM-3 ≥Insert so the poles (i and j) match those in the remote control. ≥Do not use rechargeable type batteries. 3 1 Do not: ≥mix old and new batteries. ≥use different types at the same time. ≥heat or expose to flame. ≥take apart or short circuit. ≥attempt to recharge alkaline or manganese batteries. ≥use batteries if the covering has been peeled off. Mishandling of batteries can cause electrolyte leakage which can damage items the fluid contacts and may cause a fire. Remove if the remote control is not going to be used for a long period of time. Store in a cool, dark place. ∫ Use Aim at the sensor (l 14), avoiding obstacles at a maximum range of 7 m (23 feet) directly in front of the unit. To cancel partway Press [MENU]. ∫ To start Plug-in Auto Tuning again (after relocation, for example) Preparation ≥Press [Í] to turn on the unit. ≥Make sure there is no video cassette tape loaded in the unit. ≥Press [DVD/VHS] to select "VHS" as the source. 1 Press and hold [W CH] and [X CH] on the main unit simultaneously for 3 seconds until the channel changes to "2". Disappears 2 2 Disconnect the AC power supply cord on the main unit and then reconnect it. 3 Turn on the main unit. Plug-in Auto Tuning restarts. Antenna system and channel captions all revert to the default values when you perform the procedure above. Reset the timer recording settings. (If necessary reset the clock first. l 36, CLOCK SET) ∫ To set the channels manually (l 37). ∫ If the unit couldn't set the clock automatically The MANUAL CLOCK SET screen appears. Set the time manually (l 36). RQT7921 11
-
 1
1 -
2
-
3
-
4
-
5
-
 6
6 -
 7
7 -
 8
8 -
 9
9 -
 10
10 -
 11
11 -
 12
12 -
 13
13 -
 14
14 -
 15
15 -
 16
16 -
17
-
18
-
19
-
20
-
21
-
22
-
23
-
24
-
25
-
26
-
27
-
28
-
29
-
30
-
31
-
32
-
33
-
34
-
35
-
36
-
37
-
38
-
39
-
40
-
41
-
42
-
43
-
44
-
45
-
46
-
47
-
48
-
49
-
50
-
51
-
52
 |
 |
