Panasonic SAHT830V SAHT830V User Guide - Page 5
Setup & Button, Front Speaker Assembly
 |
View all Panasonic SAHT830V manuals
Add to My Manuals
Save this manual to your list of manuals |
Page 5 highlights
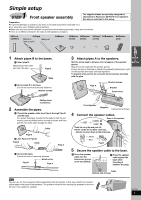
Simple setup 1 STEP Front speaker assembly The supplied stands are specially designed for attachment to Panasonic SB-FS730 front speakers. Use only as indicated in this setup. Preparation ≥To prevent damage or scratches, lay down a soft cloth and perform assembly on it. ≥For assembly, use a Phillips-head screwdriver. ≥Make sure you have all the indicated components before starting assembly, setup, and connection. ≥There is no difference between the right and left speakers and pipes. 2kFront speakers 4kPipes 2kPipe A (with a cable) 2kPipe B 2kBases 4kWasher 4kBracket 2kSmall 2kBrackets 8kRubber screws screws screws pads 1 Attach pipes B to the bases. A Insert pipe B. Match these holes when you insert the pipe. Pipe B Base B Secure pipe B to the base. Ensure the screws are securely fastened. Washer screws 3 Attach pipes A to the speakers. Slot the screw head in between the 2 stoppers of the speaker groove. Align the screw head with the speaker groove. Ensure the pipe is fastened on straight by gradually tightening the right and left screws alternately until fully tightened. To prevent short-circuit, do not cover the connection terminals with the pipe. Pipe A Bracket screws Bracket Screw head Phillips-head screwdriver 2 Assemble the pipes. A Thread the speaker cable from Pipe A through Pipe B and the base. For quicker threading, loosely fold the cable in half (do not crease), pass the folded portion through the pipe, and then pull the rest of the cable through the base. Cable Pipe B B Join Pipe A to Pipe B. Pipe B Cable Pipe A C Secure the pipes. Ensure the screw is securely fastened. Small screw Pipe B Pipe A Front speaker Stoppers Connection terminals 4 Connect the speaker cables. Rear of the speaker Twist the vinyl tip and pull off. ≥If the cords do not have vinyl tips, directly connect them to the terminals. _: White `: Blue Push! 5 Secure the speaker cable to the base. A Press the speaker cable into the base cover groove as far as possible. B Press the speaker cable against the base while threading it between the pegs. Cable Bottom side of base [Note] You can use the front speakers without assembling with the stands. In this case, attach the included rubber pads to the base of the speakers. This prevents vibration from causing the speakers to move or fall over. Use 4 pads per speaker. RQT7921 5
-
 1
1 -
 2
2 -
 3
3 -
 4
4 -
 5
5 -
 6
6 -
 7
7 -
 8
8 -
 9
9 -
 10
10 -
 11
11 -
12
-
13
-
14
-
15
-
16
-
17
-
18
-
19
-
20
-
21
-
22
-
23
-
24
-
25
-
26
-
27
-
28
-
29
-
30
-
31
-
32
-
33
-
34
-
35
-
36
-
37
-
38
-
39
-
40
-
41
-
42
-
43
-
44
-
45
-
46
-
47
-
48
-
49
-
50
-
51
-
52
 |
 |
