Panasonic SAXR700 SAXR700 User Guide - Page 9
AC power supply cord, Front speakers
 |
View all Panasonic SAXR700 manuals
Add to My Manuals
Save this manual to your list of manuals |
Page 9 highlights
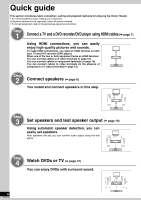
Quick guide Connect speakers Speaker impedance Front A: 6 to 8 Ω Center: 6 to 8 Ω Surround: 6 to 8 Ω Surround back: 6 to 8 Ω Use the terminal for the left speaker when you connect one surround back speaker only. Front speakers Surround speakers (R) (L) (R) (L) Surround back Center speakers speaker (R) (L) Rear panel GND LOOP EXT LOOP ANT GND FM ANT DIGITAL IN AM ANT Speaker cable OUT (BD/DVD PLAYER) IN (DVD RECORDER) IN S VIDEO VIDEO FRONTçA FRONTçB R LF L BI-WIRE R HF L CENTER SURROUND R L SURROUND BACK R ē (BD/ (TV/STB) (DVD RECODER) DVD PLAYER) ïCDð OPTICAL1 OPTICAL2 COAXIAL1 COAXIAL2 DIGITAL TRANSCEIVER OUT BD/ IN IN IN OUT BD/ IN IN IN TV MONITOR DVD PLAYER DVD RECORDER TV/STB TV MONITOR DVD PLAYER DVD RECORDER VCR CENTER L IN TV/STB XM R IN SUBWOOFER SURROUND FRONT IN IN IN OUT CD BD/DVD/ DVD 6CH Đĕ DVD RECORDER VCR TV/STB SUBWOOFER AUDIO SPEAKERS HAUT-PARLEURS Y PB PR Y PB PR Y PB PR TV MONITOR OUT DVD RECORDER IN COMPONENT VIDEO TV / STB IN Monaural connection cable AC IN AC power supply cord (included) Active subwoofer Household AC outlet (AC 120 V, 60 Hz) Connect AC power supply cord after all other cables and cords are connected. • The included AC power supply cord is for use with this unit only. Do not use it with other equipment. • Do not use an AC power supply cord from any other type of equipment with this unit. • The unit's settings remain effective after the AC power supply cord is removed from the household AC outlet. Note Do not forget to take steps instructed in "Set speakers and test speaker output" (á page 10) or "Auto speaker setup using the setup microphone" (á page 24) after connecting a new speaker. 9 RQT8739
-
 1
1 -
2
-
3
-
 4
4 -
 5
5 -
 6
6 -
 7
7 -
 8
8 -
 9
9 -
 10
10 -
 11
11 -
 12
12 -
 13
13 -
 14
14 -
15
-
16
-
17
-
18
-
19
-
20
-
21
-
22
-
23
-
24
-
25
-
26
-
27
-
28
-
29
-
30
-
31
-
32
-
33
-
34
-
35
-
36
-
37
-
38
-
39
-
40
-
41
-
42
-
43
-
44
-
45
-
46
-
47
-
48
-
49
-
50
-
51
-
52
 |
 |
