Pfaff 1214 Owner's Manual - Page 2
ontentS, V&id, United, Kingdom - sewing machine
 |
View all Pfaff 1214 manuals
Add to My Manuals
Save this manual to your list of manuals |
Page 2 highlights
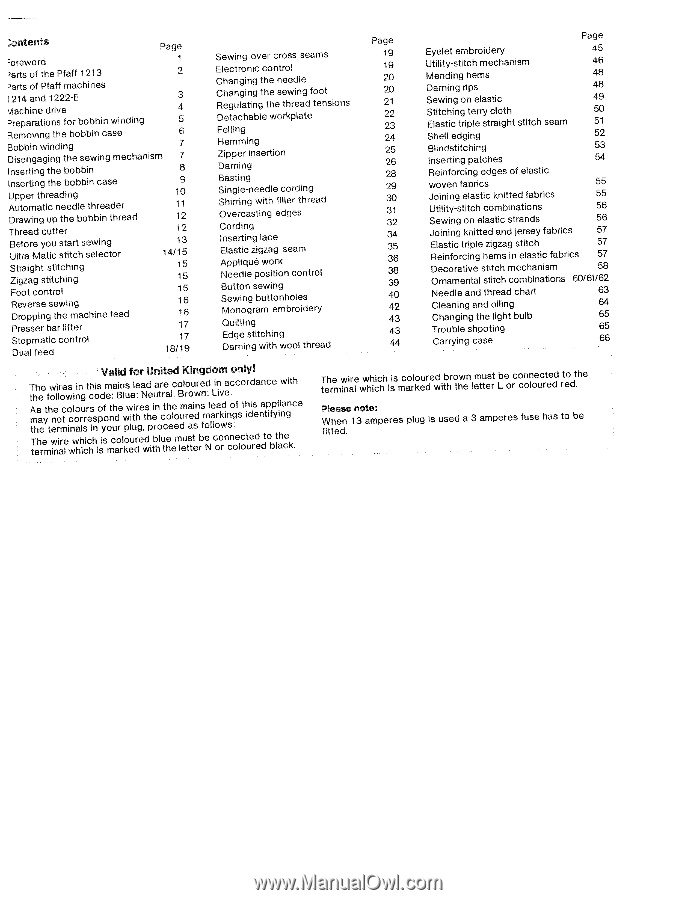
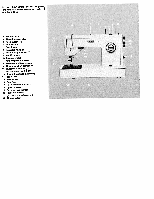
ontentS Page :oreword 1 'arts ofthePfaff 1213 2 arts of Ptaff machines 214 and 1222-E 3 viachine drive 4 3 reparations for bobbin winding 5 Removing the bobbin case 6 Bobbin winding 7 Disengaging the sewing mechanism 7 Inserting the bobbin 8 Inserting the bobbin case 9 Upper threading 10 Automatic needle threader 11 Drawing up the bobbin thread 12 Thread cutter 12 Before you start sewing 13 Ultra-Matic stitch selector 14/15 Straight stitching 15 Zigzag stitching 15 Foot control 15 Reverse sewing 16 Dropping the machine feed 16 Presser bar lifter 17 Stopmatic control 17 Dual feed 18/19 Sewing over cross seams Electronic control Changing the needle Changing the sewing foot Regulating the thread tensions Detachable workplate Felling Hemming Zipper insertion Darning Basting Single-needle cording Shirring with filler thread Overcasting edges Cording Inserting lace Elastic zigzag seam Appliqué work Needle position control Button sewing Sewing buttonholes Monogram embroidery Quilting Edge stitching Darning with wool thread Page 19 19 20 20 21 22 23 24 25 26 28 29 30 31 32 34 35 36 38 39 40 42 43 43 44 Page Eyelet embroidery 45 Utility-stitch mechanism 46 Mending hems 48 Darning rips 48 Sewing on elastic 49 Stitching terry cloth 50 Elastic triple straight stitch seam 51 Shell edging 52 Blindstitching 53 Inserting patches 54 Reinforcing edges of elastic woven fabrics 55 Joining elastic knitted fabrics 55 Utility-stitch combinations 56 Sewing on elastic strands 56 Joining knitted and jersey fabrics 57 Elastic triple zigzag stitch 57 Reinforcing hems in elastic fabrics 57 Decorative stitch mechanism 58 Ornamental stitch combinations 60/61/62 Needle and thread chart 63 Cleaning and oiling 64 Changing the light bulb 65 Trouble shooting 65 Carrying case 66 V&id for United Kingdom ony! TtAmtTthhehhsaereemeytfhtwioewnnelroiialmrroctleewoiscwnlwiooanhinrhlguisrcirtechchsihsnoipisodsiyofsemomnt:cuhadaoBriernllwkopsuweluieutldi:rhegreea,Nwdtsdhpeietiubrahnotlrcrutectaohehelle,eceomoBdlumelurrotsoaaetutieswdnrrbensfmedo:NllaeLlciooraniokrvwdnaiecns.cno:ogcfelsocothtriueddirsdeaendanttpiocfbpeyltliahinwacegnkit.che The wire terminal which which is is coloured brown marked with the must letter be connected L or coloured to the red. Please note: When 13 amperes plug is used a 3 amperes fuse has to be fitted.
-
 1
1 -
 2
2 -
 3
3 -
 4
4 -
 5
5 -
 6
6 -
 7
7 -
 8
8 -
9
-
10
-
11
-
12
-
13
-
14
-
15
-
16
-
17
-
18
-
19
-
20
-
21
-
22
-
23
-
24
-
25
-
26
-
27
-
28
-
29
-
30
-
31
-
32
-
33
-
34
-
35
-
36
-
37
-
38
-
39
-
40
-
41
-
42
-
43
-
44
-
45
-
46
-
47
-
48
-
49
-
50
-
51
-
52
-
53
-
54
-
55
-
56
-
57
-
58
-
59
-
60
-
61
-
62
-
63
-
64
-
65
-
66
-
67
-
68
-
69
-
70
-
71
-
72
 |
 |