Pfaff 1214 Owner's Manual - Page 38
ewhig, buttonhoes
 |
View all Pfaff 1214 manuals
Add to My Manuals
Save this manual to your list of manuals |
Page 38 highlights
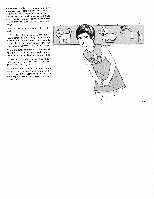
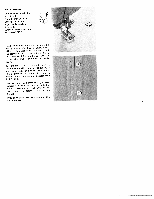
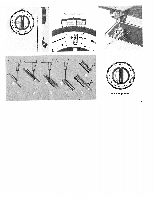
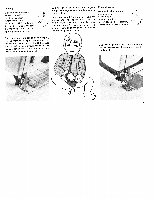
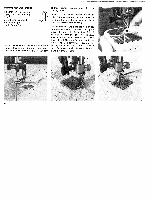
ewhig buttonhoes Mtach buttonhole too \Io. 93-040 924-91. Use No. 50 nachine embroidery thread as -ieedle and bobbin thread Oneck to make sure that all jecorative and functional-stitch outtons are out (see page 13). Mark the buttonhole on the fabric. To set the machine for programmed button hole sewing, make sure you turn knob D clockwise only. Even when buttonhole sewing is interrupted, knob D must be turned clockwise only. Turn knob D clockwise until its buttonhole symbol is positioned below the setting mark. Now turn the outer ring of the stitch selector so that its buttonhole symbol is above the setting mark. The machine is thus set for a medium stitch density (see ill. above, center). We recommend sewing a buttonhole to try out the stitch density which should be selec ted in accordance with the fabric and the thread being used. When you turn the stitch selector toward ±, the stitches are spaced further apart; when you turn it toward - they are packed together more closely (see ill above, center). Place the fabric under the buttonhole foot, pull the filler cord over the lug at the back of the foot, and place both strands under the two grooves in its sole (see ill, above, right>. Lower the foot. Now you can sew the buttonhole in one con tinuous operation, as follows 1. Begin by sewing the right seam according to the buttonhole length marked. 2. Push buttonhole control T down (see ill. above, left) until the machine has made a few zigzag stitches for the first bar. Then release control T again. 3. The machine is thus set for sewing the left seam. Now sew this seam, making it as long as the first seam. 4. Then press buttonhole control T down again to sew the second bartack. 5, Release control T. Knob D now turns until it is positioned vertically. During this phase, the machine makes a few tying stitches. Pull the filler cord into the buttonhole seam completely and trim both ends. 6. Cut the buttonhole open with your seam ripper. For sewing the next buttonhole, turn knob D clockwise until it snaps into place again with its buttonhole symbol positioned under the setting mark. Repeat this for each subsequent buttonhole. After you have sewn all buttonhoies, turn knob D clockwise until the symbol for the central needie position is positioned under the white mark (normal position)
-
 1
1 -
2
-
3
-
4
-
5
-
6
-
7
-
8
-
9
-
10
-
11
-
12
-
13
-
14
-
15
-
16
-
17
-
18
-
19
-
20
-
21
-
22
-
23
-
24
-
25
-
26
-
27
-
28
-
29
-
30
-
31
-
32
-
 33
33 -
 34
34 -
 35
35 -
 36
36 -
 37
37 -
 38
38 -
 39
39 -
 40
40 -
 41
41 -
 42
42 -
 43
43 -
44
-
45
-
46
-
47
-
48
-
49
-
50
-
51
-
52
-
53
-
54
-
55
-
56
-
57
-
58
-
59
-
60
-
61
-
62
-
63
-
64
-
65
-
66
-
67
-
68
-
69
-
70
-
71
-
72
 |
 |
