Philips HTS3400 User manual - Page 32
Tuner Operations
 |
View all Philips HTS3400 manuals
Add to My Manuals
Save this manual to your list of manuals |
Page 32 highlights
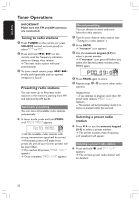
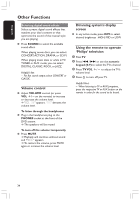
English Tuner Operations IMPORTANT! Make sure the FM and AM antennas are connected. Tuning to radio stations 1 Press TUNER on the remote (or press SOURCE control on front panel) to select "FM" or "AM." 2 Press and hold S / T on the remote until the frequency indication starts to change, then release. ➜ The next radio station will tune automatically. 3 To tune a weak station, press S / T briefly and repeatedly until an optimal reception is found. Presetting radio stations You can store up to 40 preset radio stations in the memory, starting from FM and followed by AM bands. Automatic presetting You can store all available radio stations automatically. G In tuner mode, press and hold PROG until "AUTO PROG" appears. AUTO PROG ➜ All the available radio stations with strong transmission signal will be stored. ➜ Automatic preset will begin from preset (1) and all your former presets will be overridden. ➜ If it reaches 40 presets,"PROG FULL" appears. ➜ Once complete,"PROG END" appears. Manual presetting You can choose to store only your favourite radio stations. 1 Tune to your desired radio station (see "Tuning to a radio station".) 2 Press PROG. ➜ "PROGRAM" icon appears. 3 Use the numeric keypad (0-9) to select a preset number. ➜ If "PROGRAM" icon goes off before you select the desired preset number, press PROG again. 4 Press PROG again to store. 5 Repeat steps 1~4 to store other radio stations. Helpful Hints: - If you attempt to program more than 40 preset radio stations,"PROG FULL" appears. - The system will exit presetting mode if no button is pressed within five seconds. Selecting a preset radio station G Press 1 2 or use the numeric keypad (0-9) to select a preset number. ➜ The preset number, radio frequency, and waveband will appear. Deleting a preset radio station G Press and hold Ç until "PXX CLR" appears. ➜ The current preset radio station will be deleted. 32
-
 1
1 -
2
-
3
-
4
-
5
-
6
-
7
-
8
-
9
-
10
-
11
-
12
-
13
-
14
-
15
-
16
-
17
-
18
-
19
-
20
-
21
-
22
-
23
-
24
-
25
-
26
-
 27
27 -
 28
28 -
 29
29 -
 30
30 -
 31
31 -
 32
32 -
 33
33 -
 34
34 -
 35
35 -
 36
36 -
 37
37 -
38
-
39
-
40
 |
 |