Philips HTS9800W User manual - Page 13
Basic Connections - home theater system
 |
View all Philips HTS9800W manuals
Add to My Manuals
Save this manual to your list of manuals |
Page 13 highlights
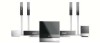
English Step 1: Assemble the speakers B Both the colored stickers must match C Basic Connections Step 2: Positioning for best effect The Philips HTS9800W Home Theater System is simple to install. Proper system placement is critical to ensure an optimum sound experience. The placement diagrams shown here are only guidelines that provide great system performance, you may find other placement choices that are more suitable for your room layout and provide the sound experience you enjoy. A Base view of the speaker stand A Connect the speaker stand with the supplied speaker wire. Match the color of the speaker wire to the color of the jack on the base of the speaker stand. Hold down the jack tab while inserting the stripped portion of the speaker wire into the tab. Then, release the jack tab to lock the wire into position. B Match the colored stickers on the rear of the speaker and the inside of the speaker stand. Position the speakers as shown and ensure the connectors fit. See the above illustration. C Secure the speaker stand with the supplied screws. Helpful Hint: - When you insert the speaker wire, make sure none of the rubber-coated wire is clamped by the jack tab. Placing the speakers When placing the speakers, ensure that: - The center speakers (FRONT CENTER, REAR CENTER) should be placed at the same height and at the normal listening ear level for the best sound performance. - The front speakers should be placed at an equal distance from the TV, the FRONT RIGHT on the right hand side and FRONT LEFT on the left hand side (as shown below.) - The rear speakers should be placed at equal distances from the REAR CENTER speaker; the REAR RIGHT on the right hand side and REAR LEFT on the left hand side (as shown below.) FRONT LEFT FRONT CENTER TV FRONT RIGHT REAR LEFT REAR CENTER REAR RIGHT 13
-
 1
1 -
2
-
3
-
4
-
5
-
6
-
7
-
 8
8 -
 9
9 -
 10
10 -
 11
11 -
 12
12 -
 13
13 -
 14
14 -
 15
15 -
 16
16 -
 17
17 -
 18
18 -
19
-
20
-
21
-
22
-
23
-
24
-
25
-
26
-
27
-
28
-
29
-
30
-
31
-
32
-
33
-
34
-
35
-
36
-
37
-
38
-
39
-
40
-
41
-
42
-
43
-
44
-
45
-
46
-
47
-
48
-
49
-
50
-
51
-
52
-
53
-
54
-
55
-
56
 |
 |
