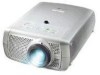
Philips LC7181 User Guide - Page 16
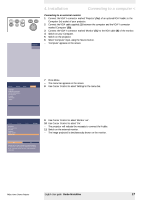
Connecting to a computer
 |
View all Philips LC7181 manuals
Add to My Manuals
Save this manual to your list of manuals |
Page 16 highlights
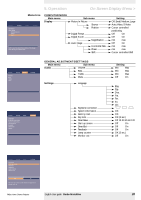
4. Installation Connecting to a computer > S-Video Pr R YG Pb B Projector PROJECTOR 54a S-VidCeoomputer Video Pr R Video Audio YL G Audio L AudioPRb B Audio R Data Audio in CAoumdipouitnerData USB PSP/2S/2 Monitor 65 54c MONITOR 42 3 For external monitor connection only COMPUTOR Computer 54b 1 Philips VGA/MAC adapter Data out Audio out USB PS/2 Mac/PC PC/Macintosh 1 Connect the Data (out) socket of the computer to the Computer (in) socket of the projector and secure the plugs by tightening the thumb screws. For this, use the VGA cable supplied (1). 2 Connect the USB (upstream) socket of the projector to the USB downstream port of the computer. For this, use an optional USB cable (2). or : 2 Connect the PS/2 (out) socket of the projector to the PS/2 (in) socket of the computer. For this, use an optional PS/2 cable (3). • When switching on, first switch on the projector and then the PC. - You can now manipulate the mouse cursor on the computer and on the screen, using Cursor Control on the remote control. When using the USB connection, make sure Windows 98, Windows ME, Windows 2000 or Windows XP is installed on the computer. - The display settings of the computer will be changed to fit the capability of the projector. 3 If required you can connect the Audio out socket of the computer to the Audio in Computer socket of the projector. For this use an optional audio cable (4). - Audio information from the Computer will then be played via the projector speaker. Philips Home Cinema Projector English User guide Garbo Matchline 16
-
 1
1 -
2
-
3
-
4
-
5
-
6
-
7
-
8
-
9
-
10
-
 11
11 -
 12
12 -
 13
13 -
 14
14 -
 15
15 -
 16
16 -
 17
17 -
 18
18 -
 19
19 -
 20
20 -
 21
21 -
22
-
23
-
24
-
25
-
26
-
27
-
28
-
29
-
30
-
31
-
32
-
33
-
34
 |
 |
