Philips LC7181 User Guide - Page 25
Digital Zoom/Magnification, Picture in picture PIP, Garbo Matchline
 |
View all Philips LC7181 manuals
Add to My Manuals
Save this manual to your list of manuals |
Page 25 highlights
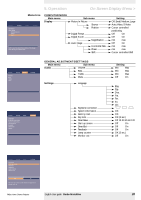
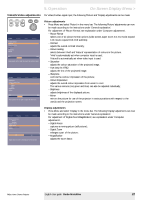
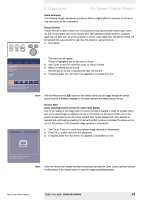
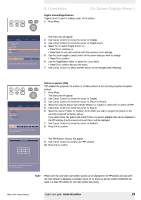
AV Mute Stand by Source Lamp Temp Menu OK 5. Operation On Screen Display Menu > Digital Zoom/Magnification 'Digital Zoom' is used to enlarge a part of the picture. 1 Press Menu. Picture Display Picture In Picture Source Position Digital Freeze Digital Zoom Magnification (more) Audio Settings off on Digital Zoom is used to enlarge part of the picture. - The menu bar will appear. 2 Use Cursor Control to move the cursor to 'Display'. 3 Use Cursor Control to move the cursor to 'Digital Zoom'. 4 Select 'On' to switch 'Digital Zoom' on. • Press OK to continue, or • Press Menu to exit and continue with the previous Zoom settings. 5 Use the zoom target to select centre of the screen area you wish to enlarge. • Press OK to confirm. 6 Use the Magnification slider to adjust the Zoom factor. • Press OK to confirm and exit the menu. 7 Use Cursor Control to select another section of the enlarged area ('Panning'). AV Mute Stand by Source Lamp Temp Menu OK Picture Display Picture in Picture Source Position... Digital Freeze Digital Zoom Magnification (more) Audio Settings PIP size Off Small Medium Large PIP is used to switch Off or On the PIP window with the selected size. PIP position... Picture in picture (PIP) 'PIP' enables the projection of a Video or S-Video picture in the currently projected computer picture; 1 Press Menu. - The menu bar will appear. 2 Use Cursor Control to move the cursor to 'Display'. 3 Use Cursor Control to move the cursor to 'Picture in Picture'. 4 Select the required picture size ('Small', 'Medium' or 'Large') or select 'Off ' to switch off 'PIP'. 5 Use Cursor Control to move the cursor to 'Source'. 6 Select the source ('Video' or 'S-Video') from which you wish to project the picture in the currently projected computer picture. If you select 'Auto' the system will check if there is a source available that can be displayed in the PIP window. If such a source is found then it will be displayed. 7 Use Cursor Control to move the cursor to 'Position'. 8 Press OK to confirm. - The 'PIP Position' window will appear. 9 Use Cursor Control to position the 'PIP' window. 10 Press OK to confirm. Move pointer to position the PIP window. Press OK key when done. Note Please note that only Video and S-Video sources can be displayed in the PIP window and only when the main window is displaying a computer source (or no source at all). Any invalid combination will result in a black PIP window for the main window has priority. Philips Home Cinema Projector English User guide Garbo Matchline 25
-
 1
1 -
2
-
3
-
4
-
5
-
6
-
7
-
8
-
9
-
10
-
11
-
12
-
13
-
14
-
15
-
16
-
17
-
18
-
19
-
 20
20 -
 21
21 -
 22
22 -
 23
23 -
 24
24 -
 25
25 -
 26
26 -
 27
27 -
 28
28 -
 29
29 -
 30
30 -
31
-
32
-
33
-
34
 |
 |
